USING LAYER STYLES
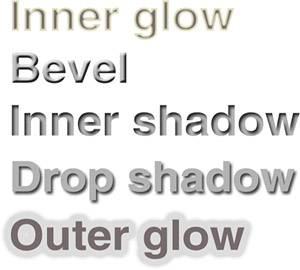
| You can quickly add three-dimensional effects and realism to raster and vector image layers by applying a layer style. Choose from a large variety of layer styles in the Preset Library or create one of your own. You can even modify existing or saved layer styles to create a look that's just right for your project, and you can save the customized style as a preset in your library. You can trade and email custom layer style preset libraries with colleagues and clients. Saved Photoshop files retain the applied style effect on any layer. Layer style effects range from simple drop shadows and embossed edges to transparent glass and textured 3D patterns. The effects remain with the layer even while you're editingwhether it's a type layer, a vector shape, or a paint layer. Not all effects can be applied to Background layers, locked layers, or layer sets. A layer style can have several effects, and each is fully editable after it has been applied. The layer styles remain fully editable because the layer effects don't degrade or destroy the image layer data. The layer with the layer style effects applied has the layer style icon (a scripted white f in a black circle) next to the layer name in the Layers palette (see Figure 6.6). Figure 6.6. A few layer styles applied to text layers can turn ordinary text into fancier ordinary text.
Layer Style Effects OverviewWhen you apply a layer style effect to a layer, the Layer Style dialog opens with the Blending Options section displayed at the top (see Figure 6.7). Click one of the Styles options in the list to the left to apply an effect and modify its settings. You can then create and customize your own layer style effects. Figure 6.7. The Layers Style dialog lets you control the application of a dozen layer styles.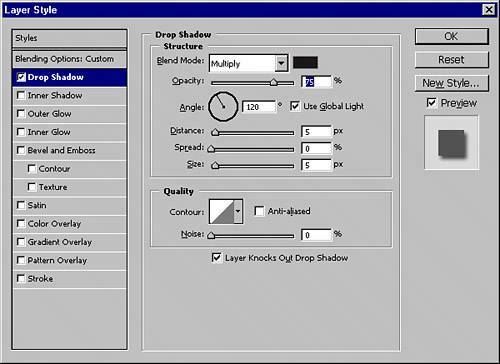 The following sections briefly explore the Styles categories listed on the left side of the Layer Styles dialog:
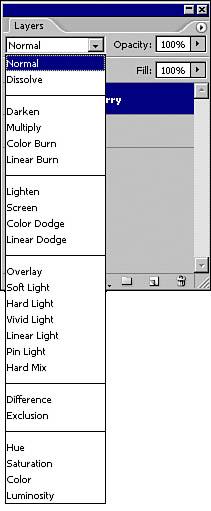
The best effects are usually combinations of layer styles that work together to create an interestingand often 3Dimage, shape, or text effect. Choosing a Blending ModeYou use the Blending Mode pop-up menu to change the way the layer color, contrast, and opacity interacts with the layers beneath it. The effect of a layer's blending mode is dependent on the layer(s) underneath. To use this powerful feature of Photoshop, you must create or build an image with at least two layers and fill the layers with a photo or fill the layer with brush strokes using the Brush tool. The default blending mode is Normal (see Figure 6.8). Try going down the list and selecting the different blending modes to see what effect each has on your image. The blending modes are
Figure 6.8. Select the blending mode from the pop-up menu in the Layers palette.
Like the Photoshop filters, the blending modes can be described in great technical detail, but no matter how much you read about these powerful features, you must try them out. The following are descriptions of a few of the blend modes:
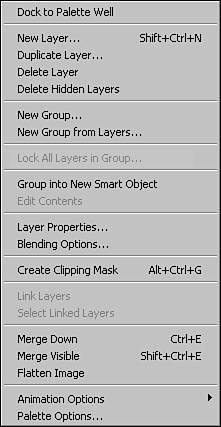
You can set a layer's blending mode in the Layer Styles dialog by choosing Layer, Layer Styles, Blending Options or by simply clicking the Blending Mode pop-up menu in the Layers palette and selecting a mode. Working with the Layers Palette MenuThe Layers palette menu contains some commands and options similar to those available using the icons at the bottom of the Layers palette, but it also offers some additional options (see Figure 6.9). You can create new layers, duplicate layers, create layer sets from linked layers, merge layers together, and delete selected individual or grouped layers. You can also dock the palette to the Palette Well at the top of the screen or set palette options from this menu. Figure 6.9. The Layers palette menu offers noteworthy options including Opacity and Fill settings, blending modes, and the ability to move layers up and down in the "stack."
Understanding the Opacity and Fill SettingsThere is a fundamental difference between a layer's Opacity and its Fill settings. The Opacity setting affects the entire layer, including any masks or layer styles applied to it. The Fill settings, on the other hand, apply only to the layer's content, without affecting anything that has been applied, masked, or stylized. Using the Layers Palette ButtonsAcross the bottom of the Layers palette are several buttons. Although they duplicate commands available in the Layer menu and the Layers palette menu, the buttons at the bottom of the Layers palette are more easily accessible Adding Layer Masks
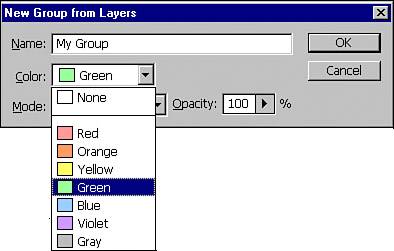
When painting within layer masks, you are limited to shades of gray, ranging from black to white. Paint in the mask with black and you effectively paint out that portion of the image. Painting with a shade of gray gives it a transparent, but not completely invisible effect. Painting with solid white enables that portion of the layer to show through completely. To reveal the masked portions of the image, erase part of the mask. The image comes back. Layer masks make the Paint and Eraser tools work opposite from normal. Click the Add Layer Mask button at the bottom of the Layers palette to create a rasterized (pixel-based) layer mask that you can paint, edit, and fill with selections. Just as you can use a face mask to hide your facial features, use a layer mask to paint out and hide portions of the layer. Click the button a second time to create a linked vector mask that can be filled with custom shapes or vectors drawn with the Pen tool. If you have an active selection in the canvas, click the Add Layer Mask button to use your active selection as the basis of the mask. This is a preferred method to make a cutout of your layer because it isn't destructive to the actual layer. Working with Layer GroupsLayer groups were called layer sets in previous versions of Photoshop. Click the Create a New Group button at the bottom of the Layers palette. By organizing multiple layers into groups, you can maintain organization in your palette with related layers. Since some of your designs may have tens of layers, grouping them makes organizing easier. You can then move groups of layers within your document's layer hierarchy. In addition to using layer groups to streamline the Layers palette, you can use them to isolate the effects of adjustment layers. Normally, an adjustment layer affects all layers below it in the Layers palette. Likewise, by default, an adjustment layer within a layer set affects all layers below it, regardless of whether they're in the group. Changing the layer group's blending mode from Pass Through to Normal prevents any adjustment layer in the set from having an effect on layers outside the set. There are several ways to create layer groups. When you know what layers you want to add to the same group, hold down the Ctrl or Figure 6.10. Create a new layer group and choose a color, blending mode, and opacity options for the group.
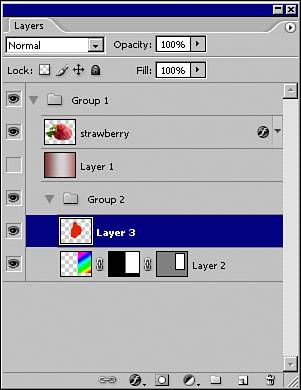
To create a nested layer group, create a new group and drag it into an existing group. Click the arrow next to the layer group name to show the contents of the group. A nested layer group is indented and so are the layers inside it (see Figure 6.11). Figure 6.11. Nested layer groups appear below the parent layer and are indented.
Dragging a layer or more than one layer onto the Create a New Group button puts that layer immediately into a new group. Selecting a Fill or Adjustment LayerFill layers can be filled with a solid color, gradient, or pattern. They are often used with a layer mask and a layer style. Click the Layers palette's New Fill or Adjustment Layer button and select the type of fill layer from the top of the pop-up menu. When you select Color, the Color Picker opens. Select Gradient and the Gradient Fill dialog opens. When you select Pattern, the Pattern Fill dialog appears. A pattern is tiled throughout the layer or an active selection.
You can perform several menu functions by simply Control-clicking (on the Mac) or right-clicking (in Windows) a different area of a layer in the Layers palette. The context menus that appear change depending on whether you click the visibility icon, layer thumbnail, or layer name. Available functions include Layer Label Colors, Show/Hide, Layer Properties, Blending Options, Duplicate or Delete Layer, Enable Layer Mask, Rasterize Layer, Copy Layer Style, Paste Layer Style, Paste Layer Style to Linked, and Clear Layer Style. Using an adjustment layer is the best way to color-correct the layers beneath it without permanently affecting the image layers. You can reverse or eliminate any modifications, corrections, or effects applied to the adjustment layer without any impact on the original image layers. Adjustment layers can be reopened at any time to change the settings, unlike changes made to the layers themselves with the Adjustments commands. Click and hold the New Fill or Adjustment Layer button and select the type of adjustment layer required from the pop-up menu. Adding and Deleting LayersAmong the most basic layer-related steps are creating and deleting layers. The familiar buttons to the right of the Layers palette handle these tasks. You can add a new layer by clicking the New Layer button or using the keyboard shortcut Shift- You can delete the active layer by clicking the Trash icon. Alternatively, you can drag a layer (or a layer mask) to the Trash icon to eliminate it. |
EAN: 2147483647
Pages: 426
