PLACING IMAGES
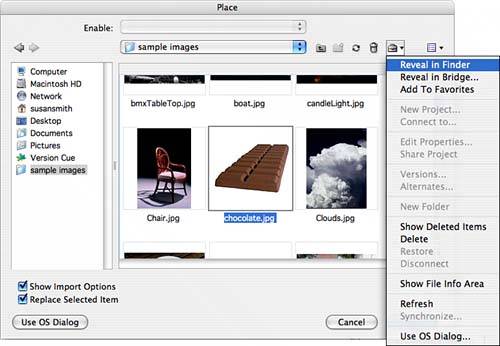
| You have several options for importing graphics into InDesign. Items can be copied and pasted from other applications, such as Photoshop or Illustrator, or they can be placed in your document using the File, Place command. You should decide between placing and pasting graphics based on several factors. When you paste graphics, you embed a full copy of the graphic in your file and have more options for editing the graphic. Embedded graphics make your file larger, however. Placing graphics often means you have to make your choices of how the graphic should display in the Place dialog, and you will not have many editing options after it's on the InDesign page. Linked files are low-resolution proxies placed in your document; linking graphics makes your file sizes smaller. When you choose File, Place, you see the Place dialog. There are a couple of ways to view the Place dialog. When you place graphics, it's usually best to use the Adobe version of the Place dialog because it's going to give you more information about your graphics (see Figure 28.1). Switch to the Adobe dialog by clicking the Adobe dialog button in the lower-left corner of the Place dialog. If the button says OS dialog, you are already viewing the Adobe dialog. Although the OS version of the dialog enables you to browse to file locations, search for files, create a new folder, and check boxes Show Import Options and Replace Selected Item, the Adobe dialog gives you all of those options and more. Figure 28.1. The Adobe Place dialog gives you many options for viewing and working with the files you are importing. First, you can view previews of all available images by selecting Thumbnails from the View pop-up menu (the last button on the right at the top of the dialog). Use the Project Tools pop-up menu to do the following:
Despite the version of the dialog you use, you always have the option to View Import Options when you select to place a file. When you click Open, the dialog that appears will show a preview of the file if you choose and enable you to set certain image and color settings. Standard image options include applying a Photoshop clipping path to the image or choosing an alpha channel you have created out of a selection in Photoshop to use like a clipping path. Standard color options include setting the image's color profile, which should be based on the source profile of your document. If a color profile is embedded in your document, that profile is automatically selected in the pop-up menu. You can also choose a rendering intent for your graphic. You should leave this at the default setting, which is based on the document's color profile and has been tested by Adobe to meet printing standards. There are a couple of ways to place a graphic on your page. If you've designed the document and drawn frames that will hold your graphics, select the frame prior to choosing File, Place. In the Place dialog, you have the option to Replace Selected Item. If the frame is empty, you're not exactly replacing it; the program simply places the item in the frame. If you haven't selected a frame, after you click the Open button you'll have a loaded graphic cursor. There are three ways to place your graphic:
|
EAN: 2147483647
Pages: 426
- ERP Systems Impact on Organizations
- Enterprise Application Integration: New Solutions for a Solved Problem or a Challenging Research Field?
- Data Mining for Business Process Reengineering
- Intrinsic and Contextual Data Quality: The Effect of Media and Personal Involvement
- Development of Interactive Web Sites to Enhance Police/Community Relations
- Article 314 Outlet, Device, Pull, and Junction Boxes; Conduit Bodies; Fittings; and Handhole Enclosures
- Article 366 Auxiliary Gutters
- Article 382 Nonmetallic Extensions
- Article 406: Receptacles, Cord Connectors, and Attachment Plugs (Caps)
- Example No. D9 Feeder Ampacity Determination for Generator Field Control