Video Levels 101
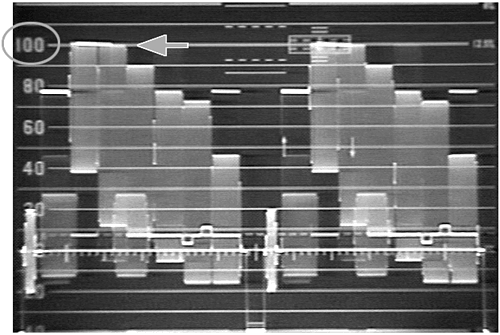
| This section might be the most technical part of the book. It's geared toward people using a waveform monitor and vectorscope (as described in the preceding section). Even if you do not have one, you will still probably benefit from reading the following sections. Video has certain basic properties that make it look the way it does. These standards help keep the images we see (especially those being broadcast) consistent and of the highest quality. A number of test patterns are available to make sure your equipment is properly calibrated. These signals are used to "line up" all the various components and keep the signal quality and image consistent throughout the entire production process. note Many of the properties that are described next are controlled independently, yet they can be affected by adjusting one or more of the other settings. The first characteristic is the video level itself, or the signal's brightness. This is called the white level. For NTSC signals, using your waveform monitor, you should make sure that your signal does not surpass the 100 IRE level (see Figure 6.22). If your image appears to be blown out, overexposed, or so glaringly bright that it hurts your eyes, you can bet that the video level is probably set too high. If your image appears to be faded the image looks washed out and the blacks (or the darkest parts of your image) do not appear to be black (or very rich) try adjusting the signal's Contrast level to lower the image's black level. On a waveform monitor, proper black levels should appear as 7.5 IRE. Figure 6.22. NTSC video levels should not exceed 100 IRE.
note Because this book's focus is on how to work within Premiere, we will cover how to correct your image quality with the tools that come with Premiere. You can gain more control with some third-party applications, but you should be able to make the Premiere tools work for you. To adjust your clip's overall brightness and contrast, do the following:
tip The Gamma Correction filter in the Image Control folder works well for adjusting the darkest portions of your video without altering the brightest portions (if tweaked moderately). Deepening the blacks could give your video a more film-like appearance. Tweaking the Contrast might affect the overall brightness of your image. You might need to bounce back and forth, making adjustments to one and then the other and back again to the first. With these parameters, your video signal should fall within (and close to) the 7.5 IRE to 100 IRE range. |
