Displacing Pixels in an Image
Photoshop's second custom effects filter is Filter Distort Displace, which enables you to distort and add texture to an image by moving the colors of certain pixels in a selection. You specify the direction and distance that the Displace filter moves colors by creating a second image called a displacement map, or dmap (pronounced "dee-map") for short. The brightness values in the displacement map tell Photoshop which pixels to affect and how far to move the colors of those pixels:
-
Black: The black areas of the displacement map move the colors of corresponding pixels in the selection a maximum prescribed distance to the right and/or down. Lighter values between black and medium gray move colors a shorter distance in the same direction.
-
White: The white areas move the colors of corresponding pixels a maximum distance to the left and/or up. Darker values between white and medium gray move colors a shorter distance in the same direction.
-
Medium gray: A 50-percent brightness value, such as medium gray, ensures that the colors of corresponding pixels remain unmoved.
Imagine that you start with the letter T pictured at the outset of Figure 10-20. Next, you create a new image window the same size as the letter T. Do this by choosing File New and then choosing the letter T image from the bottom of the Window menu. This new image serves as the displacement map. Divide the image roughly into four quadrants, and as shown in the middle example of Figure 10-20, fill the upper left quadrant with white, the lower right quadrant with black, and the other two quadrants with medium gray. Note that the green arrows are not actually part of the dmap. They appear in the figure merely to indicate the direction in which the quadrants will move colors in the displaced image.
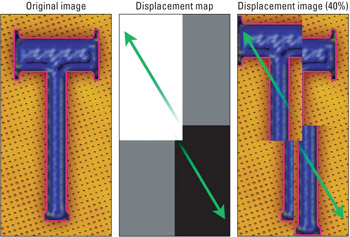
Figure 10-20: The Displace filter moves colors in an image (left) according to the brightness values in a separate image, called the displacement map (middle). The green arrows indicate the direction that the dmap moves colors in the displaced image (right).
When finished, save the dmap image in the native Photoshop format (PSD) so that the Displace filter can access it. Then, return to the hammer image, choose Filter Distort Displace, change both the Horizontal and Vertical Scale values to 40 percent each, and open the dmap from disk. The result is the image shown in the last example in Figure 10-20. In keeping with the distribution of brightness values in the dmap, the colors of the pixels in the upper-left quadrant of the carving image move up and to the left, the colors of the pixels in the lower-right quadrant move down and to the right, and the colors in the upper-right and lower-left quadrant remain intact.
| Note | A dmap must be a grayscale or color image, and you must save the dmap as a flattened image in the native Photoshop file format. The Displace command does not recognize PICT, TIFF, or any of the other non-native file formats. It's an old filter, so it has its peculiarities . |
At this point, you likely have two questions: How do you use the Displace filter, and why in the world would you possibly want to? The hows of the Displace filter are covered in the following section.
| Cross-Reference | To discover some whys ” which should in turn help you dream up some whys of your own ” read the "Using Displacement Maps" section later in this chapter. |
Displacement theory
Like any custom filtering effect worth its weight in table salt, you need a certain degree of mathematical ” or at least, geometric ” reasoning skills to predict the outcome of the Displace filter. Don't be surprised if you're a bit befuddled by your first few experiments with this filter; you won't be alone in that, and your companions- in-befuddlement won't necessarily be the math-challenged. With some time and a reasonable amount of effort, you can learn to anticipate the approximate effects of this filter.
Direction of displacement
As mentioned just a paragraph or so ago, the black areas of a dmap move colors in an image to the right and/or down and the white areas move colors to the left and/or up. This may have caused you to wonder what all this "and/or" stuff is about, and rightly so. Is it right or is it down?
In fact, the direction of a displacement can go either way. It's up to you. Here's how it works: A dmap can contain one or more channels. If the dmap is a grayscale image with one color channel only, the Displace filter moves colors that correspond to black areas in the dmap both down and to the right, depending on your specifications in the Displace dialog box. The filter moves colors that correspond to white areas in the dmap both up and to the left.
Figure 10-21 shows two examples of an image displaced using a single-channel dmap, which appears on the left side of the figure. (To create this dmap, the middle image from Figure 10-20 was used, and the Filter Blur Gaussian Blur applied to it with a Radius value of 60 pixels.) The middle image was displaced both horizontally and vertically at 20 percent and the right image at 40 percent. Therefore, the colors in the right image travel twice the distance as those in the middle image, but all colors travel the same direction.
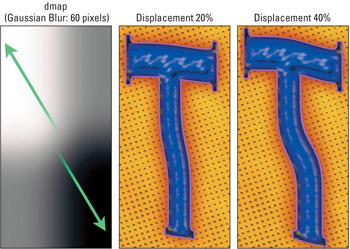
Figure 10-21: After blurring the displacement map from the previous figure (left, with arrows added to show direction), this single-channel dmap was applied to the image at 20 percent (middle) and 40 percent (right).
| Cross-Reference | The upcoming section "The Displace dialog box" explains exactly how the percentage values work. |
However, if the dmap contains more than one channel ” whether it's a color image or a grayscale image with an independent mask channel ” the first channel (red in the case of an RGB image) indicates horizontal displacement, and the second channel (green in RGB) indicates vertical displacement. All other channels are ignored. Therefore, the Displace filter moves colors that correspond to black areas in the first channel to the right and colors that correspond to white areas to the left. It then moves colors that correspond to the black areas in the second channel downward and colors that correspond to white areas upward.
Figure 10-22 examines an RGB image that contains a series of gradations. The first example shows the red channel, which transitions from gray to black to white to black and finally back to gray. The second example shows the green channel, which is filled with a white-to-black-to-white gradient. If the blue channel is filled with gray, the RGB dmap looks like the full-color image on right.
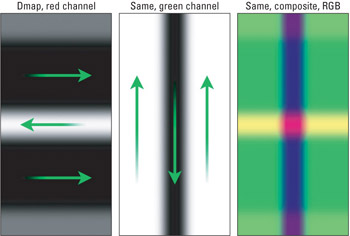
Figure 10-22: The red (left) and green (middle) channels of a full-color displacement map (right). In a dmap, red shifts colors horizontally and green shifts them vertically.
Figure 10-23 shows the effects of applying the RGB displacement map to a capital letter T. The first example shows a strictly horizontal displacement (again, set to 40 percent). The second example shows a vertical displacement. And the third shows both displacements calculated together.
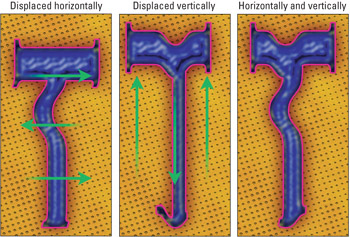
Figure 10-23: The horizontal (left) and vertical (middle) results of applying the RGB dmap from the previous figure. The final image shows horizontal and vertical displacements combined. In all cases, the Scale values are 40 percent.
Brightness value transitions
If you look closely at the images in Figure 10-23, you'll notice stretching effects, most noticeable along the left edge of the image. Although very common with displacement maps, this is an effect you'll most likely want to avoid.
The cause of the stretching is twofold: First, the left and right edges of both channels in the dmap from Figure 10-22 are laced with black and white, which displace pixels around the perimeter of the image. This forces Photoshop to duplicate border pixels, hence the stretching. Second, neighboring brightness values in a gradient may be less similar than they appear. These differences are magnified when the gradient is expressed as a displacement map.
STEPS: Removing Stretching Effects
The solution to the first problem is a gray border. The solution to the second is blurring. Follow along with these steps:
-
Press Ctrl+A ( z +A on the Mac). This selects the entire image.
-
Choose Edit Stroke. The Stroke dialog box opens, and you can enter a Width value of 50 pixels, change the Color swatch to 50 percent gray, and set the Location option to Inside. After you click OK, a nice thick gray border, which keeps the edge pixels stationary, appears. The results are shown in the first example of Figure 10-24.
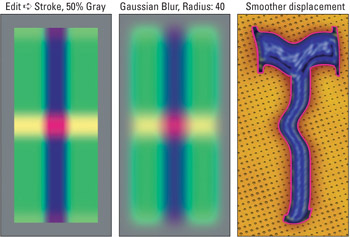
Figure 10-24: For a smoother displacement, select the entire image and stroke it with gray (left). Then blur the stroke and dmap generously(middle). The result of this dmap exhibits virtually no stretch marks (right). -
Next, choose Filter Blur Gaussian Blur and set the Radius to 40 pixels. By keeping the blur value slightly smaller than the stroke value, some gray pixels were maintained along the perimeter of the dmap, as shown in the second example.
-
Finally, apply the modified dmap to the original image. This achieves a smoother effect, as shown in the third example in Figure 10-24.
The Displace dialog box
When you choose Filter Distort Displace, Photoshop displays the Displace dialog box. Pictured in minimalist splendor in Figure 10-25, the Displace dialog box provides the following options:
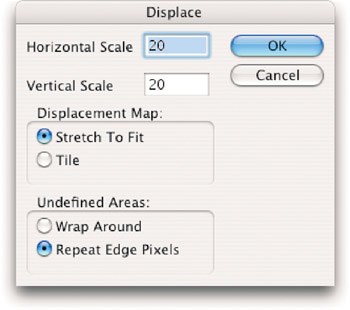
Figure 10-25: Use these options to specify the degree of distortion, how the filter matches the displacement map to the image, and how it colors the pixels around the perimeter of the selection.
-
Scale: You can specify the degree to which the Displace filter moves colors in an image by entering percentage values in the Horizontal Scale and Vertical Scale option boxes. At 100 percent, black and white areas in the dmap each have the effect of moving colors 128 pixels. That's 1 pixel per each brightness value over or under medium gray. You can isolate the effect of a single-channel dmap vertically or horizontally ” or ignore the first or second channel of a two-channel dmap ” by entering 0 percent into the Horizontal or Vertical option box, respectively.
Figure 10-26 shows the effect of distorting an image exclusively horizontally (top row) and vertically (bottom row) using a variety of positive, negative, and even radical Scale values. In all cases, the single-channel dmap originally pictured in the first example in Figure 10-21 was used. Obviously, just as easily, a multi-channel map could have been applied. But this was already aptly demonstrated in Figure 10-23.
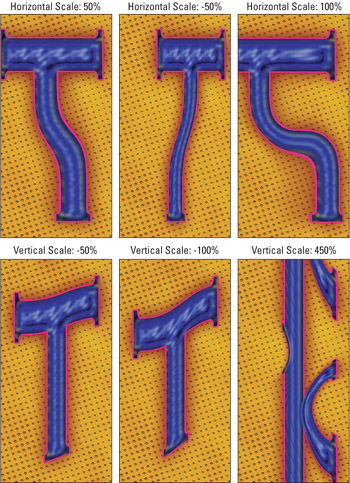
Figure 10-26: The results of applying the displacement map from Figure 10-21 to the letter T exclusively horizontally (top row) and vertically (bottom row) at each of several different percentage values. As illustrated by the right-hand examples, values over 100 percent can produce some surprising liquid image effects. -
Displacement Map: If the dmap contains fewer pixels than the image, you can either scale it to match the size of the selected image by selecting the Stretch To Fit radio button or repeat the dmap over and over within the image by selecting Tile. The first row of Figure 10-27 shows a single-channel dmap magnified to twice its normal size. It starts as a simple gradient stroked with gray and ends twirled to 999 degrees. The second row of images shows the hammer subject to each of the dmaps above it with the Horizontal and Vertical Scale values set to 25 percent and Stretch To Fit selected. The bottom row shows the same settings, except this time Tile was selected. The Displace command is unique in enabling you to distort an image using a repeating pattern.
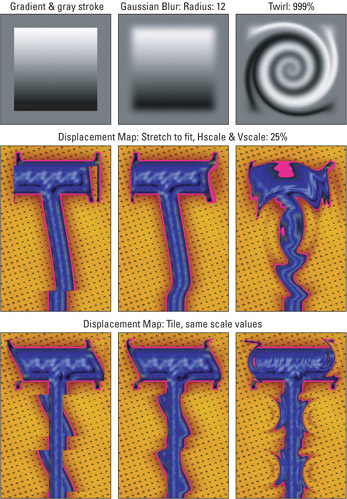
Figure 10-27: Using a sequence of tiny dmaps, each measuring only a sixth the size of the letter (top row), dmap was alternately stretched to fit the image (middle row) and the dmap repeated using the Tile setting (bottom row). -
Undefined Areas: These radio buttons let you tell Photoshop how to color pixels around the outskirts of the selection that are otherwise undefined. By default, the Repeat Edge Pixels radio button is selected, which repeats the colors of pixels around the perimeter of the selection. This can result in extreme stretching effects, as shown in the middle example in Figure 10-28. To repeat the image inside the undefined areas instead, as demonstrated in the final example in the figure, select the Wrap Around option.
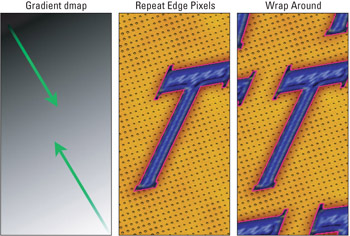
Figure 10-28: After creating a straightforward, single-channel gradient dmap (left), the Displace filter was applied using two different Undefined Areas settings, Repeat Edge Pixels (middle) and Wrap Around (right).Tip The Repeat Edge Pixels setting was active in all displacement map figures prior to Figure 10-28. As stated previously, you can avoid stretching effects by coloring the edges of the dmap with medium gray and gradually lightening or darkening the brightness values toward the center.
After you finish specifying options in the Displace dialog box, press Enter or Return to display the Open dialog box, which invites you to select the displacement map saved to disk. Only native Photoshop documents show up in the scrolling list.
EAN: 2147483647
Pages: 95