Vectors vs. Pixels
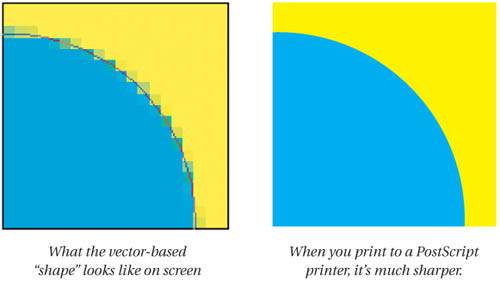
| Wasn't it Robert Frost who said, "Pixels are pixels, and vectors are vectors, and never the twain shall meet"? They may not meet, but Photoshop brings them awfully close together. In ancient versions of Photoshop, vector information was limited to paths that you could convert to selections or clipping paths. Now, Photoshop offers layer clipping paths (also called, "shapes") and text based on vector outlines. Additionally, paths can affect the pixels around and inside them, especially when you use layer effects. If you're a typical Photoshop user, you have likely focused most of your attention on pixels and let those wacky Illustrator users deal with the vectors. But Photoshop lets you perform many of the tasks for which you might use an illustration or page-layout program. Plus, its drawing tools can be very helpful even if you're a photographer or Web designer who usually ignores vector artwork, because vectors are infinitely modifiable, and they can easily be converted to bitmaps at the drop of a hat. Photoshop CS2 offers a wide array of vector tools.
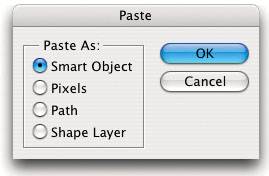
Photoshop also has very powerful tools for handling text (which by default are vectors), including placing text along a path. We cover the text features later in this chapter. Strengths and weaknessesCuriously, the primary strength and weakness of paths stem from the same attribute: Paths have no connection to the pixels below them; they live on a separate mathematical plane in Photoshop, forever floating above those lowly bitmapped images. The strength of this is that you can create, edit, and save paths without regard for the resolution of the image, or even for the image itself. You can create a path in the shape of a logo (or better yet, import the path from Illustrator or FreeHand) and drop it into any image. Then you can save it as a path in Photoshop, ask the program to rasterize the path (turn it into a bitmapped image), drop it down into the pixel layers, convert the path to a selection, or just leave it as a path so that it prints with sharp edges (as high resolution as the PostScript device you print on). The weakness of paths' separateness is that paths used as selections can't capture the subtlety and nuance found in most bitmapped images. A path can't, for instance, have any partially selected pixels or blurry parts; you can only achieve hard-edged selections (see Figure 12-43). Figure 12-43. Paths versus channels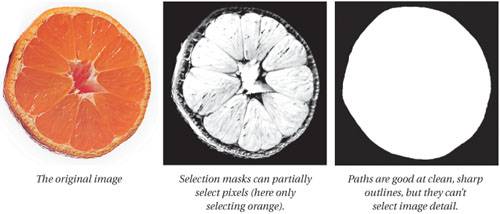 Open vs. PlaceMany people don't realize that Photoshop has a built-in PostScript RIP that can read virtually any EPS or PDF file and convert it into pixels. Your client gave you their logo in a PDF and you need to use it in Photoshop? No problem! There are two ways to import EPS and PDF files: Open and Place. OpenWhen you open an EPS or PDF file via the Open dialog box, Photoshop recognizes it as such and gives you additional options. The additional options you get with an EPS or PDF file let you specify the resolution and size of the final bitmap image. When you click OK, Photoshop makes a new document and rasterizes the EPS or PDF (turns it into a bitmap). Any areas of the EPS or PDF that don't have a fill specified come in transparent. Tip: Forcing the EPS Point If you can't see the EPS or PDF file in Photoshop's Open dialog box, it probably means that the file type, creator, or suffix is missing (depending on whether you're on a Macintosh or a PC). Your best bet is to try changing the file's name so that it ends in ".eps" or ".pdf". If this still doesn't work, the file may have become corrupted. Tip: Opening Previews You can, if you want, open the PICT or TIFF preview of an EPS file instead of rasterizing the EPS itself. This might come in handy if the whole EPS file is enormous and takes too long to rasterize. For example, if you want a thumbnail of your magazine's cover for your Web site, you could save the cover as an EPS, open it in Photoshop, and reduce it in size. However, you don't need all that high-resolution data, so you could just open the low-resolution preview and shrink that down instead. The trick is to choose EPS PICT Preview or EPS TIFF Preview from the Format popup menu in the Open dialog box. (In Windows, this is the Open As dialog box.) Now when you open the file, you only get the low-resolution preview. PlaceWhen you select Place rather than Open, Photoshop drops the EPS or PDF file into your current document and then lets you scale and rotate it to fit your needs (you can scale it by dragging a handle, rotate it by dragging outside the rectangle, and move it by dragging inside the rectangle). Hold down the Shift key while dragging a handle to constrain the width/height ratio (so it stays proportional). When you have finished scaling the image, press Return or Enter. Photoshop doesn't rasterize the image into pixels until you do this, so scaling won't degrade the final image. (Note that you can always press the Escape key to cancel the Place command.) Like Paste, Place almost always creates a new layer for your incoming image (although it won't if you place an EPS or PDF on a spot color channel, for instance). Note that your new layer is automatically saved as a smart object in CS2. We'll cover smart objects and why they're so cool in the next section. Tip: Colorizing Black and White Images For some reason, David keeps finding himself in the position of opening a black-and-white EPS file (like a logo) in Photoshop and needing to colorize it. But the Colorize feature in Hue/Saturationthe tool he'd usually use for this sort of thingdoesn't work, because it doesn't colorize pixels that are fully black or fully white. There are many different ways to get around this, but our favorite is to add a Solid Color adjustment layer just above the logo's layer, set the adjustment layer's color to Screen, and then group it with the logo layer (Option-click between the layers in the Layers palette). Then, if you want to change the color, just double-click on the adjustment layer to edit it. Smart ObjectsUntil CS2, Photoshop always rasterized placed or pasted graphics at the resolution of the current document. That means if you imported a vector graphic (such as something from Adobe Illustrator), Photoshop turned it into pixels and plopped them on a layer. Similarly, if you pasted a high-resolution image into a lower-resolution image, then scaled it down to fit, you lost much of your data. Try to scale the image up and you'd find that all those original pixels were gone, never to return (unless you paste the original graphic in again). Now things have changed in CS2 with the advent of smart object layers. If you have used a page-layout application such as InDesign or QuarkXPress, you know how they link to high-resolution or vector files on disk and only access them at print time. A smart object layer does essentially the same thingbut in this case, Photoshop does not link to a file on disk; rather, it embeds the file inside your Photoshop document. When you use the Place feature (from the File menu) to import a vector or image file, Photoshop automatically brings it in as a smart object layer. You can then move it or transform it (with scaling, warping, skewing, and so on) with the knowledge that Photoshop will automatically re-rasterize the data for you based on the original. That means you can scale it from 1,000 pixels tall down to 10 pixels tall, and then later scale it back up again and it will look just as good. Creating a smart objectAs we noted above, you can make a smart object layer by placing an external fileeither a vector file (such as a PDF, EPS, or AI) or an image file (including TIFF, JPEG, or even Camera Raw). Here are some other ways you can make smart objects:
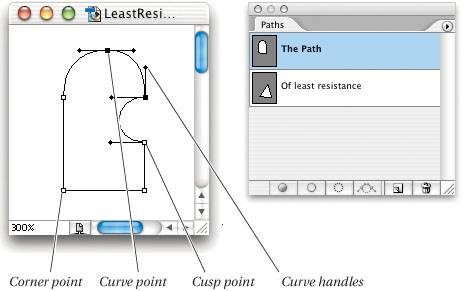
Smart object layers look and act the same as normal layers in the Layers palette, with one small difference: A small icon appears in the corner of the smart object layer's preview thumbnail (see Figure 12-45). Figure 12-45. Smart Objects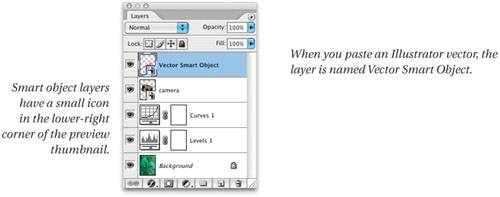 Editing smart objectsOnce you create a smart object layer, you can transform it like any other layer (use the Move tool to drag it around, use Free Transform to scale or skew it, and so on). You can also adjust its blending mode, opacity, or layer style in the Layers palette. However, if you double-click on the layer's preview thumbnail in the palette (or take the long way and choose Edit Contents from the Smart Objects submenu), Photoshop opens the smart object in its own window, ready for you to edit. If it was a raw image, Photoshop launches Camera Raw (see Chapter 11, Building a Digital Workflow). Or, if it's vector data from Illustrator, Photoshop will launch Illustrator and open the file there. When you edit a smart object layer, you're not editing the original file! Photoshop is actually writing the data to disk as a temporary, invisible file, then opening it. There is no link to the original file. After you make edits to the file, save it and close it. (And, if necessary, switch back to Photoshop.) Like magic, you'll see the smart object update, as Photoshop replaces the embedded smart object data with the new file. Tip: Linking Smart Object Layers Need more than one copy of the same smart object? For example, you might have a logo that appears in five places in the same image. You can duplicate a smart object layer by dragging it over the New Layer button in the Layers palette (or pressing Command-J). In this case, the new smart object layer points to the same embedded smart object; that is, the two layers are linked so that if you edit the smart object on one of the layers, all the layers change. On the other hand, if you duplicate the layer by choosing New Smart Object Via Copy from the Smart Object submenu (under the Layer menu), the duplicate is not linked because this actually creates a new smart object and embeds it. Replacing smart objectsYou can replace a smart object with another smart object by choosing Replace Contents from the Smart Objects submenu, then choosing the new file you want. For instance, you might want to switch one image with another. When you replace an image, any scaling, warping, or effects you applied to the first image is maintained. Exporting smart objectsBecause a smart object is just a file embedded inside your Photoshop document, you can unembed itsaving it out to disk as a separate file. To do this, select the smart object layer in the Layer palette, then choose Export Contents from the Smart Objects submenu (under the Layer menu). You don't have a lot of control over the format of the export: Image smart objects are saved as a PSB (Photoshop Large Document) file and vector objects are saved as PDF files. Rasterizing smart objectsWhen Photoshop embeds the smart object in your document, your file size grows accordingly. That is, if you place a Camera Raw file, your document grows the size of the raw image data, plus the normal amount the file would grow when you add an additional layer. If you know you no longer need to edit the smart object data, you might consider converting it to a normal layer (discarding the embedded data) at its current size, resolution, and so on. To do this, choose Convert to Layer from the Smart Objects submenu. Alternately, you can choose Smart Object from the Rasterize submenu (under the Layer menu). Tip: Warping Text and Smart Object Layers Sandee Cohen and Steve Werner (authors of Real World Creative Suite 2) alerted us to an interesting problem and its workaround. Photoshop won't let you apply the arbitrary Warp feature (from the Transform submenu, under the Edit menu) to a text layer. However, you can select one or more text layers into a smart object layer and then apply any warp you want. Tip: Get It From the Context Menu The commands on the Smart Object submenu (under the Layer menu)such as those to create or export a smart objectalso appear in the context menu when you right-click on one of the layer tiles (not the preview thumbnail) in the Layers palette. We find this much faster than using the Layer menu. Creating and Editing PathsIf you've ever used Adobe Illustrator or Macromedia FreeHand, you're already familiar with drawing and editing paths in Photoshop. In fact, the paths interface is most similar to Adobe Illustrator's (no surprise there; see Figure 12-46). Figure 12-46. Paths Whether you're drawing a layer clipping path, a path to clip the entire document, or a path to help you select pixels, you have to use the same basic tools. Remember that paths are visible only when the path is selected in the Paths palette (or, for layer clipping paths, when its tile is selected in the Layers palette). The Paths palette displays all the paths in your document, and gives you some control over what to do with them. To draw a path, you must select one of the Pen tools or Shape tools in the Tools palette. There are seven Pen tools and six Shape tools, but we tend to use only two or three of the Pen tools, using modifier keys to get to the rest. Pen toolThe Pen tool (press P) is the only tool we ever select to draw paths. Without modifier keys, you can draw straight-line paths by clicking, or curved paths by clicking and dragging. You can also easily access any of the other tools. For instance, if you move this tool over a point on a line, it automatically changes to the "delete point" tool. If you move the Pen tool over a segment, it lets you add a point (click or click-and-drag). If you're forever adding or deleting points when you don't mean to, just turn off the Auto Add/Delete checkbox on the Options bar. Selection toolsAs in Illustrator and InDesign, Photoshop has both a Selection tool and a Direct Select tool. You can press A (for "arrow") to jump to the selection tool in the Tool palette, and then press Shift-A if you want the other selection tool. However, if you want the Direct Select tool, it's much easier to hold down the Command key when any Pen tool or the Selection tool is active. These tools let you select a point or points on the path. For example, you can select points on a curve with the Direct Select tool by clicking on them or by dragging a marquee around them. To select all the points on a curve, use the Selection tool or hold down the Option key when you click on the path with the Direct Select tool (or, Command-Option-click with the Pen tool). Once you've selected a point or a path, you can move it. As in most other programs, if you hold down the Shift key, Photoshop only lets you move the points in 90- or 45-degree angles. If you hold down the Option key when you click and drag, Photoshop moves a copy of the entire path. Tip: Paths vs. Shapes vs. Pixels Important note: Each time you use the Pen tools, you need to specify in the Options bar whether you want the Pen tools to create a path or a vector shape. When you select one of the Shape tools, you can choose path, vectors, or pixels (see Figure 12-47). Figure 12-47. The Path and Shape tool's Options bar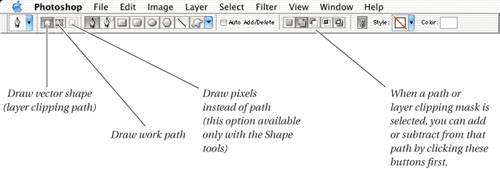 Convert Point toolWhen you're working with the Pen tool, you can create a sharp corner by clicking, or a rounded corner by dragging. When you have two round corners on either side of a corner point, that corner point is called a cusp point. But what if you change your mind and want to make a corner into a curve, or a curve into a cusp? The Convert Point tool lets you add or remove curve handles (those levers that stick out from the sides of curve or cusp points). If you click once on a point that has curve handles, the curve handles disappear (they get sucked all the way into the point), and the point becomes a corner. If you click and drag with the Convert Point tool, you can pull those handles out of the point, making the corner a curve. Similarly, you can make a cusp by clicking and dragging on one of the control handles on either side of the point. If you select the Pen tool, you can get the Convert Point tool by holding down the Option key. Tip: Use Cusp Points Many folks tell us that they make all points cusp points while drawing paths. Here's how: To create the first point of the path, just click and drag to set the angle of the first curve. All subsequent points on the path are created by clicking, dragging to set the angle of the previous curve, and then Option-dragging from the point to set the launch angle of the next curve. Finally, to close the path (if you want it closed), Option-clickif you want the final segment to be a straight lineor Option-dragif you want the final segment to be a curveon the first point of the path. While it takes some getting used to and takes a bit more work, this technique gives you much more control over the angle and curve of each segment in the path because each point is independent of the ones on either side. Freeform Pen toolDavid got into this business because he can't draw worth beans, but if you've got a steady hand and a sure heartand a graphics tablet wouldn't hurt, eitheryou might find yourself wanting to draw paths with the Freeform Pen tool. When you let up on the mouse button, Photoshop converts your loose path to a smooth path full of corner, curve, and cusp points. (Exactly how closely Photoshop follows your lead is up to the Curve Fit setting on the Options bar.) Note that, like the Lasso tool, you can draw a straight line with the Freeform Pen tool by holding down the Option key and lifting the mouse button. Then you can either click to "connect the dots" or release the Option key to return to freeform drawing. Magnetic Pen toolOnce the engineers at Adobe figured out how to make the Magnetic Lasso tool, it was a snap for them to add the functionality to the Pen tool, too. Thus, the Magnetic Pen tool was born. (Well, it's not really a separate tool; you get it by turning on the checkbox labeled Magnetic on the Options bar.) The Magnetic Lasso and the Magnetic Pen work so similarly that it's hardly worth discussing twice; instead go read that section in Chapter 8, Making Selections. Their similarity extends to producing a result that you will almost certainly have to finesse; the magnetic tools are not known for their precision. Tip: Hide the Path When you have a path selected in the Paths palette or a layer clipping path selected in the Layers palette, Photoshop displays the path on screen as a thin gray line. When you have a non-painting tool selected in the Tool palette (like the selection tools or the Move tool), you can deselect the path (make the line go away) by pressing the Enter key. Tip: Arrow Keys and Paths If you have one or more points on a path selected, you can move them one pixel at a time using the arrow keysbut only when the Pen or one of the Selection tools is selected in the Tool palette. Or, if you hold down the Shift key, the arrow keys move the path ten image pixels (not screen pixels). At 100-percent view, image pixels and screen pixels are the same thing, of course. Tip: Drag Segments, Too When editing your paths, don't get too caught up with having to move the paths' points and the curve handles around. As in FreeHand and Illustrator, you can also drag the path segment itself. If it's a curved segment, Photoshop adjusts the curve handles on either side of it automatically. If it's a straight-line segment (hence there are no curve handles to adjust), Photoshop actually moves the corner or cusp points on either side of the segment. Tip: Connecting Paths You've got two paths you want to connect? It's not as hard as you think.
Tip: Flipping, Rotating, and Modifying Paths At first glance, it doesn't appear that you can transform (rotate, scale, and so on) paths in Photoshop, but you can: Just select the path you want to edit in the Paths palette and choose Free Transform from the Edit menu (or press Command-T). Similarly, you can select from the many options in the Transform submenu (under the Edit menu). You don't have to transform the entire path, either. If the path has several subpaths, you can select one of them (by Option-clicking on the subpath) before transforming. You can even select one or more points on the path; in this case, Photoshop only changes those points and the segments around them. Paths to SelectionsOnce you have a path, you can convert it into a selection, rasterize it (turn it into pixels), or fill it with a color or adjustment. Let's look at converting to selections first. Photoshop makes this process easy for you: You can convert a path into a selection in one of four ways:
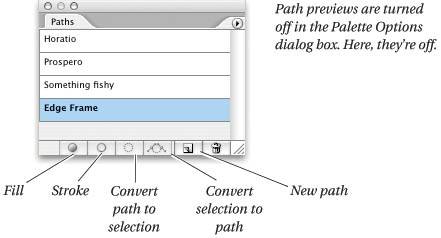
If you hold down the Option key while dragging a path on top of, or clicking on, the Convert Path to Selection icon, Photoshop displays the Make Selection dialog box. This dialog box lets you add, subtract, or intersect selections with selections you've already made (if there is no selection, these options are grayed out). It also lets you feather and anti-alias the selections. The default for selections (if you don't go in and change this dialog box) is to include anti-aliasing, but not feathering. Alternatively, you can use these keystrokes instead of the Make Selection dialog box to add, subtract, or intersect paths:
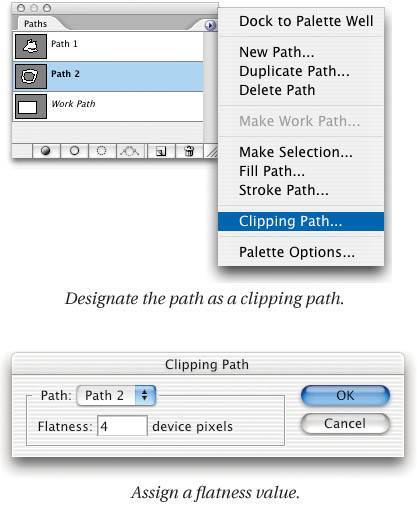
Each of these works when clicking on the Make Selection icon or dragging the tile over the icon, too. But the Enter key is so much easier. Selections to PathsTo turn a selection into a path, choose Make Work Path from the popout menu in the Paths palette. When you ask Photoshop to do this, you're basically asking it to turn a soft-edged selection into a hard-edged one. Therefore, the program has to make some decisions about where the edges of the selection are. Fortunately, the program gives you a choice about how hard it should work at this: the Tolerance field in the Make Work Path dialog box. The higher the value you enter, the shabbier the path's representation of the original selection. Values above 2 or 3 typically make nice abstract designs, but aren't otherwise very useful. There's one more way to convert a selection into a new path: Click on the Make Path icon in the Paths palette. Note that this uses whatever tolerance value you last specified in the Make Work Path dialog box, unless you hold down the Option key while clicking on the icon, in which case it brings up the dialog box. Rasterizing PathsAs we said back in Chapter 3, Image Essentials, rasterizing is the process of turning an outline into pixels. Photoshop lets you rasterize paths in two ways: You can fill the path area and you can stroke the path. FillingTo fill the path area with the foreground color, drag the path's tile to the Fill Path icon, or click on the Fill Path icon in the Paths palette. Or, better yet, Option-click the icon, and the Fill Path dialog box appears (this is the same dialog box you get if you choose Fill Path from the Paths palette's popout menu). The dialog box gives you options for fill color, opacity, mode, and so on. StrokingStroking the path works just the same as filling: You can drag the path's tile to the Stroke Path icon, or simply click on the Stroke Path icon in the Paths palette (while a path is visible). You can change the tool it uses to stroke with by Option-clicking on the Stroke Path icon (or select Stroke Path from the popout menu in the Paths palette). Tip: Stroking on Enter When you have a painting tool selected in the Tool palette (like the Brush, Dodge, or Rubber Stamp tool), pressing Enter strokes the path with that tool (using the current brush size and blending mode). We like this because we almost always want a different painting tool than the one we used last time. (See "Retouching," earlier in this chapter, for a powerful retouching technique that uses the Clone Stamp tool and this "path stroking" tip.) Tip: Rasterizing Paths Inside Selections If you make a selection before filling or stroking your path, Photoshop fills or strokes only within that selection. This has tripped up more than one advanced user, but if you're aware of the feature, it can really come in handy. Clipping PathsThe old art of cutting silhouettes out of paper is mostly gone now, though it lives on at street fairs and tourist spots. If you've ever seen someone cutting one of these, you know how painstaking a process it can be. We wonder why, then, people expect creating a silhouette in Photoshop to be as easy as snapping their fingers. Far from it: masking out the background of an imageleaving only the foreground objectis a difficult proposition. Unfortunately, it's something that many of us in production work have to do every day (see Figure 12-49). Figure 12-49. The effect of a clipping path The biggest problem is often not making a selection to silhouette (we cover a lot of selection and silhouetting techniques in Chapter 8, Making Selections). Rather, it's bringing that selection into a page-layout program without unnaturally harsh edges resulting. In this section we'll discuss getting silhouettes to print properly from InDesign, QuarkXPress, or PageMaker. Why use pathsPeople use paths most often when they want to place a silhouette of an object over a colored background in a page-layout program. For instance, many catalogs have a colored tint over the entire page, with irregularly shaped objectsshoes, toaster ovens, carsfloating as if in mid-air. If you try to achieve this effect in QuarkXPress by simply making the background transparent (white) rather than using a clipping path, you'll get an object surrounded by a white box. Adobe InDesign, on the other hand, can read the transparency in TIFF, PDF, or native Photoshop files, so you don't need clipping paths at all. If you bring one of these images into InDesign, it will appear as though it had a clipping path, even if it doesn't. In our opinion, this is one of the greatest reasons to use InDesign over QuarkXPress. Soft edgesThe main problem with clipping paths is that you cannot clip a soft or semitransparent edge. Because paths are mathematical lines and curves, they're always as sharp as the printer you print on. That's almost always sharper than the resolution of your image, so be prepared for your edges to look overly crisp. No, you can't make a soft, fuzzy edge with a clipping pathso, no drop shadows or clouds! Similarly, clipping around a gauzy dress is out. If your subject is having a bad hair day, clipping around the head is going to make it look even worse. There are several ways of making soft edges interact with your background on pages (see "Drop Shadows," later in this chapter). The best one, however, is simply to design your page so that the image doesn't have to overlap any other colors in your page-layout application. (Actually, the best one is to just erase to transparencyeasier than making a sharp-edged clipping pathand then using InDesign.) Alternatively, if you have to use XPress or PageMaker, you can forget about clipping paths and composite the image with the background in Photoshop, using the techniques in Chapter 8, Making Selections. Making pathsHowever, if you find yourself needing a real clipping path, the secret is (of course) Photoshop's paths feature. Remember that Bézier paths are generally smoother than raster (bitmap) data, because they're always imaged at the resolution of your output device, whereas bitmapped images print at whatever resolution they're set to, or at the coarseness of your halftone screen. Once you use the Pen tools to create a path in Photoshop (and then save that path in the Paths palette by double-clicking on the Working Path tile), you can specify that your path be used as a clipping path upon output.
TIFF vs. EPSPhotoshop is able to saveand QuarkXPress, InDesign, and PageMaker can readclipping paths in either TIFF or EPS files. Because we tend to use TIFF files, this is great news. Remember that clipping paths don't really delete the data itself; the entire image gets sent to the printer along with the instructions on how to clip it down. Tip: Bump Up Your Flatness You can often speed up print times dramatically and/or avoid PostScript "limitcheck" errors by raising the PostScript flatness value in the Clipping Path dialog box. The flatness value determines how hard the PostScript interpreter works to give you smooth curves. The higher the flatness value, the faster the graphic prints, but the more choppy the curve gets. However, you can almost always raise your flatness to between 3 and 5, never see the difference, and speed your printing times considerably. Of course, flatness only applies to PostScript curves, so if you're not using clipping paths on a PostScript printer, there's no need for a flatness value. Tip: Inset Paths Slightly When you're drawing paths around objects to silhouette them in Photoshop, make sure you draw the path very slightly inside the object's borderperhaps one or two pixels inside the edge. This usually avoids most of the spillover from the background color. If spillover is a significant problem with an image, you should be thinking about building a Photoshop composite instead of using a clipping path. Tip: Pick Your Clipping Path Not only can QuarkXPress and InDesign see (and use) a clipping path in your Photoshop TIFF image, they can see (and use) any other path saved with the file, too. You can control the clipping path behavior of TIFFs in QuarkXPress on the Clipping tab of the Modify dialog box. In InDesign, select Clipping Path from the Object menu. This is useful for two reasons:
Layer Clipping Paths and ShapesPhotoshop lets you create layer clipping pathsthat is, vector paths that define the boundary of a layer, as though someone had snipped around that layer with a pair of scissors. Basically, these are exactly the same as layer masks, except that instead of an 8- or 16-bit channel defining a layer's transparency, Photoshop uses a sharp-edged line. What's cool is that the line always matches the resolution of your PostScript printerjust like text from QuarkXPress or InDesign might look blocky on screen but is perfectly smooth from a laser printer or imagesetter. (Notice that we snuck the word "PostScript" in there. While we'll discuss a couple of good reasons to use layer clipping paths for Web or fine-art images, they're really designed for printing to a PostScript printer either from Photoshop itself or from a page-layout program like QuarkXPress or Adobe InDesign.) You may hear people talking about Photoshop's "Shapes" feature, but in reality the Shape tool is just a way to create a layer clipping path quickly. Drawing something with the Shape tool is the same thing as creating a Solid Color Fill layer, adding a layer clipping path, and drawing on it. We use the terms layer clipping path and layer clipping mask interchangeably. Making a layer clipping pathThere are three ways to make a layer clipping path (well, we can only think of three; see Figure 12-51):
Figure 12-51. Three ways to make a layer clipping path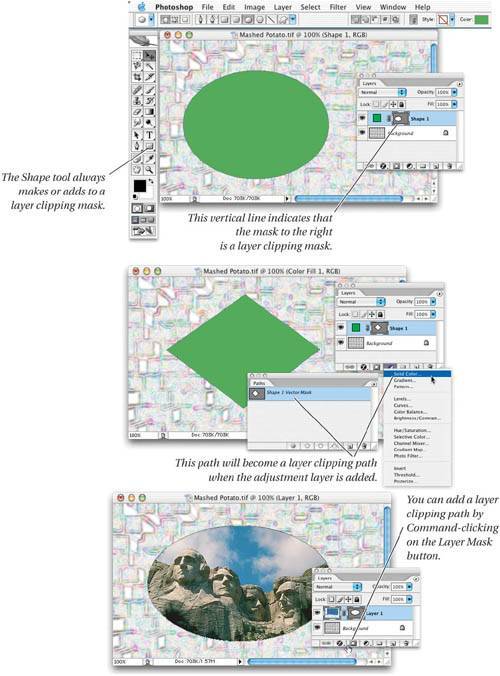 Tip: Adding and Subtracting Paths If you use the Shape tool while a layer clipping path is selected in the Paths palette (if it's visible on screen), then Photoshop adds your shape to that layer clipping path. Before you draw the shape, you can tell the program how you want this new path to interact with the path already there by clicking on the Add, Subtract, Intersect, or Exclude Intersection button in the Options bar. If you forget to select one, don't fret: Command-click with the Shape tool on the shape you just drew (to select all its points), and then click the button in the Options bar. Tip: Vectors for Web and Fine Art Even if you don't print to a PostScript printer, vector art (in the form of layer clipping paths) can be useful. For instance, let's say you want a grid of buttons for your Web page. You can make the buttons by painting pixels on a layer and then applying layer effects (such as Emboss) to them; but if you later need to change the buttonsperhaps make them all slightly smallerit's going to be a real hassle because you need to actually edit the pixels. Instead, if you make each button with the Shape tool (or with the Pen tool on a layer clipping mask), the edits are simple: Just use the Path Selection tool or the Transform Path feature to reshape the paths on the layer clipping path (see Figure 12-52). Figure 12-52. Quick edits with shapes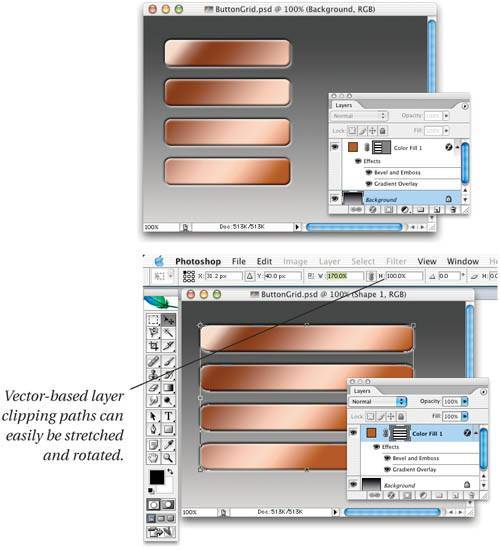 Tip: Invert the Path One of the most annoying parts of making layer clipping paths is that there's no easy way to invert the path (making the clipped-out parts fall inside the path and vice versa). But there is a way.
Tip: Turn Off the Clipping Path You can disable a layer clipping path (turning it off, so the whole layer is visible) the same way you turn off a regular layer mask: Shift-click on the layer clipping path's thumbnail on the Layers palette. (Or, the slow way: Select "Disable Layer Clipping Path" from the Layer menu.) Making vectors and pixels interactPutting vector artwork on a layer on top of pixels is no great feat; if that's all you want to do, you can do the same thing in Illustrator, FreeHand, QuarkXPress, InDesign, or whatever. The real value to Photoshop's layer clipping paths is in how pixels can blend together and still retain a sharp edge. For example, you can use the Shape tool to draw a solid black oval on top of your Background layer, and then change the opacity of that layer to 50 percent. Now, you can see the background image through your semi-transparent black oval. Of course, the vector artwork isn't really blending with the pixels beneath it. Rather, Photoshop is mixing the pixels on one layer with the pixels on another layer and then using the layer clipping path to define the edge between the two layers. If you zoom in to magnify the edge of the oval, it appears as though the edge is anti-aliased with the background; however, when you print from Photoshop (or save the image as an EPS and print it from a page-layout program), you'll see that the edge is sharp (see Figure 12-53). Remember that what Photoshop is showing you on screen is what the image would look like if you flattened it (losing the vector paths). Figure 12-53. Vectors fool the eye. Any layer can have a layer clipping path (even text layers), and you can change the opacity, blending mode, or layer effect of a clipped layer just the way you would ordinarily. So, if you want your shape layer to have a drop shadow, use the Overlay mode, and have a 75-percent opacity, you can change all that in the Layers palette. Tip: Blending Into Vectors How do those folks at Sports Illustrated do those covers anyway? You know the type: a photo of some sports star partially over and partially under the title of the magazine. It has always been very difficult to achieve this sort of look, because where the photograph overlaps the sharp, vector masthead, the pixels have to anti-alias into the text. Photoshop lets you create this kind of effect easily: Just put the text on one layer, and the cutout image on a different one (see Figure 12-54). Figure 12-54. Vectors and pixels together at last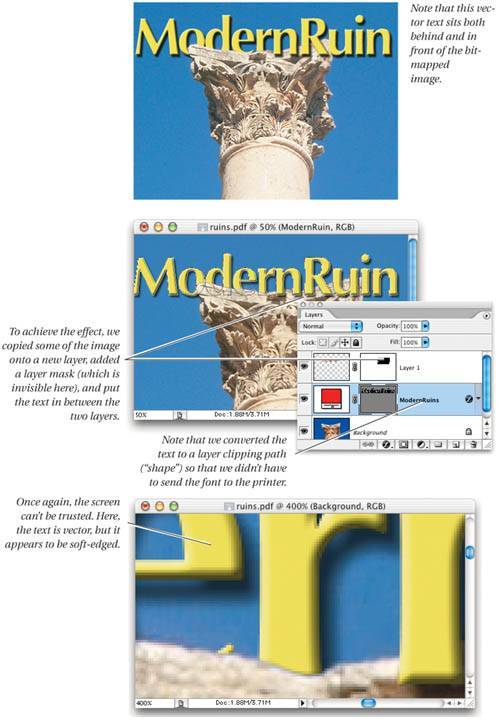 Tip: Don't Fill, Adjust! When you use a Shape tool, Photoshop automatically creates a Solid Color Fill layer and applies the shape to the layer clipping path. But you can change this from a Solid Color Fill layer to any other kind of adjustment layer in the Change Layer Content submenu (under the Layer menu). For example, you could change it to a Gradient Map, a Curves adjustment layer, or a Pattern layer. Then you can adjust the layer's opacity and blending mode to change how it interacts with the shapes and pixels on layers beneath it. Tip: Saving Vectors We cover how to save images in Chapter 13, Image Storage and Output, but in case you're in a rush, we'll let you in on a secret now: If you have used layer clipping paths, and you want to retain those sharp edges when you print your image from your page-layout application, you should probably save your file as either a PDF or an EPS file. If you are using a spot color, you'll have to use the DCS 2.0 format. Note that while the EPS format saves and prints the layers and clipping paths properly, when you reopen your EPS file in Photoshop, it automatically gets flattened. Very annoying. So, make sure you save the EPS as a copy, and archive your layered Photoshop file just in case you need to go back to edit it. PDF files don't have this problem. |
EAN: N/A
Pages: 220
