| When you were a kid bored in school, you may have drawn a little happy face in your notebook corner that turned to a frowning face, little by little. Then you flipped the pages (quietly so you didn't get in trouble, of course) to make it look animated. That little exercise that got you a D in math because you weren't paying attention was your first introduction to frame-by-frame animations (shame on you for getting a D in math, though!). As you might imagine, frame-by-frame animating means two things. Lots of time will be taken making the animation because you are doing it "manually" in gobs of keyframes, and also the potential to create bigger file sizes goes up. Yet, they can be very useful tools in your Flash 8 toolbox (the one in your brain) because you can create more complicated effects and animations than tweening can. Tween is a joy, but it just can't do everything. Not yet, anyway. So until the day when tweening can do everything, well, a little frame-by-frame tradition won't hurt. Frame-by-frame animation is best-suited to more-complex animation sequences, in which the image must be different for each frame, such as trying to animate facial expressions or create a walk cycle. Because most frames change in a frame-by-frame animation, the penalty is a higher file size because the frames you create have new data that Flash has to store in the exported SWF file. Tip If you are hand-drawing your animations, you might want to try using a pen tablet to create your drawings with, such as those made by Wacom. Flash recognizes pressure sensitivity and pen tilt, depending on the features in your tablet.
In the following example, you'll complete the page turn animation that you started in the previous exercise. 1. | In bookstore9.fla, open the mcPageTurn movie clip where you created the shape tween in the previous exercise.
You already have a shape tween on the animation layer spanning between Frame 1 and 10, which begins the first half of the page turn animation. To get the level of detail necessary for the second half of the page turn, you'll use a frame-by-frame animation. Although you could certainly create another shape tween to finish the animation, using frame-by-frame animation allows you to have more control over the motion. Obviously, it also helps you learn how to create frame-by-frame animation, too.
| 2. | Insert a new keyframe at the end of the shape tween, and then turn on onion skinning.
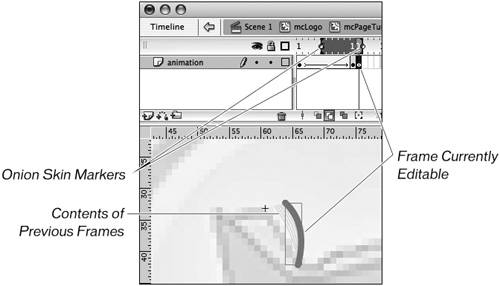
Select the Onion Skin Outlines button to turn on onion skinning, which is a very powerful tool to assist you in creating frame-by-frame animation. Onion skinning allows you to view not only the current frame you are editing but also the contents of the previous and next frames. This feature helps you line up your drawings across your keyframes to ensure that the animation is smooth. The current frame that you are editing appears in full color (similar to working with onion skinning disabled), whereas neighboring frames appear to be slightly faded out or as an outline.
 Click the empty frame following the shape tween (Frame 11) and press F6 to insert a new keyframe. The contents of the previous frame are added to the new keyframe, which you will modify in the following step. Click and drag the edges of the onion skin markers above the Timeline to see more frames of the animation.
 | 3. | Modify the contents of the new keyframe.
In the previous exercise, you bent the line into a curve to create the appearance of a page turning halfway. In this exercise, you will bend the page a little bit further and modify its length on each new frame that you create. All the while, you will keep the base of the page (at the spine of the book) stationary.
Each keyframe created should contain an incremental change to the line graphic to create the page turn animation. Select the keyframe you created in Step 2 (Frame 11) and then deselect the line on the Stage. Mouse near the upper end of the line, and when the cursor changes, drag the tip of the line the right so the line bends. The frame is now modified from the one to the left.
| 4. | Insert new keyframes and modify the page graphic until the page is on the other side of the book cover.
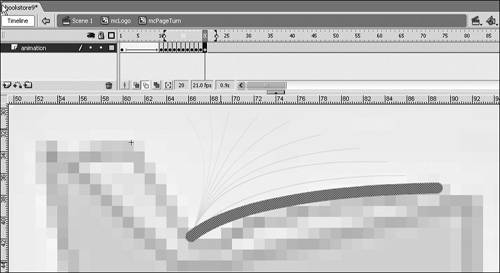
When you finish the modifications to the contents of Frame 11, select Frame 12 and press F6 to enter another keyframe. The contents of Frame 11 are copied into Frame 12, where you can modify the line again. Make the same kind of modifications that you did for Frame 11 by dragging the upper tip of the page further to the right. Bend the page, if necessary, by mousing near the middle of the line and dragging the page to modify its bend when you see the curved line cursor. However, most of the modifications can be made by moving the upper tip of the line (or "page"). Just make sure that you do not move the bottom tip of the page by the spine. Only bend the middle of the page or move the upper tip of the line.
Because the onion skin feature shows you an outline for each frame around the one you are working on, it should help you figure out how the animation will appear while you are editing. You can also scrub the Timeline by dragging the playhead back and forth.
Tip Make sure that you do not modify the lower point of the line. If you modify the lower point of the line, it appears as if the page is shifting in the book instead of being bound to the spine! Enter as many keyframes as you require until the animation is complete. When you get toward the end of the animation, you probably have to drag the end of the page outward to make it slightly longer in length.
 The animation is finished as soon as the page animates all the way to the front book cover. You might have about 9 or 10 keyframes when the animation is complete.
Tip You can make the animation look a bit better by fading out the page during the frame-by-frame animation. To do this, you can return to each keyframe you created in this exercise and select a different amount of alpha for the line. You can do this using the Alpha slider in the Color Mixer panel. Select the first line in the frame-by-frame animation using the Selection tool, and then drag the Alpha slider downward to about 90%. For each frame, gradually fade out the page more until you reach around 10% for the final page. | 5. | Insert frames at the end of the animation in order to add a pause between the page turns.
Select Frame 85 and press F5 to add a frame to the layer, which means that the animation will appear to pause before turning the page again. Remember that because this is a movie clip, it loops on the Stage endlessly, unless otherwise directed with ActionScript. This means that the page will appear to turn over and over again, with a pause in between each one.
 | 6. | Select File > Save As and enter bookstore9.fla into the File Name field.
Click Scene 1 in the edit bar to return to the main Stage. Save the file as bookstore9.fla and close it. You are done with this file until the next lesson.
|
|

