Where Do Pixels Come From?
| In the early '90s Sandee and Steve used desktop scanners to work with grayscale or black-and-white images and low-resolution color comps. When we needed high-resolution images for printing we would buy them from a service bureau with a drum scanner, like the one where Steve worked. These days we can get very high-resolution pixels from a variety of sources, or we can create them within the applications of Adobe Creative Suite. Here's a short summary of how. ScannersPixels are digital data produced by the scanning process. There are many kinds of scanners, but most people are either scanning reflective art (artwork you can place on the glass of a scanner) or transparencies. The scanner illuminates the object being scanned artwork, a slide or a film negative. These scanners use sensors that measure the amount of light reflecting from the art (flatbed scanners) or passed through a transparency (slide scanners). They usually use one of three kinds of sensors CCD, CMOS, or PMT. CCD and CMOS sensors measure the light. In a scanner, the sensors are arranged in rows (also known as linear arrays). Each sensor takes a single sample. If there were 400 sensors in an inch on the array, we would say the scanner samples 400 samples per inch. (PMT sensors are used in the drum scanners that are now a dying breed.) A motor moves the scanning head across the object being scanned. The scanner then takes the electrical signal that represents a sample (which is analog data) and translates it into a number (which is digital data). To translate the analog sample into digital data, the scanner uses an analog-to-digital (A/D) converter. How accurately the scanner converts this information while suppressing inherent "noise" interference greatly determines the quality of the scanned image. Noise is random fluctuation in information due to imperfections in the analog equipment. These days, most scanners capture more information than is needed (see "Bit Depth," below) as one strategy to correct for the inevitable noise which is part of the scanning process. Pixels the digital data are the end product of the scanning process. (Of course, this summary oversimplifies the process. We highly recommend Real World Digital Scanning and Halftoning from Peachpit Press for all the messy details.) Photoshop does not actually scan images, but provides a connection to the scanner once you've installed the scanner software. Most scanners use their own software, which plugs into Photoshop to provide an interface for the scan. Digital CamerasDigital cameras today have become almost as popular as the cell phone, and the quality of consumer-level cameras now almost equals what professionals captured with the first digital cameras in the 1990s. Digital photography has evolved considerably since then, when a photographer likely would first take a photo with a film camera, have the film developed and turned into a transparency or print, and then scan the result a time-consuming process. You can visualize the digital camera as a portable scanner. It also uses CCD or CMOS sensors to capture the light of a scene in an area array camera. Where the film would be positioned behind the lens of a film camera, there is now an array of sensors to capture and digitize the light. Digital cameras have several advantages over the film camera and scanner workflow:
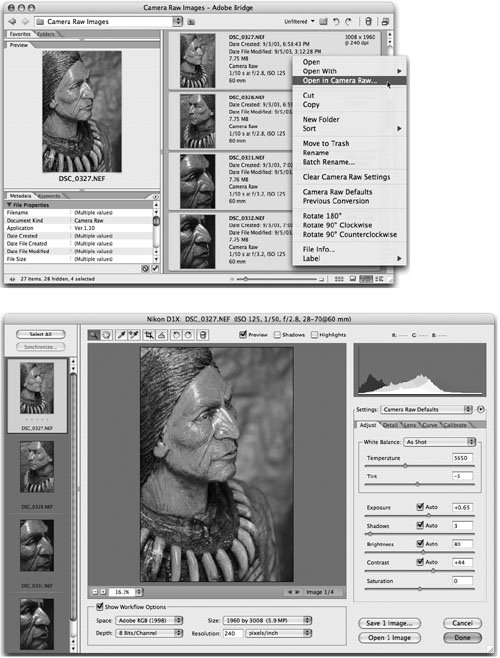
Most digital cameras by default save captured digital images as JPEG files. Most use color filters over each sensor to split the incoming light into its red, green, and blue components. Each of these three components is actually a grayscale file. To store the JPEG data, the camera's firmware performs a conversion on these channels of information, using on-camera settings for white balance, tone, saturation, and so on. The Camera Raw WorkflowMany digital cameras support saving images in a camera raw file. This file stores the unprocessed image information captured by the camera's sensors. This data is not processed by the camera's software, but contains the original data unlike JPEG files saved by the camera. There is not a single "raw" format; each camera has its own way of storing the digital data for example, a Canon CRW file, or a Nikon NEF file. Camera raw files have become the electronic negative of digital cameras. Adobe added a new digital camera workflow to Photoshop in 2003 when Adobe began selling the Camera Raw 1.0 Photoshop plug-in. The plug-in processes supported camera raw file formats using the Photoshop built-in camera profiles and EXIF data (information saved with an image by the camera). Working with the "raw," unconverted data gives a photographer much greater control over the interpretation of an image than was possible before (see the sidebar, "Camera Raw and CS2"). The image's tone and color can be edited according to a photographer's preferences, rather than the preferences of the camera software engineers. It's similar to a chef who starts with all the raw ingredients for spaghetti sauce instead of trying to spice up a jar from the grocery store. Tip: Converting Camera Raw Files You may have files from cameras that aren't recognized in Bridge. If that happens (as it did to us when working on this chapter), go to the Adobe Web site and download the Adobe DNG Converter. This is a utility that converts with no loss of quality or information proprietary camera raw files into the more-universal DNG (Digital Negative) format.
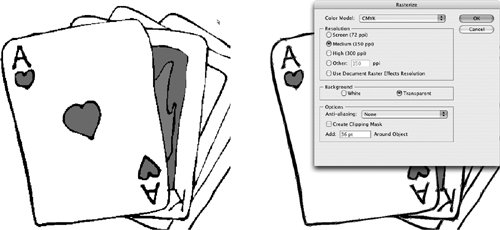
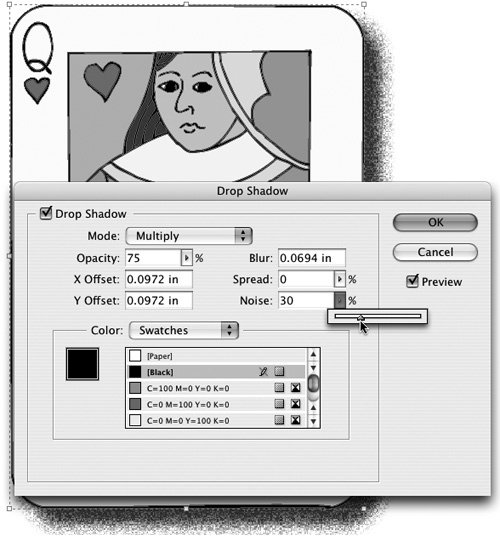
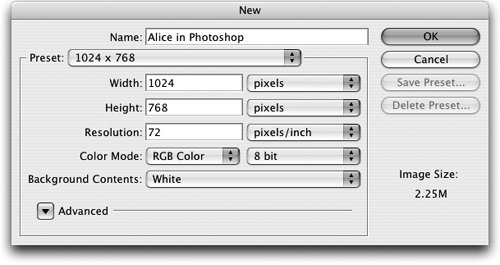
Stock PhotographyFor those of us like Steve and Sandee who aren't photographers, another good option for getting pixels is to purchase stock photography or buy images directly from a photographer (when you have the budget for it). Adobe has decided to make this process easier for graphics professionals by integrating a service for purchasing stock photography, called Adobe Stock Photos, into Adobe Creative Suite. It's also available to those who purchase the individual CS2 applications. We talk about this in the "Accessing Adobe Stock Photos" section in Chapter 3, "View from the Bridge." Creating Bitmapped Graphics in CS2 ApplicationsYou can also create pixels using Adobe Creative Suite 2 applications, sometimes in unexpected places. That's what we'll discuss next. Creating Pixels in PhotoshopAs you no doubt know, Photoshop CS2 is Pixel Central for Adobe Creative Suite 2. Even folks who know very little about computers have heard of Photoshop and its legendary abilities to transform images! (Photoshop has even been part of the plot of an episode of Friends.) Every time you choose File > New, you use the New dialog box to create a new pixel grid (see Figure 4-3). We'll spend much of the next section telling you about the different kinds of editing controls in Photoshop for working with pixels. Figure 4-3. Any time you use the New dialog box in Photoshop, you create a grid of pixels. What's less well known is that the other members of the Adobe Creative Suite 2 family Illustrator and InDesign, in particular are pretty adept at creating pixels too. Here are a couple examples: Rasterizing Vectors in IllustratorYou can turn any Illustrator object into pixels by choosing Object > Rasterize or Effect > Rasterize (see Figure 4-4). We selected the vector paths of the playing cards and applied the Rasterize effect. In the Rasterize dialog box, choose the color model, resolution, background, and anti-aliasing for the rasterization effect. Figure 4-4. The objects on the left are vector. Applying the Rasterize effect in Illustrator turns vector objects (left) into pixels, but as a live (editable) effect (right). What's the difference between these two confusingly similar commands? Choosing Object > Rasterize permanently changes the objects to pixels. Using the same command under the Effects menu creates a live effect that can be subsequently edited (see the sidebar, "Illustrator Filters vs. Effects"). When you then want to make the effect permanent, use the Expand Appearance command in the Object menu. There are many reasons why you might want to rasterize artwork in Illustrator. You might want to apply a Photoshop filter or effect on the pixels, which you can't do with vector objects. You might need to create pixels for a web or multimedia project. We talk about applying raster effects in the "Applying Filters and Effects" section below. Tip: Use Effects to Retain Spot Colors When you choose Object > Rasterize, any spot colors will be converted to process. Use Effect > Rasterize instead to preserve spot colors. This makes Illustrator even more powerful than Photoshop when it comes to working with spot colors. The same effect could not be applied as easily to spot colors in Photoshop. And it could never be edited later, as Illustrator's Effects can. Creating Drop Shadows in InDesignInDesign can also create effects that are made up of pixels. You can apply live drop-shadow and feathering (soft-edge) effects either to InDesign-created objects like text frames, or to placed graphics. For example, to apply a drop shadow to any object, you choose Object > Drop Shadow. This applies a frame-based effect based on the settings in the Drop Shadow dialog box (see Figure 4-5). You'll see commands similar to those for a Photoshop Drop Shadow layer effect color, blending mode, opacity, X and Y offset, and blur. Figure 4-5. The InDesign CS2 Drop Shadow dialog box lets you add drop-shadow effects to objects. There are controls to adjust Spread and Noise. In InDesign CS2, you can also control the spread of the shadow. The Spread control determines the extent of the shadow and reduces the radius of the blur. The percentage is applied to the Blur value. The Noise control can add a grainy quality to the shadow, which can make it more realistic, or provide a "grungy" look. Noise is also helpful in avoiding the problem of banding, where the edge of the shadow can have sudden shifts in tone. |
EAN: 2147483647
Pages: 192

