| Making a plane "live" turns it into a modeling aid, and is an easy way to draw a curve directly on a surface. By adding a curve to the water plane, you can attach BoatG to it so that the boat follows along the curve (the animation path ). Because the curve is drawn on the water, it will also deform with the water's motion. Tutorial: Animating the Boat Along a Path To animate the boat, you'll create a motion path along the water and attach the boat to it. You can continue from the previous tutorial, or load the scene file noted here. -
Hide the BoatL layer and display WaterL. Make sure the Time Slider is set to the first frame, 0, which sets the plane to its original shape before deformation. Open the Outliner, expand WaterGroup, and select WaterPlane. In the Hotbox, click Modify Make Live. The plane turns a dark green color by default to indicate that it's live.   -
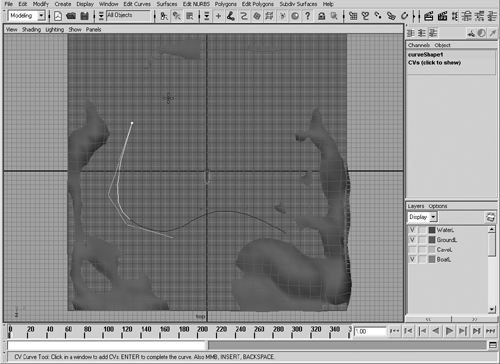
Display the GroundL layer, and switch to the Top view. You can work in Shaded mode (hotkey: 5 ) and enable wireframes, too, with Shading Shade Options Wireframe on Shaded. Create a CV curve (Hotbox Create CV Curve Tool), and click along the top of the water, making a path with CVs that will go across the water (see Figure 4.15). Note that the curve won't appear until you've created the first four points, and then it updates with each new click. If you want to go back one step on the curve drawing, press the Backspace key. Press Enter when you're done drawing the curve. Try to create the path so that you don't click on the "islands" so the boat doesn't run ashore. Don't worry about your curve being perfect; you can always tweak it later. Name the curve BoatPath. Figure 4.15. A CV curve path has been drawn onto a live surface.  -
The curve is still not part of WaterPlane and will not be until you make the plane not live. Deselect the curve you created by clicking on a blank area of the viewport, and in the Hotbox, click Modify Make Not Live. You now have a curve drawn directly on the surface. Although the curve is part of the plane, you can select it separately by clicking on it. -
Display the BoatL layer, and select the BoatG group in the Outliner. Zoom in on BoatPath and Shift+click to select the curve. The boat and the curve should both be selected. Switch to Animation mode (hotkey: F2 ). Attach the boat to BoatPath by choosing Animate Motion Paths Attach to Motion Path on the menu. Restore the view to Four View mode, and play the animation in the Perspective view (hotkey: Alt+v ). BoatG will now follow along the path as the animation plays. -
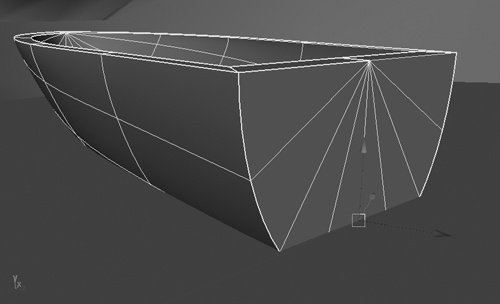
After watching the animation, you probably noticed a few problems. The boat is under the water because of the pivot location for BoatG. When an object is attached to a path, the point of attachment is at the object's pivot point. To fix this, set the animation frame to 0 in the Time Slider, and zoom in on BoatG in the Perspective view. With BoatG selected, switch to the Translate tool (hotkey: w ), and press the Insert key to enter Pivot Editing mode. Translate the pivot along the Y axis until the boat is sitting on top of the water. Leave the boat submerged a little, just as a real boat would be. When you have the boat positioned (see Figure 4.16), press Insert again to exit Pivot Editing mode. Figure 4.16. By moving the boat's pivot point, you can position it above the water.  -
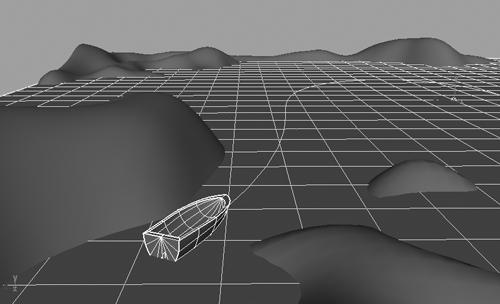
The next problem is that the boat floats sideways along the path. To correct the direction in which the boat is facing , with BoatG selected, open the Attribute Editor (hotkey: Ctrl+a ), and click the motionPath1 tab to display the list of options for the motion path. Select Z in the Front Axis drop-down list and change World Up Type to Normal (which orients the object's Y axis to the curve direction). Click the Close button at the bottom of the Attribute Editor. The boat should now be facing in the correct direction, as shown in Figure 4.17. Figure 4.17. The boat is now facing in the right direction.  tip If you play the animation and the boat jerks back and forth, check the CVs on your motion path. Clustering them too closely together could be the cause of this problem. Also, avoid scrubbing the Time Slider because it can have negative effects on an object's dynamics.
Tutorial: Placing the Camera In this tutorial, you're going to render a scene from the perspective of someone riding in the boat. The camera you add will be a major step in creating that illusion. You can continue from the previous tutorial, or load the scene file noted here. -
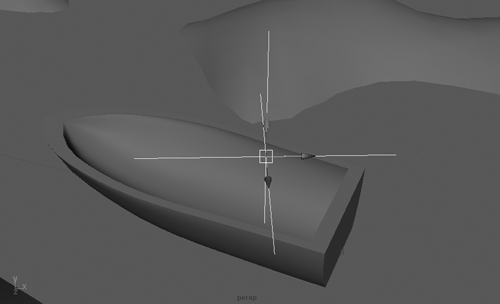
Switch back to the Four View layout by tapping the spacebar. First, create a locator to lock the camera onto by clicking Create Locator, and name it CameraHinge in the Channel Box. With the locator selected, you need to position it directly above the boat. Using the Move tool (hotkey: w ), position the locator so that it's directly above the boat, near the back end, as shown in Figure 4.18. The camera will be placed inside the boat attached to the locator.   Figure 4.18. Position the locator at the back of the boat, slightly above it.  -
Next, you'll attach the locator to the boat so that it moves with BoatG along BoatPath. Open the Outliner, select CameraHinge, and MMB-drag it on top of BoatG. -
Next, you'll import a camera that's already set up for the scene. With the Maya Fundamentals CD-ROM in the drive, go to File Import. Browse to the file noted below the CD icon, select the file, and click the Import button. This camera is now located at the scene origin and has an environmental sky attached to it. In the Outliner, expand BoatG, select CameraHinge, and then Ctrl+click on BoatCamera so that both items are selected.  -
To attach the camera to CameraHinge, you need to set a constraint, which enables you to lock an attribute to a specific value, position, orientation, or scale. Make sure you're in Animation mode (hotkey: F2 ), and click Hotbox Constrain Point to place the camera directly on the locator. Now the camera will follow the locator and, therefore, the boat. -
In the Perspective view, select the camera and choose Panels Look Through Selected to change the current view to that of the camera. You can change to the camera at any time by choosing Panels Perspective BoatCamera. If you don't have all your layers visible, display them all in the Layer Editor. Play the animation, and watch the viewport from the BoatCamera perspective. tip The reason you didn't parent the boat to the camera is that the child of a parent inherits the parent's attributes. So if you scaled your boat, for example, it would affect the camera in a way you don't want. -
You might have noticed that the camera follows the boat, but doesn't change its orientation during the animation the way it should. To fix the camera problem, you'll set an orient constraint on the locator. In the Outliner, select CameraHinge and then BoatCamera, and click Hotbox Constrain Orient . Now the camera will change its orientation according to the locator. -
If the camera is pointing the wrong direction, you can easily fix that by selecting CameraHinge and using the Rotate tool (hotkey: e ) to rotate around the Y axis until BoatCamera is pointing toward the front of the boat. As you rotate and adjust the camera, watch the view from BoatCamera. -
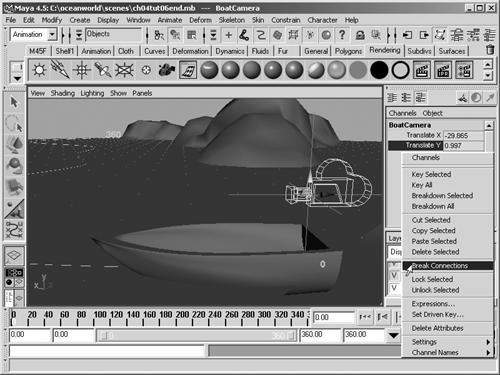
Select the BoatCamera in the Outliner and right-click in the Channel Box over the Translate Y label. This brings up an option menu; choose Break Connections, as shown in Figure 4.19. This lets the camera's height float free, making for a less jerky ride on the boat when viewed from this camera. Figure 4.19. Using the locator (CameraHinge) to constrain the camera's rotation.  tip Play back the animation and watch it carefully . If the front of the boat goes under water, try moving BoatG's pivot point toward the front of the boat. If the boat is moving too fast, you can modify BoatPath by deleting CVs on it to shorten the length of the path. Traveling a shorter path in the same amount of time (360 frames ) means the boat will move slower.
 |
