101. Create a Star WarsStyle Credit Roll  BEFORE YOU BEGIN BEFORE YOU BEGIN
68 About the Properties Panel 74 About Advanced Effects 103 Create a Title from Scratch
 SEE ALSO SEE ALSO
87 Create a Brady Bunch Effect 93 Show Your Video Through a Shape or Text
On the Adobe user's forum, one of the most commonly asked questions about titles is how to create Star Warsstyle rolling credits. This style of credit roll has been used for years, especially in science fiction movies. But the Star Wars title is a bit unique in its style and application. It must have been quite a bit of work creating that title in the late 1970s. It took a lot more time and equipment to do then what you can do today in Premiere Elements in about 10 minutes. 1. | Open a Blank Title and Enter Text
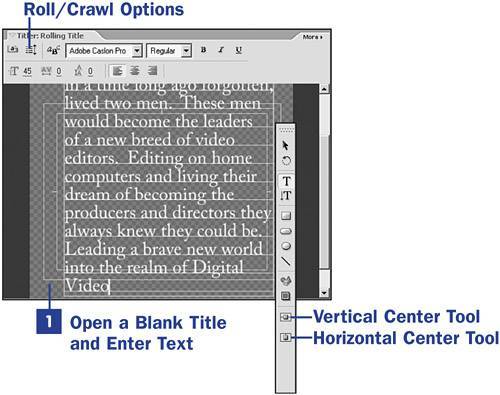
For this task, start from a blank canvas and only enter text. Choose Title, New Title, give the title a name, and click OK to open a blank title in the Titles workspace. Using the default text style, enter all the text for your title. I have yet to find a limit to the lines of text you can enter on a title; just keep pressing Enter to start a new line. If, by chance, you should run out of room for text in one title clip, just start a second title. Be sure to keep your text within the safe title margin as you are entering it, and center the text using the Horizontal and Vertical Center tools in the Title toolbar.
101. Create a Star WarsStyle Credit Roll   


| 2. | Select Roll
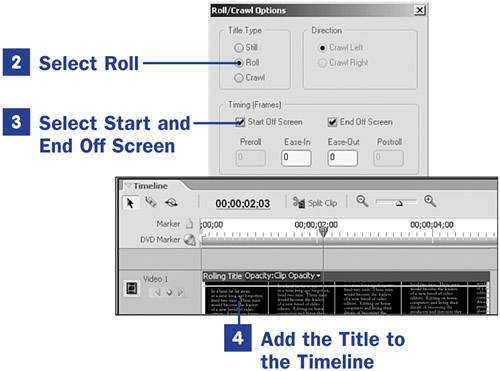
When you have entered all your title text, click the Roll/Crawl Options button at the top of the Titler panel to open the Roll/Crawl Options dialog box. Select Roll as the type of title you want to create.
| 3. | Select Start and End Off Screen
Under the Timing (Frames) section of the Roll/Crawl Options dialog box, enable both the Start Off Screen and End Off Screen check boxes. Make sure that the Ease-In and Ease-Out values are set to 0.
| 4. | Add the Title to the Timeline
Click the Edit button located on the main taskbar to open the Edit workspace. Your title has automatically been added to the Media panel. Drag the title from the Media panel and drop it on a video track on the main Timeline. If you drop the title on the Video 1 track, it will have a black background. Because the title has a transparent background, you can place it on a track above another clip and have the lower track video show through the title.
| 5. | Apply the Corner Pin Effect to the Title
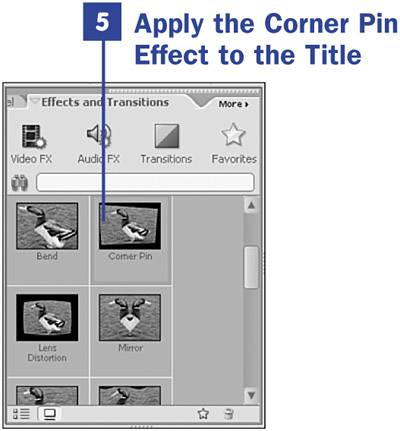
In the Effects and Transitions panel, locate the Corner Pin effect. It is located in the Video FX collection in the Distort category. Drag and drop the effect on the title.
| 6. | Set the Corner Pin Properties
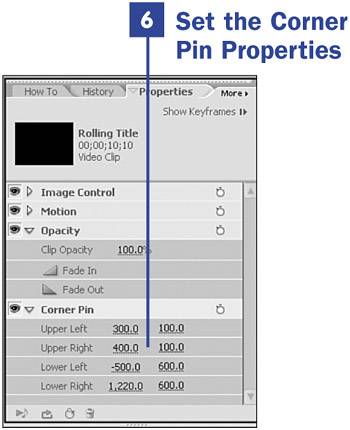
Place the CTI in the main Timeline over any part of the title and make sure that the title is selected by clicking it. In the Properties panel, click the arrow in front of the Corner Pin listing to open the control panel for the Corner Pin effect. Set the Corner Pin properties as follows:
Upper Left: 300.0 and 100.0
Upper Right: 400.0 and 100.0
Lower Left: 500.0 and 600.0
Lower Right: 1220.0 and 600.0
Each time you enter or change a value in one of the position fields, you can view the change to the title in the Monitor. You can adjust these values over and over again. If you don't quite like the way it looks, try a higher or lower number until you get it just right.
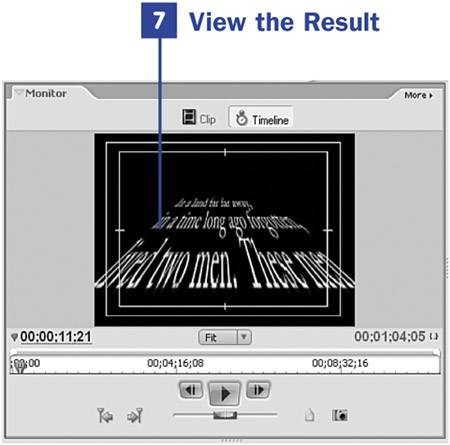
| 7. | View the Result
Render the Timeline by pressing Enter. Move the CTI in the main timeline to the first frame of the title clip and play your Star Warsstyle credit roll. Enjoy the fruit of your labors!
|
|
 BEFORE YOU BEGIN
 SEE ALSO