Debugging Techniques
| Suppose you wrote your program and made it bulletproof by catching and properly handling all exceptions. Then you run it, and it does not work right. Now what? (If you never have this problem, you can skip the remainder of this chapter.) Of course, it is best if you have a convenient and powerful debugger. Debuggers are available as a part of professional development environments such as Eclipse, NetBeans, or JBuilder. However, if you use a new version of Java that is not yet supported by development environments or if you work on an unusual platform, you will need to do a great deal of debugging by the time-honored method of inserting logging statements into your code. Useful Tricks for DebuggingHere are some tips for efficient debugging if you have to do it all yourself.
CAUTION
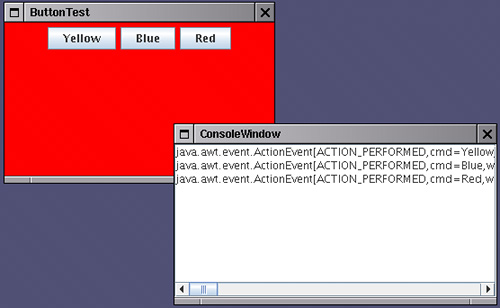
Using a Console WindowIf you run an applet inside a browser, you may not be able to see any messages that are sent to System.out. Most browsers will have some sort of Java Console window. (Check the help system for your browser.) For example, Netscape Navigator has one, as does Internet Explorer 4 and above. If you use the Java Plug-in, check the Show Java Console box in the configuration panel (see Chapter 10). Moreover, the Java Console window has a set of scrollbars, so you can retrieve messages that have scrolled off the window. Windows users will find this a definite advantage over the DOS shell window in which the System.out output normally appears. We give you a similar window class so you can enjoy the same benefit of seeing your debugging messages in a window when debugging a program. Figure 11-5 shows our ConsoleWindow class in action. Figure 11-5. The console window
The class is easy to use. Simply call: ConsoleWindow.init() Then print to System.out or System.err in the normal way. Example 11-5 lists the code for the ConsoleWindow class. As you can see, the class is quite simple. Messages are displayed in a JTextArea inside a JScrollPane. We call the System.setOut and System.setErr methods to set the output and error streams to a special stream that adds all messages to the text area. Example 11-5. ConsoleWindow.java 1. import java.awt.*; 2. import java.awt.event.*; 3. import javax.swing.*; 4. import java.io.*; 5. 6. /** 7. A window that displays the bytes sent to System.out 8. and System.err 9. */ 10. public class ConsoleWindow 11. { 12. public static void init() 13. { 14. JFrame frame = new JFrame(); 15. frame.setTitle("ConsoleWindow"); 16. final JTextArea output = new JTextArea(); 17. output.setEditable(false); 18. frame.add(new JScrollPane(output)); 19. frame.setSize(DEFAULT_WIDTH, DEFAULT_HEIGHT); 20. frame.setLocation(DEFAULT_LEFT, DEFAULT_TOP); 21. frame.setFocusableWindowState(false); 22. frame.setVisible(true); 23. 24. // define a PrintStream that sends its bytes to the 25. // output text area 26. PrintStream consoleStream = new PrintStream(new 27. OutputStream() 28. { 29. public void write(int b) {} // never called 30. public void write(byte[] b, int off, int len) 31. { 32. output.append(new String(b, off, len)); 33. } 34. }); 35. 36. // set both System.out and System.err to that stream 37. System.setOut(consoleStream); 38. System.setErr(consoleStream); 39. } 40. 41. public static final int DEFAULT_WIDTH = 300; 42. public static final int DEFAULT_HEIGHT = 200; 43. public static final int DEFAULT_LEFT = 200; 44. public static final int DEFAULT_TOP = 200; 45. } Tracing AWT EventsWhen you write a fancy user interface in Java, you need to know what events AWT sends to what components. Unfortunately, the AWT documentation is somewhat sketchy in this regard. For example, suppose you want to show hints in the status line when the user moves the mouse over different parts of the screen. The AWT generates mouse and focus events that you may be able to trap. We give you a useful Eventtrace class to spy on these events. It prints out all event handling methods and their parameters. See Figure 11-6 for a display of the traced events. Figure 11-6. The Eventtracer class at work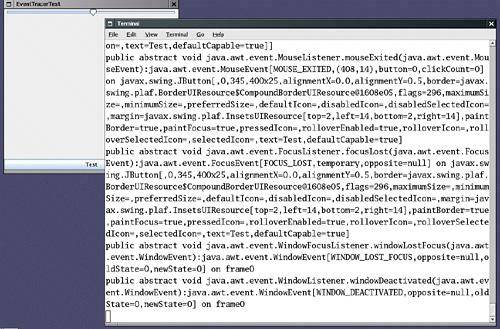 To spy on messages, add the component whose events you want to trace to an event tracer: EventTracer tracer = new EventTracer(); tracer.add(frame); That prints a textual description of all events, like this: public abstract void java.awt.event.MouseListener.mouseExited(java.awt.event.MouseEvent): java.awt.event.MouseEvent[MOUSE_EXITED,(408,14),button=0,clickCount=0] on javax.swing You may want to capture this output in a file or a console window, as explained in the preceding sections. Example 11-6 is the Eventtracer class. The idea behind the class is easy even if the implementation is a bit mysterious.
NOTE
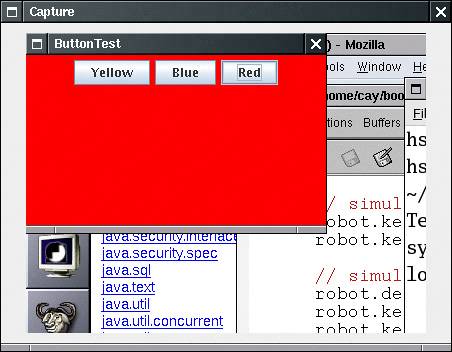
Example 11-7 tests the event tracer. The program displays a frame with a button and a slider and traces the events that these components generate. Example 11-6. EventTracer.java 1. import java.awt.*; 2. import java.awt.event.*; 3. import java.beans.*; 4. import java.lang.reflect.*; 5. 6. public class EventTracer 7. { 8. public EventTracer() 9. { 10. // the handler for all event proxies 11. handler = new 12. InvocationHandler() 13. { 14. public Object invoke(Object proxy, Method method, Object[] args) 15. { 16. System.out.println(method + ":" + args[0]); 17. return null; 18. } 19. }; 20. } 21. 22. /** 23. Adds event tracers for all events to which this component 24. and its children can listen 25. @param c a component 26. */ 27. public void add(Component c) 28. { 29. try 30. { 31. // get all events to which this component can listen 32. BeanInfo info = Introspector.getBeanInfo(c.getClass()); 33. 34. EventSetDescriptor[] eventSets = info.getEventSetDescriptors(); 35. for (EventSetDescriptor eventSet : eventSets) 36. addListener(c, eventSet); 37. } 38. catch (IntrospectionException e) {} 39. // ok not to add listeners if exception is thrown 40. 41. if (c instanceof Container) 42. { 43. // get all children and call add recursively 44. for (Component comp : ((Container) c).getComponents()) 45. add(comp); 46. } 47. } 48. 49. /** 50. Add a listener to the given event set 51. @param c a component 52. @param eventSet a descriptor of a listener interface 53. */ 54. public void addListener(Component c, EventSetDescriptor eventSet) 55. { 56. // make proxy object for this listener type and route all calls to the handler 57. Object proxy = Proxy.newProxyInstance(null, 58. new Class[] { eventSet.getListenerType() }, handler); 59. 60. // add the proxy as a listener to the component 61. Method addListenerMethod = eventSet.getAddListenerMethod(); 62. try 63. { 64. addListenerMethod.invoke(c, proxy); 65. } 66. catch(InvocationTargetException e) {} 67. catch(IllegalAccessException e) {} 68. // ok not to add listener if exception is thrown 69. } 70. 71. private InvocationHandler handler; 72. } Example 11-7. EventTracerTest.java 1. import java.awt.*; 2. import java.awt.event.*; 3. import javax.swing.*; 4. 5. public class EventTracerTest 6. { 7. public static void main(String[] args) 8. { 9. JFrame frame = new EventTracerFrame(); 10. frame.setDefaultCloseOperation(JFrame.EXIT_ON_CLOSE); 11. frame.setVisible(true); 12. } 13. } 14. 15. class EventTracerFrame extends JFrame 16. { 17. public EventTracerFrame() 18. { 19. setTitle("EventTracerTest"); 20. setSize(DEFAULT_WIDTH, DEFAULT_HEIGHT); 21. 22. // add a slider and a button 23. add(new JSlider(), BorderLayout.NORTH); 24. add(new JButton("Test"), BorderLayout.SOUTH); 25. 26. // trap all events of components inside the frame 27. EventTracer tracer = new EventTracer(); 28. tracer.add(this); 29. } 30. 31. public static final int DEFAULT_WIDTH = 400; 32. public static final int DEFAULT_HEIGHT = 400; 33. } Letting the AWT Robot Do the WorkVersion 1.3 of the Java 2 Platform adds a Robot class that you can use to send keystrokes and mouse clicks to any AWT program. This class is intended for automatic testing of user interfaces. To get a robot, you need to first get a GraphicsDevice object. You get the default screen device through the sequence of calls: GraphicsEnvironment environment = GraphicsEnvironment.getLocalGraphicsEnvironment(); GraphicsDevice screen = environment.getDefaultScreenDevice(); Then you construct a robot as: Robot robot = new Robot(screen); To send a keystroke, tell the robot to simulate a key press and a key release: robot.keyPress(KeyEvent.VK_TAB); robot.keyRelease(KeyEvent.VK_TAB); For a mouse click, you first need to move the mouse and then press and release a button: robot.mouseMove(x, y); // x and y are absolute screen pixel coordinates. robot.mousePress(InputEvent.BUTTON1_MASK); robot.mouseRelease(InputEvent.BUTTON1_MASK); The idea is that you simulate key and mouse input and afterwards take a screen snapshot to see whether the application did what it was supposed to. You capture the screen with the createScreenCapture method: Rectangle rect = new Rectangle(x, y, width, height); BufferedImage image = robot.createScreenCapture(rect); The rectangle coordinates also refer to absolute screen pixels. Finally, you usually want to add a small delay between robot instructions so that the application can catch up. Use the delay method and give it the number of milliseconds to delay. For example: robot.delay(1000); // delay by 1000 milliseconds The program in Example 11-8 shows how you can use the robot. A robot tests the button test program that you saw in Chapter 8. First, pressing the space bar activates the leftmost button. Then the robot waits for two seconds so that you can see what it has done. After the delay, the robot simulates the tab key and another space bar press to click on the next button. Finally, we simulate a mouse click on the third button. (You may need to adjust the x and y coordinates of the program to actually press the button.) The program ends by taking a screen capture and displaying it in another frame (see Figure 11-7). Figure 11-7. Capturing the screen with the AWT robot
As you can see from this example, the Robot class is not by itself suitable for convenient user interface testing. Instead, it is a basic building block that can be a foundational part of a testing tool. A professional testing tool can capture, store, and replay user interaction scenarios and find out the screen locations of the components so that mouse clicks aren't guesswork. At the time of this writing, the robot is brand new and we are not aware of any sophisticated testing tools for Java user interfaces. We expect these tools to materialize in the future. Example 11-8. RobotTest.java 1. import java.awt.*; 2. import java.awt.event.*; 3. import java.awt.image.*; 4. import javax.swing.*; 5. 6. public class RobotTest 7. { 8. public static void main(String[] args) 9. { 10. // make frame with a button panel 11. 12. ButtonFrame frame = new ButtonFrame(); 13. frame.setDefaultCloseOperation(JFrame.EXIT_ON_CLOSE); 14. frame.setVisible(true); 15. 16. // attach a robot to the screen device 17. 18. GraphicsEnvironment environment = GraphicsEnvironment.getLocalGraphicsEnvironment(); 19. GraphicsDevice screen = environment.getDefaultScreenDevice(); 20. 21. try 22. { 23. Robot robot = new Robot(screen); 24. run(robot); 25. } 26. catch (AWTException e) 27. { 28. e.printStackTrace(); 29. } 30. } 31. 32. /** 33. Runs a sample test procedure 34. @param robot the robot attached to the screen device 35. */ 36. public static void run(Robot robot) 37. { 38. // simulate a space bar press 39. robot.keyPress(' '); 40. robot.keyRelease(' '); 41. 42. // simulate a tab key followed by a space 43. robot.delay(2000); 44. robot.keyPress(KeyEvent.VK_TAB); 45. robot.keyRelease(KeyEvent.VK_TAB); 46. robot.keyPress(' '); 47. robot.keyRelease(' '); 48. 49. // simulate a mouse click over the rightmost button 50. robot.delay(2000); 51. robot.mouseMove(200, 50); 52. robot.mousePress(InputEvent.BUTTON1_MASK); 53. robot.mouseRelease(InputEvent.BUTTON1_MASK); 54. 55. // capture the screen and show the resulting image 56. robot.delay(2000); 57. BufferedImage image = robot.createScreenCapture(new Rectangle(0, 0, 400, 300)); 58. 59. ImageFrame frame = new ImageFrame(image); 60. frame.setVisible(true); 61. } 62. } 63. 64. /** 65. A frame to display a captured image 66. */ 67. class ImageFrame extends JFrame 68. { 69. /** 70. @param image the image to display 71. */ 72. public ImageFrame(Image image) 73. { 74. setTitle("Capture"); 75. setSize(DEFAULT_WIDTH, DEFAULT_HEIGHT); 76. 77. JLabel label = new JLabel(new ImageIcon(image)); 78. add(label); 79. } 80. 81. public static final int DEFAULT_WIDTH = 450; 82. public static final int DEFAULT_HEIGHT = 350; 83. } java.awt.GraphicsEnvironment 1.2
java.awt.Robot 1.3
|
EAN: 2147483647
Pages: 132