Get Button
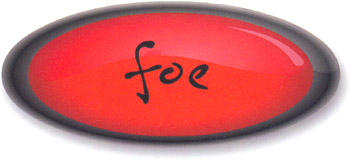
The gel button is probably one of the most popular and duplicated button styles ever made. There's a lot to think about when creating this gem, so we briefly explain the unofficial design requirements. The button typically resembles a pill and it is supposed to be transparent and shiny. Also, any text on the button should reflect to the bottom of the pill. Let's get started:
-
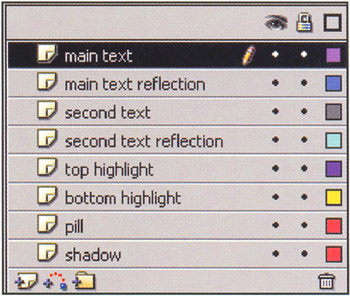
Open a new Flash movie. Again, the default values on stage size and frame rate will work fine. Next, create eight layers and name them as shown below:
-
Select the Rectangle Tool (R), click on the Round Rectangle Radius button, and give the rectangle a radius of 100 . While you're working with the Tools panel, make sure that the stroke color (line) is turned off.

With these options selected, drag out a rectangle on the pill layer (which will look like a rounded-edge rectangle) to around 430x98 (it doesn't have to be exact ”that's just what we used). The fill color is not important at this point.
-
With the rectangle drawn, make sure to fill it with the appropriate fill gradient. Select the rounded rectangle on the stage and adjust the color mixer for a Linear gradient with these colors (refer to the previous tutorial for further instructions):
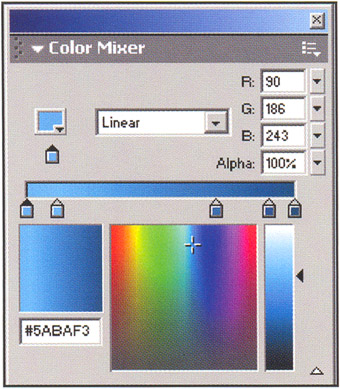
The colors from left to right are as follows : #5ABAF3, #64BEF4, #2A73A6, #0B578C, and #0A4E76. Likely the gradient will be from left to right. You need to reposition this gradient for top to bottom.
-
Now choose the Fill Transform Tool (F) and click on the rectangle. You'll see the edit handles appear on the pill for the gradient. Click and hold down the rotation handle and rotate the gradient such that the dark color is on top and the gradient is as tight on the pill as possible. It may help to get the gradient perfectly straight on the pill if you make sure that View > Snap to Objects is on.

-
Next, you add the lower highlight. In the bottom highlight layer you are going to create an object that looks something like this:

It really doesn't matter how you make this shape as long as it looks something like the one shown and has the color #9CD2F8. We made ours by creating another rectangle with the same properties as the main part of the pill. We then used the Arrow Tool to select the area that we wanted to trim and deleted it ”simple enough!
Convert this shape into a movie clip (press F8) and call it bottom_highlight. You now need to add the fade on the outside of the shape. Double-click into this new movie clip and select the shape. In the menu, select Modify > Shape > Soften Fill Edges .... Set Distance to 40 , Number of Steps to 10 , and Direction to Expand . The shape should look something like this now:

-
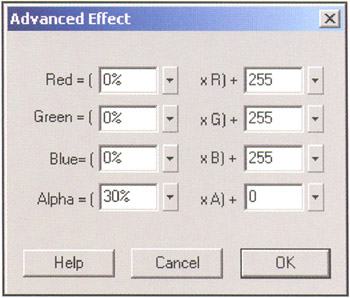
Click back to Scene 1 (the root timeline) and select the bottom highlight movie clip. In the Property Inspector at the bottom of the screen in the Color setting, choose Advanced and then Settings .... Make sure that your settings match those shown at right.
-
Position the highlight so that your pill now looks like this:

-
Now let's create the upper highlight. In the top highlight layer you will need to create another shape. This one should resemble the following shape:

-
Again, there are probably quite a few ways that you could create this shape. We used the Rectangle Tool with the same settings as above and drew out a long, thin rectangle slightly smaller in width than the main pill. Then, with the distortion tool ( Modify > Transform > Distort ), we grabbed the two top edges and pulled them in slightly to give the shape a bend that roughly matched the shape of the main pill:

-
You now need to add the gradient fill. Make sure the new highlight shape is selected and adjust your gradient fill to match those shown at right.
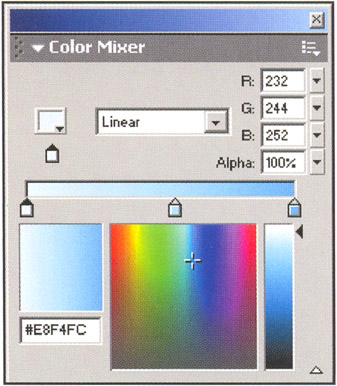
The colors from left to right are as follows: #E8F4FC, #B5DCF6 , and #62B4EC .
-
Once again you will need to adjust the direction of the gradient by selecting the Fill Transform Tool and rotating the gradient where the lightest color is at the top and moving the top highlight to match this one:

-
Now you will create the shadow. You may want to hide the other layers for now so you can see the shadow layer. Again, choose the Rectangle Tool with a round radius, using the same parameters as before. In the shadow layer, draw a rectangle that is about 10% smaller than your original pill. Use a solid fill and the color #3C8BBE .
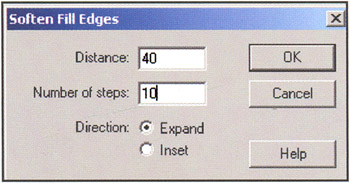
With the shape selected, make it a movie clip (F8) and call it pill_shadow . Now double-click the new movie clip to edit it. Make sure the shape is selected and select Modify > Shape > Soften Fill Edges ... from the top menu. In the Soften Fill Edges dialog box, adjust the settings as shown below:
-
Now back in the main timeline (Scene 1), select the pill_shadow movie clip and adjust its width to 106%, its height to 90%, and its alpha to 40%.
Again, the reason we are re-adjusting the shadow movie clip to these settings here rather than making them like that to begin with is to illustrate that there is usually a lot of tweaking to be done before you are satisfied with your results. In this case, we made the shadow and then decided that it had to be adjusted to 106% x 90% to look right.

So at this point you have a really convincing gel button. But let's take it one more step by adding some text.
-
To complete the button you'll add the text friendsofED in the main text and main text reflection layers of your movie. You will use a common font, Arial Black, a point size of 45, Auto Kern selected, and the color #3C8BBE.
With that text selected, make it a movie clip and call it foe_shadow. Position your text in the middle. Now copy that movie clip and paste a copy of it in the main text layer in the same position (you can use Edit > Paste in Place ). You need to break apart the pasted movie clip down to a simple graphic. With that newly pasted movie clip selected, press CTRL/CMD+B twice to get the text down to its raw vector graphics. You will know that it is a vector graphic because it will look like it has little dots over the graphic when selected. Lock all the layers except the main text layer.
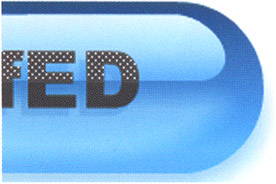
With the Arrow Tool, select the top half of the text. Your selection should include only the part of the text graphics that overlaps the upper highlight.
-
Change the color of this selected area to #454545. Now choose the other half and make it black. This has the effect of making the text look as if it's part of the button, picking up some of the highlight.
-
Finally, unlock the shadow layer, set its alpha to 25%, and move it slightly down and to the left. This produces the reflection in the pill of the friendsofED text. You can repeat this procedure for whatever other text you'd like to feature on your button, and voila ”the 3D pill-shaped gel button is complete! Take a look at the file gel_button.fla to see the final version of this design:

You should have a clear idea by now of how light and shadow plays an important role in creating the impression of 3D. Other concepts play a role in 3D as well. In the case of the pool ball and gel button examples that you've just studied, you used reflection to indicate that the surface of your objects is smooth. In the gel button, you used the lower highlight to give the button a sense of transparency and depth ”it actually looks as if the light is shining through the button as well as reflecting off its smooth surface.
As a bonus, we've provided another variation of this button that includes previous techniques. It's called foe_button.fla , and it's essentially a flat version of this technique with a few extras:
