Refining the Mix: Volume and Panning
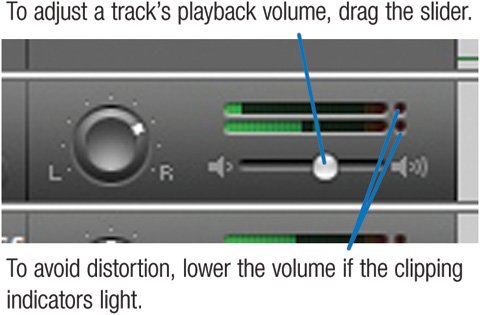
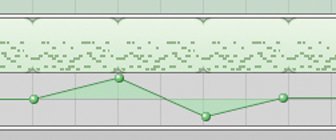
| A good song has a pleasing mix of melody, chord changes, and maybe lyrics. A good recording of a song has a pleasing mix between instruments. It's possible to have a poorly mixed version of a great song, and as a spin of the radio dial will confirm, it's also possible to have a well-mixed version of a lousy song. As a GarageBand-based recording engineer, the job of mixing is yours. Adjust each track's volume so all the tracks mesh no single instrument should overwhelm the others, but important instruments or voices should be louder than less important ones. And to create a rich stereo field, pan some instruments toward the left channel and others toward the right. You'll find some tips for panning on the opposite page. To adjust a track's playback volume level and panning position, use the Mixer area of GarageBand's window. If the Mixer isn't visible, display it by clicking the little triangle at the top of the Tracks area or by choosing Show Track Mixer from the Track menu ( To have a track's volume or panning change as the song plays, create a volume curve or panning curvea set of control points that tell GarageBand how to change volume or panning over time. Note If you've edited a track's volume or panning curve, you can't drag the volume slider or turn the panning knob. Instead, make volume or panning adjustments to the curve. Adjusting Volume Editing a Volume Curve To create fades, add expression, or mute a track for part of a song, edit the track's volume curve.
Adjusting Panning To pan a track, drag its pan knob to turn it clockwise (toward the right speaker) or counterclockwise (toward the left). To return to dead center, Option-click the knob. Editing a Pan Curve To pan a track from one channel to the other as the song plays, edit the track's pan curve. Display the track's curve by clicking its triangle or pressing A. Then, choose Track Panning from the pop-up menu and click the little box at the left edge of the pop-up menu to turn on the curve for editing. Next, create control points and drag them. To pan toward the left channel, drag a control point up. To pan toward the right, drag a control point down. Tips for curves. To adjust a control point's location in time, drag it left or right. To delete a control point, click it and press the Delete key. To delete or move multiple control points at once, select them by Shift-clicking or dragging across them. If you move regions within your song, any curves you created for them don't move along with the regions. To move the curves, select their control points and then drag them left or right as a group to reunite them with the regions they're supposed to affect. Mixing Tips: Panning By sweating the details of your stereo mix, you can make your song more aurally interesting. Two ears, two speakerstake advantage of them. Sit right. Your position relative to your speakers will affect how you hear a stereo mix. When refining your track panning, sit directly between your speakers. Test your mix with headphones if you like, but don't rely exclusively on themyour listeners won't. Panning hard. Think twice about panning tracks completely to the left or right. In the real world, sound reaches both ears even when a musician is at the far side of the stage. Of course, some songs have little to do with the real world, so feel free to bend this rule. Panning for realism. If you're after a realistic stereo mix, visualize your ensemble and pan accordingly. In a jazz combo, the drums might be slightly to the left, bass in the middle, piano slightly to the right, and sax further right. Panning a duet. If your song contains a vocal duet or two instruments that trade solos, pan one of the vocalists or instruments somewhat left (about 10 o'clock on the pan wheel) and the other somewhat right. To simulate backup singers, record each part on a separate track and pan the tracks near each other on one side of the stagefor example, one track at 9 o'clock and the other at 10 o'clock. Panning similar instruments. If your song contains multiple instruments that have a similar frequency rangefor example, a solo guitar and a rhythm guitarpan each instrument to the opposite side of center. The 10 o'clock and 2 o'clock positions are good starting points. Consider your effects. If you've applied an effect that enhances a track's stereofor example, Chorus, Flanger, or Tremolothink twice about panning that track heavily to one channel. You'll lose many of the benefits of the effect. Panning percussion. If you've built up a drum kit by recording different drums and cymbals on different tracks, pan the tracks to increase realism. Put the snare and kick drum dead center. Pan the hi-hat slightly right, and the ride and crash cymbals slightly left. If you're using tom-toms, pan them according to their pitch: high-pitched toms slightly right, low-pitched toms slightly left. This layout mirrors the typical layout of a drum kit: the hi-hat is on the drummer's left and the floor tom is on his or her right. |


