Administering SharePoint s SQL Databases
Administering SharePoint's SQL DatabasesOne of the most complex aspects of a SharePoint implementation is the SQL Server 2000 database. In addition to regular administrative tasks within SharePoint and the operating system itself, SQL requires its own specific administration. Administering SQL Server Data Files and File GroupsSQL Server databases consist of both data and log files. Each SQL Server database must have at least one database file. The first database file is referred to as the primary data file and is acknowledged as the starting point of a SQL Server database. It points to the other files or file groups in the database and is known by its .mdf file extension. SQL Server can also have additional secondary files, which would consist of all additional data files. These data files are optional, and the extension of the secondary data file is .ldf. A data file for SQL 2000 can grow to be multiple terabytes in size. It is typical for an organization's needs and space requirements to be met by a single database file smaller than this. Some reasons for creating additional database files include performance, data placement, hard disk space limitations, and a need to minimize backup and restore times. File groups are used collectively to group more than one data file. It is common for file groups to be used for administrative, performance, and data allocation purposes. Several rules apply when creating file groups and allocating data files to the file groups:
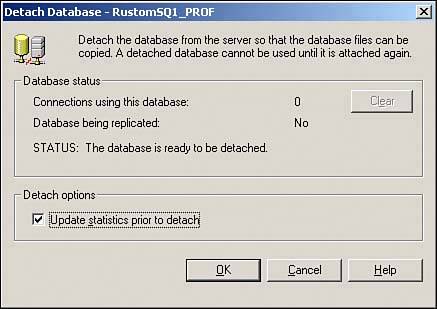
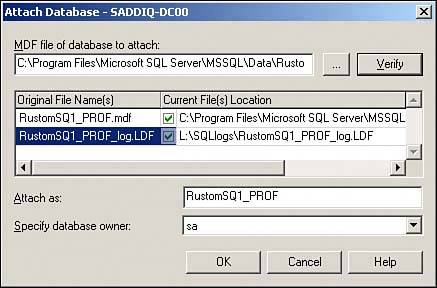
NOTE It is possible to designate specific database tables and indexes on separate file groups to increase performance. Configuring Automatic Database File GrowthSQL Server allows database files to grow automatically as a result of specific options being set when the database is created. Each option is defined by a database administrator and can be changed at any given time. For example, if the auto growth feature is turned on, a database will grow by a desired percentage or by a specific amount of megabytes. An administrator can also limit the maximum size of a data file. Separating Transaction Logs from the Database VolumeThe default installation directory is not always the one where the SharePoint database should reside. Often, it is best to separate the databases onto a dedicated drive-set. To properly scale an environment, it is not a recommended practice to place the SQL Server database and the transaction logs on the same hard drive or RAID set. Not only does performance suffer, but if the hard drive or RAID set fails, a database administrator will not be able to restore the database to the point of failure because the transaction log is also lost. Therefore, it is beneficial to isolate the transaction log from the SQL Server database for a combination of performance, scalability, and availability. Because transaction log I/O operations are approximately 100% sequential and 100% writes, isolation of the database and transaction logs increases performance because sequential writes of the database and transaction log can take place simultaneously. All SharePoint databases such as the content, component, and configuration should be isolated from their transaction logs. Perform the following steps to move the SQL Server transaction log for the SharePoint profile database from the default location to an isolated hard disk drive. In this example, the database is first detached, the log file is moved from the C: drive to the L:\SQLLogs folder, and then the database is reattached:
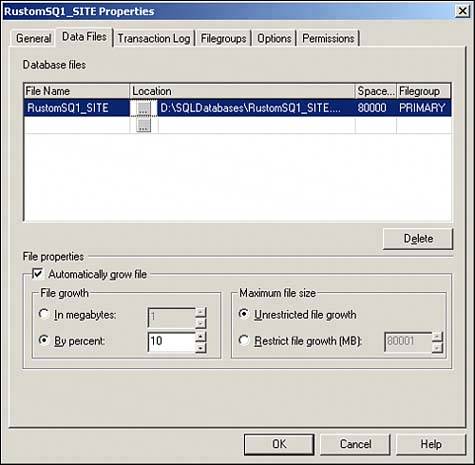
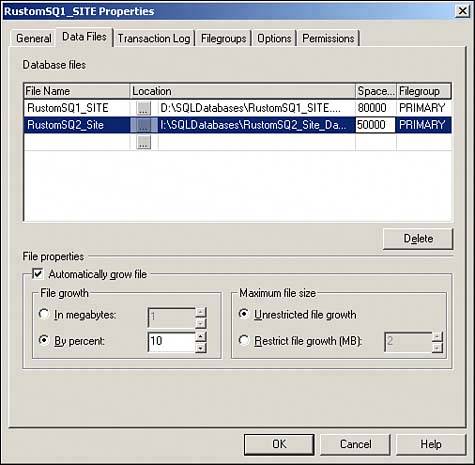
NOTE It would not be beneficial to isolate the database and the transaction logs on separate drives if the database's recovery model is set to Simple. The Simple recovery model truncates the transaction log. Therefore, disk contention would not take place because the transactions are not being logged. Administering a SharePoint SQL Database in a Real-World ScenarioThe following scenario illustrates a common situation experienced by SharePoint administrators. In this example, a drive that contains the SQL database is fast running out of space, and a solution to this problem needs to be found. The fictional CompanyABC has a SharePoint Site database on a back-end SQL Server. The SQL server is configured with four separate RAID volumes. Windows Server 2003 is installed and configured as the operating system on drive C. The SQL Server primary data file for the SharePoint Site database resides on drive D, and the site database transaction log is on drive L. The primary data file is currently 80GB and is growing at a fast rate. The capacity of drive D is 100GB with only 10GB of free space available. In addition, the database is set to automatically grow by 10% and unlimited file growth. Drive D is almost full; therefore, CompanyABC's database administrator must address this issue or the database will become unoperational if there isn't any additional space left on the Drive D: for the database. CompanyABC has another 100GB capacity hard disk drive with approximately 90GB of free space. This hard disk drive is referred to by the letter I. The database administrator should turn off automatic file growth on the primary data file, which is residing on the hard disk drive D and create a secondary database file hard disk drive I. Turning off the autogrowth feature on the primary data file and creating a secondary database file allows CompanyABC's database to continue to be operational as additional space is allocated to the database. Any new data will now be written to the secondary database file. This allows the database to function as the secondary database file starts. Follow these steps to turn off autogrowth on the primary data file, as depicted in this example, and then create a secondary data file on a separate drive:
|
EAN: 2147483647
Pages: 288
- The Second Wave ERP Market: An Australian Viewpoint
- The Effects of an Enterprise Resource Planning System (ERP) Implementation on Job Characteristics – A Study using the Hackman and Oldham Job Characteristics Model
- Data Mining for Business Process Reengineering
- Intrinsic and Contextual Data Quality: The Effect of Media and Personal Involvement
- Development of Interactive Web Sites to Enhance Police/Community Relations