Getting Started
It's time to roll up your sleeves and actually put FileMaker Pro to use. Most of this book deals with being a FileMaker developersomeone who is focused on the programming side of creating and managing FileMaker solutions; however, ironically, development composes only a small percentage of the overall time a given database gets used. Much of the time a FileMaker solution will simply be in use, and its users will care nothing for scripting, calculations, or the vagaries of user interface design. They will simply be involved with working with a developer's creation and will not need to know anything of the programming side of FileMaker.
Becoming facile in working with FileMaker databases will prove quite helpful in allowing you to quickly access the information you want and to understand the underpinnings of any database, regardless of user interface.
This chapter introduces you to how to make the most of FileMaker databases that have already been built. All FileMaker databasesoften called solutions, systems, or applicationshave certain common elements, and becoming adept at using FileMaker Pro solutions will not only help you manipulate and analyze data better, but also assist you in extending what you can accomplish with that data. We'll cover some broad concepts at first, move into the nuts and bolts of working with databases, and finally wrap things up with some techniques to help you become a FileMaker Pro power user.
One quick note before we begin: This chapter assumes that you want to learn as much as you can about FileMaker Pro. Although the concepts and functions described can be fairly basic (how to open a database, for example), this chapter covers a fair number of advanced topics as well. This chapter is a good place to start if you're unfamiliar with FileMaker Pro, or if you still don't quite feel comfortable using a FileMaker Pro database.
Before going much further, we need to be clear on some basic FileMaker Pro vocabulary. Databases store collections of information, and one of their primary functions is to properly identify the information they store. It's not enough to simply save the text strings "Pink Floyd" and "Dark Side of the Moon" in a file. For a database to be useful, you need to know that Pink Floyd is a band and that Dark Side of the Moon is an album (one of the greatest of all time!).
For a database to fulfill its primary function, a developer needs to have properly identified all the appropriate elements of information you or your organization wants to store and use. It is in these identifications that information becomes meaningful.
Records and Fields
Databases store information about one or more kinds of entities. For example, a database might store information about music albums, or musicians, or guitar manufacturers. In FileMaker, each individual item is referred to as a record. So in a database of music CDs, each record represents an individual CD.
To track the attributes of items or specific informationfor example, Dark Side of the Moon's release date of March 24, 1973fields are defined specific to each type of item. These fields hold and also identify the type of information found for each record. Examples of fields that might be found in the music CD database are release date, recording studio, and so on.
In FileMaker Pro you will be working with a specific individual record at a time and will be viewing (and storing) information from that record's fields.
Note
For those of you familiar with SQL, a row corresponds to a record in FileMaker Pro, and a column corresponds to a field.
|
For more information on SQL and how it relates to FileMaker Pro, see Chapter 20, "Exporting Data from FileMaker," p. 595. |
Understanding Tables
It's important to have a grasp of what a table is when you're working with FileMaker Pro.
Simply stated, a table is a collection of like records. You might have one table of automobile model records and another table of manufacturer records. Miata would belong in the automobile table, and Mazda in the manufacturer table. From the music example, music albums would belong to one table, musicians to another, and genres to another. An album isn't a genre, nor are musicians the same as the albums they create.
For the purposes of using FileMaker Pro, you need to remember one thing: Every layout (a view or form for data) in FileMaker Pro is associated with a specific table. If you're looking at a layout with a picture of a Mazda Miata, and fields that break out the attributes of that car, more than likely you're in an automobiles table. If you're seeing a layout with "Mazda" at the top and multiple car models listed, you're more than likely in the manufacturer table. This will come into play later in the chapter when you begin working with multiple records and found sets.
|
To explore working with multiple recordsets, see "Working with a Found Set," p. 51. |
Note
In FileMaker Pro, you can have as many tables in a single file (.fp7 document) as you need: FileMaker 8 is a relational database platform. Versions of FileMaker since version 3's introduction in 1995 were also relational, but earlier versions allowed only one table per file.
Before FileMaker 7, database solutions would often be collections of files and require that you open all these multiple files at once to use a solution. In FileMaker 8, you can consolidate solutions into single files with multiple tables.
|
To dig deeper into working with multiple tables and understanding relational data models, see Chapter 6, "Working with Multiple Tables," p. 157, and Chapter 5, "Relational Database Design," p. 129. |
FileMaker Pro Navigation
One of the first things you'll want to do when you open a database in FileMaker Pro is navigate the various screens, called layouts, that a developer designed as the interface for the database. Using these layouts, you can view records, enter data into fields, see reports, run scripts, and more.
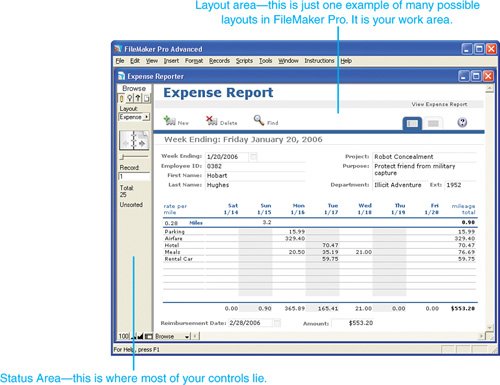
In addition to the menus common to all software applications, there are two important work areas to distinguish from one another in a FileMaker Pro database: the Status Area on the left and the Layout area on the right (see Figure 2.1).
Figure 2.1. These are the primary areas of all FileMaker Pro databases; in some cases, however, a developer might have hidden the Status Area.
 |
Note that the menus and menu items you see in your FileMaker database may well be quite different from those you see in the screenshots in this book or in other FileMaker solutions. FileMaker Pro 8 Advanced includes a feature to customize menus, and the developer who created the file you are working with may have changed its menu set from the standard. |
Layouts
Most FileMaker Pro databases open to a data-entry layout. Generally you have access to fields, commonly designated by a field border or embossing of some kind (depending on the aesthetic design or dementia of the database's developer), or you may come across a layout used for reporting purposes only. Figures 2.2, 2.3, and 2.4 illustrate just a few examples of layouts you might find with databases created in FileMaker Pro.
Figure 2.2. FileMaker's built-in starter solutions offer a simple, clean interface. Shown here are a form layout (one record per screen) and a list layout (multiple records per screen).

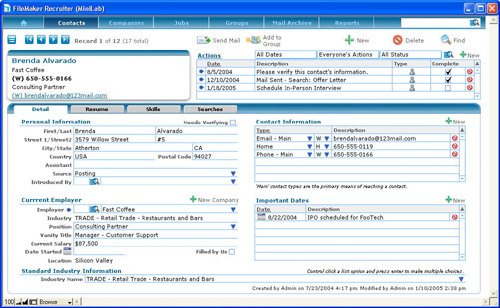
Figure 2.3. FileMaker applicationscommercially available database solutions from FileMaker, Inc.demonstrate the possibilities of more feature-rich systems. (Screenshots provided by permission of FileMaker, Inc.)

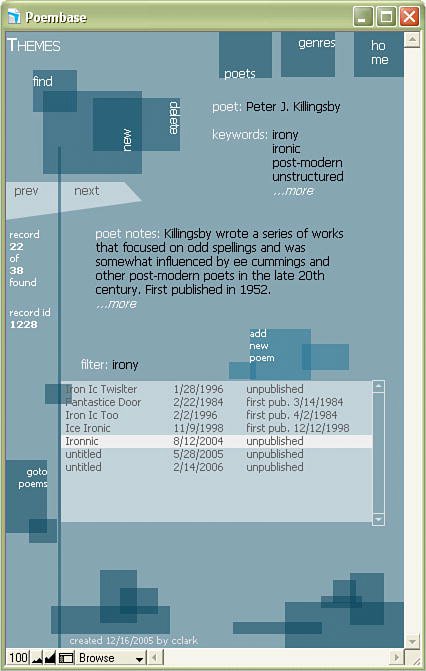
Figure 2.4. Here's a bit of a departure from the staid designs of typical productivity applications. FileMaker offers a wide range of layout possibilities.
The Status Area
The Status Area serves as a primary control center for FileMaker Pro. In Browse modethe state in which all data entry and general use occursthe Status Area displays a book icon and other elements for navigating a database solution.
FileMaker Pro has four modes, which we'll explain later in this chapter. For now, note that the Status Area changes appearance and function depending on which mode you're using. In Find mode it allows access to search functions and special search wildcard characters. In Layout mode the Status Area contains most of the tools used for defining the look and feel of your database.
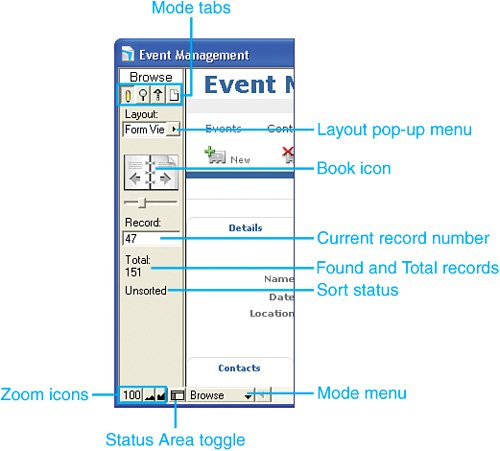
Figure 2.5 details the various elements of the Status Area, as it appears in Browse mode.
Figure 2.5. Note the various functions of the Status Area in Browse mode. To jump to a specific record, type a number into the record number field and press Enter.
The elements of the Status Area include the following:
- Layout pop-up menu Not to be confused with the Layout menu in Layout mode, this enables you to navigate from layout to layout in your database. Developers can control whether a layout appears in this list.
- Book icon The book icon enables you to page through each record in your database. You stay on the same layout, but you see the information for each record in your database as you click through your records. The slider below enables you to jump ahead and back by multiple records.
- Current record number Not to be confused with a record identifier, key, or ID, this number indicates which record in your current set you're viewing, relative to the others you're currently working with. FileMaker Pro allows you to establish found setsgroups of records with which you're currently workingand this number shows where your current record lies relative to the found set. In one situation a given record might be record number 1, in another (say after sorting your database differently) it might be number 20.
- Found and Total records These numbers show how many records are in your found set compared to the total in your entire database. Found sets are covered in more detail later in the chapter.
- Sort status FileMaker Pro allows you to sort your records based on some criterion. Depending on how your found set has been sorted, the Status Area shows Sorted, Semi-sorted, or Unsorted. A semi-sorted state would occur if you were to sort the records in your database and then create a new record.
- Zoom icons These allow you to zoom in and out on a given layout.
- Status Area toggle This allows you to show and hide the Status Area.
- Mode menu This pop-up menu functions in the same way as the mode icons.
Caution
You'll notice something missing from FileMaker Pro: back and forward buttons. It's important that you not confuse the book icon with such. The book icon enables you to page back and forward through your data as opposed to paging through your layouts in Browse mode.
Some users familiar with the Web will wrongly expect the book icon to step forward and back through their navigation history within a database.
FileMaker Pro Modes
You'll interact with your FileMaker Pro databases via one of four modes. At times, developers choose to tailor a layout for use with a specific mode, but more often than not, layouts can be effectively used with all four. To switch between modes, use the View menu.
To familiarize you with the four modes, here's a simple description of each.
- Browse mode Browse mode is FileMaker Pro's primary mode, where all data entry occurs, and generally is the principal mode you'll use in a given solution.
- Find mode Here you create and then perform find requests to search for specific sets of records.
- Preview mode When preparing to print from FileMaker Pro, you may opt to switch to Preview mode to see what a given layout will look like after it is printed. Developers may also build Preview mode steps into their reporting functions so that you can review a document before sending it to a printer. Preview mode is also necessary to view some summary-type reports.
- Layout mode It is in Layout mode that a great deal of development occurs. Here developers can manipulate all the elements of a given layout, including controlling all the things that appear on that layout.
Note
You can change modes in four other ways: You can use the menu at the lower left of your screen, you can use the mode tabs at the top of the Status Area, you can use various functions and/or buttons that a developer may have programmed to switch modes, and you can use keyboard shortcuts (listed under the View menu).
Views
In addition to the modes of FileMaker Pro, there are three views as well. A view is a particular way of displaying record data on the screen. To change between them, use the View menu as well. These are the three views:
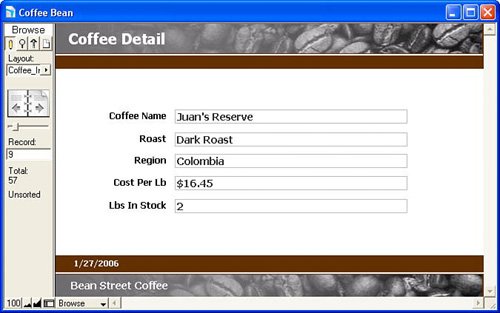
- Form view Allows you to see and manipulate only one record at a time (see Figure 2.6).
Figure 2.6. Form view is usually where most data entry is performed.
- List view Here you can display multiple records. At any given moment, you still are working with only one specific record while still being able to view the rest (see Figure 2.7).
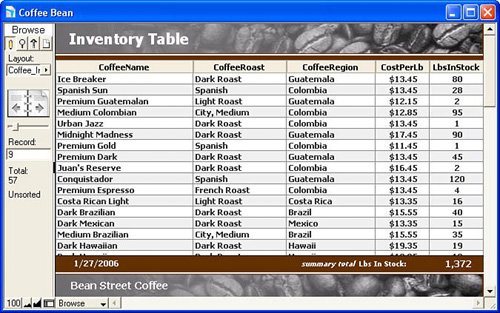
Figure 2.7. Notice at the bottom of the screen that List views can also include summary data.

- Table view Table view simply displays the raw data for a given record (depending on what fields have been placed on a layout). It looks quite similar to a spreadsheet application (see Figure 2.8). This is extremely handy for reviewing large groups of data quickly, but it offers few user interface controls.
Figure 2.8. In Table view you can automatically resize, move, and sort with column headers.
Buttons
Notice that we've largely been talking about fields on layouts. Most FileMaker Pro solutions also include buttons. Figure 2.9 shows a few examples.
Figure 2.9. Buttons can come in all shapes and sizes in FileMaker Pro. Text can be a button, a field can be a button, and even just a mysterious blank area in the middle of a layout can be a button.
Buttons trigger actionsoften by launching scripts that developers writeand are specific to a given FileMaker Pro database. Buttons can perform dozens of actions, such as creating a new record, deleting a record, navigating to another layout, performing a calculation, performing a find request, controlling windows, and even spell-checking and emitting a simple beep. The possibilities are nearly endless.
You'll need to become familiar with the specifics of a given FileMaker Pro solution to come to understand what its buttons do. The person who built the system should have those details, or should have provided some form of training or documentation.
Tab Control Objects
|
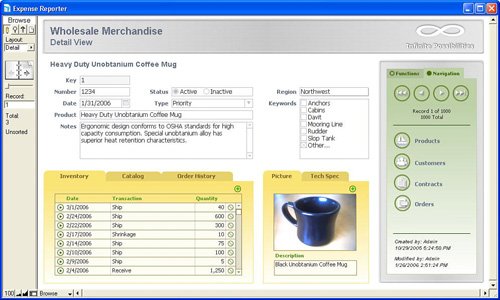
Another element you'll work with on layouts is the new Tab Control object introduced in FileMaker 8. With it, developers can create multiple panes of information on a single layout, as shown in Figure 2.10, and users can flip from pane to pane as they need. Each tab pane displays information from the same record: Think of it as extending the amount of screen real estate you can view at any given time. |
Figure 2.10. The Tab Control in FileMaker 8 allows you to organize and view data for a given record without having to scroll or move to other layouts. Note the three tabs shown here for Inventory, Picture, and Navigation.
Part I: Getting Started with FileMaker 8
FileMaker Overview
- FileMaker Overview
- FileMaker and Its Marketplace
- Introduction to Database Software
- FileMaker Deployment Options
- Whats New in FileMaker Pro 8
Using FileMaker Pro
- Getting Started
- Working in FileMaker Pro
- Troubleshooting
- FileMaker Extra: Becoming a FileMaker Pro Power User
Defining and Working with Fields
- Defining and Working with Fields
- Working Under the Hood
- Working with Fields
- Working with Field Types
- Assigning Field Options
- Troubleshooting
- FileMaker Extra: Indexing in FileMaker
Working with Layouts
- Working with Layouts
- Whats a Layout?
- Creating and Managing Layouts
- Working with Parts
- Working with Objects on a Layout
- Working with the Tab Control Object
- Working with Fields
- Portals
- Troubleshooting
- FileMaker Extra: Designing Cross-PlatformFriendly Layouts
Part II: Developing Solutions with FileMaker
Relational Database Design
- Relational Database Design
- Understanding Database Design
- Database Analysis
- Working with Entities and Attributes
- Understanding Relationships
- Relationship Optionality
- Understanding the Role of Keys in Database Design
- Many-to-Many Relationships: Solving the Puzzle
- The Basics of Process Analysis
- FileMaker Extra: Complex Many-to-Many Relationships
Working with Multiple Tables
- Working with Multiple Tables
- Multitable Systems in FileMaker Pro
- Creating a One-to-Many Relationship in FileMaker
- Working with Keys and Match Fields
- Understanding Table Context
- Working with Related Data
- Creating a Many-to-Many Relationship
- Relational Integrity
- Rapid Multitable Development
- Troubleshooting
- FileMaker Extra: Building a Three-Way Join
Working with Relationships
- Working with Relationships
- Relationships Graphs and ERDs
- Relationships as Queries
- Creating Self-Relationships
- Creating Ranged Relationships
- Creating Cross-Product Relationships
- Working with Data from Distant Tables
- Working with Multiple Files
- How and When to Use Multiple Files
- Troubleshooting
- FileMaker Extra: Managing the Relationships Graph
Getting Started with Calculations
- Getting Started with Calculations
- Understanding How and Where Calculations Are Used
- Exploring the Calculation Dialog Box
- Essential Functions
- Using Conditional Functions
- Aggregate Functions
- Learning About the Environment
- Troubleshooting
- FileMaker Extra: Tips for Becoming a Calculation Master
Getting Started with Scripting
- Getting Started with Scripting
- Scripts in FileMaker Pro
- Creating Scripts
- Common Scripting Topics
- Triggering Scripts
- Working with Buttons on Layouts
- Troubleshooting
- FileMaker Extra: Creating a Script Library
Getting Started with Reporting
- Getting Started with Reporting
- Deriving Meaning from Data
- Working with Lists of Data
- Summarized Reports
- Delivering Reports
- Troubleshooting
- FileMaker Extra: Incorporating Reports into the Workflow
Part III: Developer Techniques
Developing for Multiuser Deployment
- Developing for Multiuser Deployment
- Developing for Multiple Users
- Sessions in FileMaker Pro
- Concurrency
- Audit Trails in FileMaker Pro
- Launch Files
- Troubleshooting
- FileMaker Extra: Development with a Team
Implementing Security
- Approaching Security
- User-Level Internal Security
- File-Level Access Security
- Troubleshooting
- FileMaker Extra: Working with Multiple Files
Advanced Interface Techniques
- Advanced Interface Techniques
- User Interfaces in FileMaker Pro
- Navigation
- Multiwindow Interfaces
- Working with Custom Menus
- Showing/Hiding Layout Elements
- Dedicated Find Layouts
- Data Presentation
- Working with Table View
- Troubleshooting
- FileMaker Extra: User Interface Heuristics
Advanced Calculation Techniques
- Advanced Calculation Techniques
- Whats an Advanced Calculation Technique?
- Logical Functions
- Text Formatting Functions
- Array Functions
- The Filter-ing Functions
- Custom Functions
- GetNthRecord
- Troubleshooting
- FileMaker Extra: Creating a Custom Function Library
Advanced Scripting Techniques
- Advanced Scripting Techniques
- What Is Advanced Scripting?
- Script Parameters and Script Results
- Script Variables
- Window Management Techniques
- Go to Related Record
- Troubleshooting
- FileMaker Extra: Recursive Scripts
Advanced Portal Techniques
- Advanced Portal Techniques
- Portals in FileMaker Pro
- Portal Basics
- New Record Only Relationships
- Horizontal Portals
- Using Portals to Create Calendars
- Selection Portals
- Filtered Portals
- Dynamic Portal Sorting
- Troubleshooting
- FileMaker Extra: Portals and Record Locking
Debugging and Troubleshooting
- Debugging and Troubleshooting
- What Is Troubleshooting?
- Staying Out of Trouble
- Planning for Trouble
- Troubleshooting Scripts and Calculations
- Troubleshooting in Specific Areas: Performance, Context, Connectivity, and Globals
- File Maintenance and Recovery
- FileMaker Extra: Other Tools of the Trade
Converting Systems from Previous Versions of FileMaker Pro
- Converting Systems from Previous Versions of FileMaker Pro
- Migration Choices
- Converting Files
- Pre-Conversion Tasks
- Post-Conversion Tasks
- Troubleshooting
- FileMaker Extra: Converting Web-Enabled Databases
Part IV: Data Integration and Publishing
Importing Data into FileMaker Pro
- Importing Data into FileMaker Pro
- Working with External Data
- Flat-File Data Sources
- Importing Multiple Files from a Folder
- Importing Photos from a Digital Camera
- Importing from an ODBC Data Source
- Importing from an XML Data Source
- Using a Script to Import Data
- Troubleshooting
- FileMaker Extra: Exploiting the FileMaker-to-FileMaker Import
Exporting Data from FileMaker
- Exporting Data from FileMaker
- Getting Out What You Put In
- The Basic Mechanics of Exporting
- Export File Formats
- Formatting Exported Data
- Exporting Related Fields
- Exporting Grouped Data
- Exporting to Fixed-Width Formats
- Working with Large Fields and Container Fields
- Scripted Exports
- Accessing FileMaker Data Using ODBC and JDBC
- Using FileMaker Pro as an ODBC Client
- Troubleshooting
- FileMaker Extra: Accessing FileMaker Data via JDBC
Instant Web Publishing
- Instant Web Publishing
- An Overview of Instant Web Publishing
- Enabling and Configuring IWP
- Designing for IWP Deployment
- Using an IWP Solution
- Troubleshooting
- FileMaker Extra: Building Your Own Next and Previous Page Buttons
FileMaker and Web Services
- FileMaker and Web Services
- About Web Services
- FileMaker and XML
- Transforming XML
- XML Import: Understanding Web Services
- Working with Web Services
- Troubleshooting
- FileMaker Extra: Write Your Own Web Services
Custom Web Publishing
- Custom Web Publishing
- About Custom Web Publishing
- Custom Web Publishing Versus Instant Web Publishing
- Custom Web Publishing Versus XML Export
- Getting Your Databases Ready for Custom Web Publishing
- Publishing FileMaker Data as XML
- Using XSLT with Custom Web Publishing
- Building Web Applications with XSLT-CWP
- Other Custom Web Publishing Commands and Parameters
- About the FileMaker XSLT Extensions
- Troubleshooting
- FileMaker Extra: About the Custom Web Publishing Tools
Part V: Deploying a FileMaker Solution
Deploying and Extending FileMaker
- Deploying and Extending FileMaker
- FileMaker Deployment Options
- Single User
- Peer-to-Peer Hosting
- FileMaker Server
- Web Publishing
- ODBC/JDBC
- Citrix/Terminal Services
- Runtime Solutions
- Deploying to Handheld Devices
- Customized Deployment Options
- Troubleshooting
- FileMaker Extra: The Limits of Customization
FileMaker Server and Server Advanced
- FileMaker Server and Server Advanced
- About FileMaker Server
- Installing FileMaker Server
- Running FileMaker Server
- Using the Server Administration Tool
- Configuring and Administering FileMaker Server Using the SAT
- Managing Clients
- Managing Databases
- Administration from the Command Line
- Working with External Services
- Automatically Updating Plug-ins
- Scheduled Tasks
- Monitoring FileMaker Server
- Troubleshooting
- FileMaker Extra: Best Practices Checklist
FileMaker Mobile
- FileMaker Mobile
- FileMaker Mobile 8 Overview
- Using FileMaker Mobile on Your Handheld Device
- Troubleshooting
- FileMaker Extra: Publishing Related Data
Documenting Your FileMaker Solutions
- Documenting Your FileMaker Solutions
- Why Is Documentation Important?
- Developing Naming Conventions
- Using Comments Effectively
- Documenting the Relationships Graph
- Using the Database Design Report
- Using Third-Party Documentation Tools
- Putting the Finishing Touches on Your Documentation
- Final Thoughts on Documentation
- FileMaker Extra: Soliant Development Standards
EAN: 2147483647
Pages: 296
