Working with Custom Menus
 |
The capability to customize menus in FileMaker files is arguably the single most powerful new feature in FileMaker 8. To modify the menu sets in FileMaker, you will need to develop using FileMaker Pro 8 Advanced; however, anyone working with FileMaker Pro (or a bound runtime solution) will be able to utilize the custom menus you create. The custom menus feature dramatically alters the user interface landscape for FileMaker: Developers can now control menus beyond simply turning them off and can drive a great deal of application logic. |
An example will serve to illustrate the usefulness of custom menus. Suppose that you have built a solution with a section for customers and another for orders. Assume that the system is somewhat complex and that for some specific reason you as a developer do not want users creating new order records or new customer records by selecting New Record from the Records menu in FileMaker (perhaps new record creation needs also to create child records in parallel or do some other bookkeeping within your system). Instead you want scripts that you've written to manage the creation of these important records.
In past versions of FileMaker, you would have had to either train your users not to use the New Record menu iteman impractical solution at bestor disable user access to most of the menu system. This in turn would have forced you to re-create much of FileMaker's functionality, beyond the new order and new customer scripts, for all the other commands users would need and ordinarily access from the menus. Disabling menu commands was an all-or-nothing proposition.
Note
Note that some third-party developers created plug-ins for FileMaker that would allow you to control menus in earlier versions. One such plug-in, CNS Menu from Comm-Unity Networking Systems, allows you to create additional hierarchical menus beyond those offered in FileMaker. We encourage you to visit FileMaker's website and review the plug-ins available; many allow you to further modify its interface.
In FileMaker Pro 8 Advanced, you can create your own menu set and control at the most granular level when menu items appear, how they work, and even what keyboard shortcuts they use. Such customizations, if made, will apply throughout the FileMaker interface, affecting contextual menus, the close box on Windows systems, and potentially every menu item in FileMaker.
Using custom menus allows you to do the following:
- Change the names of menus or menu items
- Override or extend the functionality of native FileMaker menu items with your own scripts
- Change or add keyboard shortcuts to existing or new menu items
- Disable or remove individual menu items or entire menus
- Load custom menu sets on demand, or tie menu sets to particular layouts, modes, or operating systems
Before delving further into custom menus, you will need to be clear on the nomenclature used. There are four separate elements to consider when working with custom menus:
- Menu Item This is a single item on a menu that a user can select. For example, New Record and Save As menu items can also be separators or submenus.
- Command Commands refer to the native controls "baked into" FileMaker: They perform an action in FileMaker. In FileMaker's standard menu set, all the actions are predefined by the applicationfor example, entering Find mode or opening the Help system. You can also create custom commands that initiate a script you as a developer will have written. It is possible to tie a menu item to a command in FileMaker and thus offer the native functionality that the command controls.
- Menu A menu is a collection of menu items and comprises the full set of menu items available, regardless of whether they are all active or visible in any given mode or situation. Examples of menus are File and Edit. The File menu starts with the New Database, Open, and Open Remote menu items.
- Menu Set A menu set is the set of all menus currently active or potentially available in FileMaker. It is a collection of menus and is the element you will load or associate with layouts. The FileMaker Standard menu set includes all the menus we've worked with for years: File, Edit, View, Insert, and so on.
Note that any specific menu or menu item may be present or not, grayed out or not, depending on certain conditions. For example, in Browse mode the standard FileMaker Pro 8 Advanced menu set includes the Records menu, but in Layout mode, the Records menu is not available and instead the Layouts menu becomes available. These conditional states can be tied to FileMaker modes, layouts, or user platform.
One important concept you will need to grasp is that FileMaker controls all custom menu elements at the menu set level. That means that if you want your Records menu to show New Customer on a Customers layout and New Order on an Orders layout, you will need to create two additional custom menu sets, one to contain each new variant of the Records menu.
This does not mean, however, that you need to create duplicate menus or menu items. Menus and menu items can be used by multiple menu sets. You need only create menu items that are unique and require customization. In the preceding example, you'd need to create two menu sets (a Customers set and an Orders set), two versions of the Records menu, and also two new menu items (New Customer and New Order).
When you change from one set to the other, all the user will see is that one menu item has changed; however, in the mechanics of working with custom menus, you will in fact have loaded a new menu set altogether.
Menu Sets Interface
The interface for managing custom menus is somewhat complex, but just as with the security controls in FileMaker 8, there's a lot of power under the hood. When you choose Tools, Custom Menus, Define Custom Menus, you'll see a dialog box with two tabs, shown in Figure 13.7.
Figure 13.7. The initial view of the Define Custom Menus dialog shows each menu available in the file, both those that are standard and those you've created.
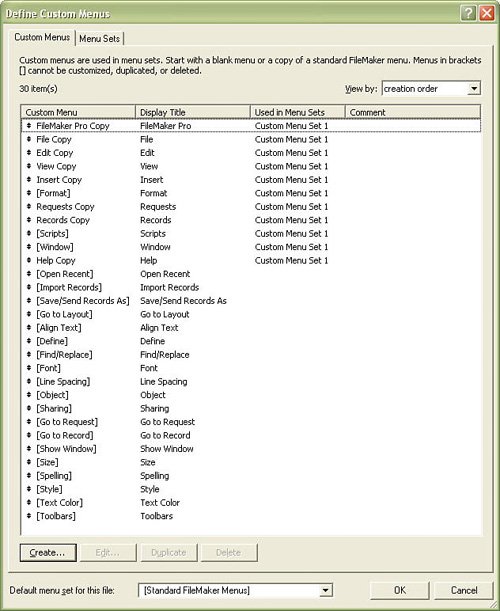
The first tab, Custom Menus, shows all the individual menus in your file. Remember that you can mix and match menus and menu sets; a single menu might appear in multiple menu sets. This list then is the superset of all menus defined within a given file.
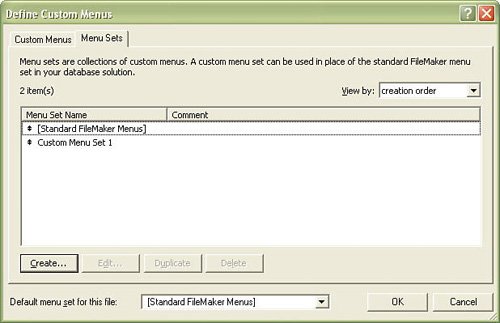
Each FileMaker file contains duplicates of the standard FileMaker 8 menus, grouped into a single custom menu set called Custom Menu Set 1. This provides developers with an easy starting point from which you can further customize these duplicates without fear of breaking your system. If you turn to the second tab, Menu Sets, in Figure 13.8, you will see that two menu sets are already defined: the standard FileMaker menu set and Custom Menu Set 1, ready for modification.
Figure 13.8. The Menu Sets tab allows you to view all the menu sets defined in a given file.
One aspect of custom menus that can prove a little confusing is the interplay between FileMaker's standard menu set and its menus and your own additional custom menus. The term custom menus really refers to additional menus within your file. It is not possible to delete or change FileMaker's standard menu set or its menus. As a developer, you will need to load a custom menu set and work with copies of the standard menus in FileMaker to change your interface.
If you refer to Figure 13.7, you'll notice that some menus have a value in the third column denoting to which menu sets they belong, but in other cases no information is given. These menus might not be used anywhere or they often are submenus, available as hierarchical children to other menus. You can opt to add additional hierarchical submenus to menus as needed.
Some menus have square brackets around their names. These are the standard menus in FileMaker used by FileMaker's standard menu set. They are included in this list so that they can be used in other custom menu sets, but they cannot be edited or deleted.
In Figure 13.9 notice that Custom Menu Set 1 includes the [Format], [Scripts], and [Window] menus, which are not editable.
Figure 13.9. The Edit Menu Set dialog is where you can add and remove individual menus to and from a menu set, picking and choosing from among standard and custom menus.
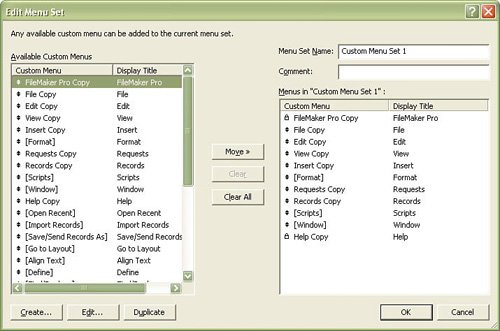
It is here in the Edit Menu Set dialog that menu sets can be created, deleted, and assembled from various menus available. If you select a menu in the left column, you can then click Edit to edit a single menu and create menu items.
Customizing a Menu
Recall from the previous sections that to present users with a custom menu item, you will need to load an entire custom menu set, and that the standard menu set for FileMaker is not modifiable. To change any behavior in FileMaker's menus, you will need to work with either the pregenerated Custom Menu Set 1 or a menu set you've created. (We will cover how to create your own menu set later in the chapter.)
To illustrate this process, we will begin with the default state of Custom Menu Set 1, as shown in Figure 13.9. You reach this by selecting Custom Menu Set 1 from the Menu Sets tab and clicking the Edit button.
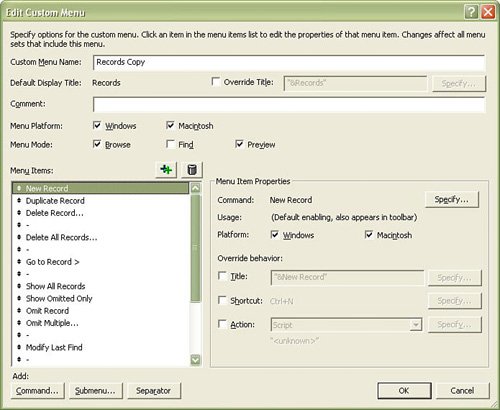
We will use the example presented previously: Assume that you want to change the Records menu to become Customers. To do so, you will need to edit the Records Copy menu. Select it and click Edit to be presented with the Edit Custom Menu dialog shown in Figure 13.10.
Figure 13.10. The Edit Custom Menu dialog allows you to change the appearance and behavior of a menu, which is composed of menu items.

This dialog offers a range of options for controlling a menu. Notice that the name of the menu and its title are different. The name is an internal identifier you can use in whatever ways you need. The title is that which users see and select in their FileMaker interface. Here you can override the Records Copy menu name to read Customers. We recommend you keep the custom menu name and its title somewhat in line with each other to avoid confusion.
It's important to note that the title of a menu can be not only changed with a fixed value but also controlled programmatically via the Calculation dialog. This would allow you to create dynamic labels in which (for example) your FileMaker database could be localized in different languages based on a global preference setting.
Also note that each menu can be set to appear only within certain FileMaker modes (Browse, Find, and Preview) and can be tied to an operating system platform as well. It's important to remember that this behavior will remain true for all the menu sets with which this menu is associated.
Consider the scenario you're exploring here: You want to change the Records menu to be Customers, and New Record to become New Customer. It is likely that you'd want this change to be applied only in Browse mode; in Find mode, New Request would likely be more appropriate than New Customer. For this you'd need to create two separate menus and set the modes in which they appear appropriately.
Below the settings for mode and platform, you can manipulate individual menu items. Menu items belong to a specific menu and are not shareable across multiple menus in the way that menus may be shared across multiple menu sets. The New Record menu item in Figure 13.10 belongs to the Records Copy menu.
You can add separators, create submenu items, and insert new commandsmenu itemsto the list as you need. Note too that you can reorder the list of menu items using the up/down icon in the leftmost portion of the Menu Items list.
Customizing a Menu Item
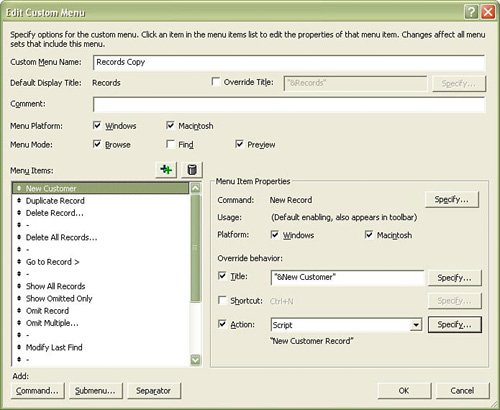
To make a change to an individual menu item (like, for example, modifying New Record to instead read New Customer and attaching a script to the action), first select the menu item in the Edit Custom Menu dialog. Various settings will appear to the right of your menu item list. Refer to Figure 13.11 for an example.
Figure 13.11. Select a menu item on the left in order to change settings that control how it appears or to attach a script.
In its default state, the New Record menu item is set to execute the standard FileMaker command New Record and has no script attached. You can opt to turn off the preestablished behavior and instead substitute your own script or choose from among the range of conventional FileMaker commands within the application.
You can opt to leave a FileMaker command attached to a menu item and add your own script to it, rather than disabling the command. This approach will ensure that anywhere the command appears in FileMaker (for example, as an icon on a toolbar, in a contextual menu, or as the close-window button), those interface controls will remain in place. Your script will still override the behavior of the FileMaker command, but by leaving it attached to the menu item, you ensure that it replaces all controls within FileMaker.
This is an important distinction to make: If you create a menu item with no FileMaker command attached, it will appear only in the appropriate menu. If you attach a command, your menu item may appear in a contextual menu or may override behavior controlled from a toolbar or window control. If you want to completely override a FileMaker behavior, we recommend that you leave the command attached to the menu item. (Among many other useful effects, this would allow you to have your own script run anytime a user clicked the Close box on a window.)
In addition to changing the application-level behavior of a menu item, you can enable or disable its appearance for a given operating system platform, change its title (nomenclature within FileMaker's interface), and finally control whether it has a keyboard shortcut. Note that it is entirely possible to create keyboard shortcut conflicts. As with menu names, you can programmatically control the titles of menu items via the Calculation dialog.
To change the appearance of the New Record menu item to read New Customer and to subsequently control the creation of new records within your customer table by script, make the changes that appear in Figure 13.12.
Figure 13.12. This menu item replaces the default New Record menu item in your database. Instead of relying on FileMaker's default New Record command, this item overwrites its behavior with a New Customer Record script.
To test how your custom menu works, go to Tools, Custom Menus, and select Custom Menu Set 1 to make it active. You can then see the visual changes to the FileMaker interface and test to see that your scripts are controlling your database properly. (Control-click) [right-click] on a customer layout (using the preceding example) to see that your New Customer menu item appears in the contextual menu FileMaker uses in Browse mode.
Loading and Activating Menu Sets
As we've described in previous sections, the way to make a new menu item or custom menu available to your users is by including it in a menu set and then making that set active. There are several ways in which you can load a menu set:
- Assign a custom menu set as the default menu set for an entire file.
- Assign a specific custom menu set to a layout.
- Load a menu set on demand by using a script.
- Load custom menu sets on demand, or tie menu sets to particular layouts, particular modes, or a particular operating system.
- Choose from among the available custom menus in the Tools, Custom Menus menu choices. This last option assumes that you're working with FileMaker Pro 8 Advanced and that you have [Full Access] privileges in the file.
You can assign a custom menu set to work across an entire file at the bottom of the Define Custom Menus dialog shown earlier in Figure 13.7. The menu set you choose will load with the file and be overridden only if you employ one of the means of loading another custom menu set in its place.
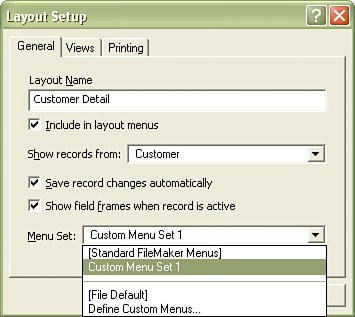
Custom menu sets can also be applied on a layout-by-layout basis. On the General tab of the Layout Setup dialog, shown in Figure 13.13, you can specify which menu set a given layout should present to users.
Figure 13.13. You can assign a custom menu set to each layout within your system.
Last you can exert the most control over your database solution by using the Install Menu Set script step. When you use this script step, you can override a file's default menu set or you can simply load a menu set that will remain active until some other condition prompts it to change, such as encountering another Install Menu Set script step or navigating to a layout that calls for a different menu set.
Note that running this script will change the menu set only for the current session (for the user running the script) and will not affect either the permanent default menu set assigned in the Define Custom Menus dialog or other users in the system. When a user closes and reopens a FileMaker file, the default menu set will load again.
Creating a New Menu from Scratch
So far we've worked with the Custom Menu Set 1 provided within FileMaker; however, it is entirely possible to create new custom menu sets and display entirely new menus as needed.
Consider the scenario of giving your users a menu of report scripts to run. Developers have been able to give users access to scripts for many years, under the Scripts menu, but they weren't able to assign different keyboard shortcuts, could list only custom scripts in the Scripts menu, and could customize neither the name of the Scripts menu nor the name of each individual script. With custom menus you can create your own menus and submenus as needed, making your solutions easier to use and your interfaces more informative.
To create a new menu, once again you will also need to create a menu set with which to control when and how the new menu loads. We recommend never modifying Custom Menu Set 1 and instead simply duplicating it whenever you have a new menu set to create. Custom Menu Set 1 in its default state replicates the entire set of FileMaker controls so that it is possible to make one or two changes without having to re-create every menu item within FileMaker.
After you've duplicated Custom Menu Set 1 and named it something appropriate, remove the [Scripts] menu from the set. (Remember, this only removes it from being accessible in this set. You've not modified the menu itself.) Then, by clicking the Create button, add a new menu to your menu set. When you do you, you'll be presented with the dialog shown in Figure 13.14.
Figure 13.14. You can choose to associate a new menu with an established FileMaker menu or make it an entirely additional menu.
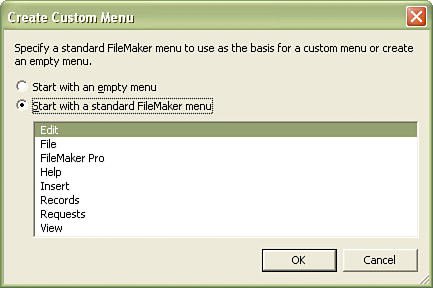
Here you can associate a new menu with an established FileMaker menu (thus making use of its accessibility in toolbars and contextual menus) or create a new, empty menu. In the scenario we're describing here, an empty menu is the way to go. You are adding to the interface, not replacing it.
Note
Note that when you add a menu to those available within a menu set, you won't be able to remove or reorder the FileMaker Pro menu that displays in Mac OS X, nor will you be able to remove or reorder the Help menu from either the Mac or the Windows versions of the software. Furthermore, the Tools menu will always appear in FileMaker Pro 8 Advanced.
After you've created a new menu, simply click the Edit button and you will be able to add new menu items as you need. If you have other custom menus prepared, you can choose to add them to a menu as a submenu, or you can choose to add commands to your menu. In this scenario, you'd likely want to create a single command for each report you want listed, and then attach the script that drives that report to each new menu item. The complete settings for a Reports menu are shown in Figure 13.15.
Figure 13.15. A custom Reports menu is often a welcome addition to many FileMaker databases. (Notice the inclusion of a submenu and the use of separators.)

Custom menus are an extremely powerful new addition to FileMaker; in the past many developers would opt to shut down access to the standard menus in FileMaker to maintain control and ensure data integrity within their database solutions. With this new feature, it's possible to drive much more of the application from its native controls provided out of the box and to tweak only those elements necessary as a given solution requires.
Part I: Getting Started with FileMaker 8
FileMaker Overview
- FileMaker Overview
- FileMaker and Its Marketplace
- Introduction to Database Software
- FileMaker Deployment Options
- Whats New in FileMaker Pro 8
Using FileMaker Pro
- Getting Started
- Working in FileMaker Pro
- Troubleshooting
- FileMaker Extra: Becoming a FileMaker Pro Power User
Defining and Working with Fields
- Defining and Working with Fields
- Working Under the Hood
- Working with Fields
- Working with Field Types
- Assigning Field Options
- Troubleshooting
- FileMaker Extra: Indexing in FileMaker
Working with Layouts
- Working with Layouts
- Whats a Layout?
- Creating and Managing Layouts
- Working with Parts
- Working with Objects on a Layout
- Working with the Tab Control Object
- Working with Fields
- Portals
- Troubleshooting
- FileMaker Extra: Designing Cross-PlatformFriendly Layouts
Part II: Developing Solutions with FileMaker
Relational Database Design
- Relational Database Design
- Understanding Database Design
- Database Analysis
- Working with Entities and Attributes
- Understanding Relationships
- Relationship Optionality
- Understanding the Role of Keys in Database Design
- Many-to-Many Relationships: Solving the Puzzle
- The Basics of Process Analysis
- FileMaker Extra: Complex Many-to-Many Relationships
Working with Multiple Tables
- Working with Multiple Tables
- Multitable Systems in FileMaker Pro
- Creating a One-to-Many Relationship in FileMaker
- Working with Keys and Match Fields
- Understanding Table Context
- Working with Related Data
- Creating a Many-to-Many Relationship
- Relational Integrity
- Rapid Multitable Development
- Troubleshooting
- FileMaker Extra: Building a Three-Way Join
Working with Relationships
- Working with Relationships
- Relationships Graphs and ERDs
- Relationships as Queries
- Creating Self-Relationships
- Creating Ranged Relationships
- Creating Cross-Product Relationships
- Working with Data from Distant Tables
- Working with Multiple Files
- How and When to Use Multiple Files
- Troubleshooting
- FileMaker Extra: Managing the Relationships Graph
Getting Started with Calculations
- Getting Started with Calculations
- Understanding How and Where Calculations Are Used
- Exploring the Calculation Dialog Box
- Essential Functions
- Using Conditional Functions
- Aggregate Functions
- Learning About the Environment
- Troubleshooting
- FileMaker Extra: Tips for Becoming a Calculation Master
Getting Started with Scripting
- Getting Started with Scripting
- Scripts in FileMaker Pro
- Creating Scripts
- Common Scripting Topics
- Triggering Scripts
- Working with Buttons on Layouts
- Troubleshooting
- FileMaker Extra: Creating a Script Library
Getting Started with Reporting
- Getting Started with Reporting
- Deriving Meaning from Data
- Working with Lists of Data
- Summarized Reports
- Delivering Reports
- Troubleshooting
- FileMaker Extra: Incorporating Reports into the Workflow
Part III: Developer Techniques
Developing for Multiuser Deployment
- Developing for Multiuser Deployment
- Developing for Multiple Users
- Sessions in FileMaker Pro
- Concurrency
- Audit Trails in FileMaker Pro
- Launch Files
- Troubleshooting
- FileMaker Extra: Development with a Team
Implementing Security
- Approaching Security
- User-Level Internal Security
- File-Level Access Security
- Troubleshooting
- FileMaker Extra: Working with Multiple Files
Advanced Interface Techniques
- Advanced Interface Techniques
- User Interfaces in FileMaker Pro
- Navigation
- Multiwindow Interfaces
- Working with Custom Menus
- Showing/Hiding Layout Elements
- Dedicated Find Layouts
- Data Presentation
- Working with Table View
- Troubleshooting
- FileMaker Extra: User Interface Heuristics
Advanced Calculation Techniques
- Advanced Calculation Techniques
- Whats an Advanced Calculation Technique?
- Logical Functions
- Text Formatting Functions
- Array Functions
- The Filter-ing Functions
- Custom Functions
- GetNthRecord
- Troubleshooting
- FileMaker Extra: Creating a Custom Function Library
Advanced Scripting Techniques
- Advanced Scripting Techniques
- What Is Advanced Scripting?
- Script Parameters and Script Results
- Script Variables
- Window Management Techniques
- Go to Related Record
- Troubleshooting
- FileMaker Extra: Recursive Scripts
Advanced Portal Techniques
- Advanced Portal Techniques
- Portals in FileMaker Pro
- Portal Basics
- New Record Only Relationships
- Horizontal Portals
- Using Portals to Create Calendars
- Selection Portals
- Filtered Portals
- Dynamic Portal Sorting
- Troubleshooting
- FileMaker Extra: Portals and Record Locking
Debugging and Troubleshooting
- Debugging and Troubleshooting
- What Is Troubleshooting?
- Staying Out of Trouble
- Planning for Trouble
- Troubleshooting Scripts and Calculations
- Troubleshooting in Specific Areas: Performance, Context, Connectivity, and Globals
- File Maintenance and Recovery
- FileMaker Extra: Other Tools of the Trade
Converting Systems from Previous Versions of FileMaker Pro
- Converting Systems from Previous Versions of FileMaker Pro
- Migration Choices
- Converting Files
- Pre-Conversion Tasks
- Post-Conversion Tasks
- Troubleshooting
- FileMaker Extra: Converting Web-Enabled Databases
Part IV: Data Integration and Publishing
Importing Data into FileMaker Pro
- Importing Data into FileMaker Pro
- Working with External Data
- Flat-File Data Sources
- Importing Multiple Files from a Folder
- Importing Photos from a Digital Camera
- Importing from an ODBC Data Source
- Importing from an XML Data Source
- Using a Script to Import Data
- Troubleshooting
- FileMaker Extra: Exploiting the FileMaker-to-FileMaker Import
Exporting Data from FileMaker
- Exporting Data from FileMaker
- Getting Out What You Put In
- The Basic Mechanics of Exporting
- Export File Formats
- Formatting Exported Data
- Exporting Related Fields
- Exporting Grouped Data
- Exporting to Fixed-Width Formats
- Working with Large Fields and Container Fields
- Scripted Exports
- Accessing FileMaker Data Using ODBC and JDBC
- Using FileMaker Pro as an ODBC Client
- Troubleshooting
- FileMaker Extra: Accessing FileMaker Data via JDBC
Instant Web Publishing
- Instant Web Publishing
- An Overview of Instant Web Publishing
- Enabling and Configuring IWP
- Designing for IWP Deployment
- Using an IWP Solution
- Troubleshooting
- FileMaker Extra: Building Your Own Next and Previous Page Buttons
FileMaker and Web Services
- FileMaker and Web Services
- About Web Services
- FileMaker and XML
- Transforming XML
- XML Import: Understanding Web Services
- Working with Web Services
- Troubleshooting
- FileMaker Extra: Write Your Own Web Services
Custom Web Publishing
- Custom Web Publishing
- About Custom Web Publishing
- Custom Web Publishing Versus Instant Web Publishing
- Custom Web Publishing Versus XML Export
- Getting Your Databases Ready for Custom Web Publishing
- Publishing FileMaker Data as XML
- Using XSLT with Custom Web Publishing
- Building Web Applications with XSLT-CWP
- Other Custom Web Publishing Commands and Parameters
- About the FileMaker XSLT Extensions
- Troubleshooting
- FileMaker Extra: About the Custom Web Publishing Tools
Part V: Deploying a FileMaker Solution
Deploying and Extending FileMaker
- Deploying and Extending FileMaker
- FileMaker Deployment Options
- Single User
- Peer-to-Peer Hosting
- FileMaker Server
- Web Publishing
- ODBC/JDBC
- Citrix/Terminal Services
- Runtime Solutions
- Deploying to Handheld Devices
- Customized Deployment Options
- Troubleshooting
- FileMaker Extra: The Limits of Customization
FileMaker Server and Server Advanced
- FileMaker Server and Server Advanced
- About FileMaker Server
- Installing FileMaker Server
- Running FileMaker Server
- Using the Server Administration Tool
- Configuring and Administering FileMaker Server Using the SAT
- Managing Clients
- Managing Databases
- Administration from the Command Line
- Working with External Services
- Automatically Updating Plug-ins
- Scheduled Tasks
- Monitoring FileMaker Server
- Troubleshooting
- FileMaker Extra: Best Practices Checklist
FileMaker Mobile
- FileMaker Mobile
- FileMaker Mobile 8 Overview
- Using FileMaker Mobile on Your Handheld Device
- Troubleshooting
- FileMaker Extra: Publishing Related Data
Documenting Your FileMaker Solutions
- Documenting Your FileMaker Solutions
- Why Is Documentation Important?
- Developing Naming Conventions
- Using Comments Effectively
- Documenting the Relationships Graph
- Using the Database Design Report
- Using Third-Party Documentation Tools
- Putting the Finishing Touches on Your Documentation
- Final Thoughts on Documentation
- FileMaker Extra: Soliant Development Standards
EAN: 2147483647
Pages: 296
