Hack 64. Build Custom Icons on the Fly


Using libraries that extend the Google Maps API in various ways, you can quickly achieve powerful results.
The XMaps library is a set of extensions to the Google Maps API. As of this writing, the library builds on the Google Maps API to add many capabilities that the API itself does not provide. As of this writing, the additional features provided by XMaps include filled polygons, text along polylines, and custom icons and markers. For this hack, we will see how to easily create new icons by making use of the XIcon and XMarker classes from XMaps. The XMaps library lives on the Web at http://xmaps.busmonster.com/.
7.4.1. The Hack
The XIcon class is similar to Google's GIcon class, but it automates some of the steps necessary to create icons, making it simpler to make new icons on the fly. You could do the same thing that the XIcon class does by using a server-side script, but here we are using something that does not require any extra server horsepower or bandwidth from you. XIcon objects are limited in that they are a filled concave polygon (e.g., the outline of a car, lion, or circle), but you have the advantage of being able to specify the color, size, opacity, and any text on it on the fly.
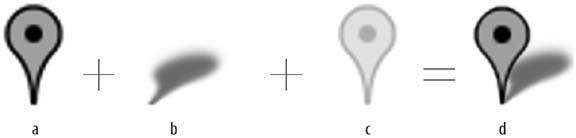
The GIcon class makes use of a set of pre-rendered PNG images stored on a server somewhere. The default GIcon uses three images from Google Ride Finder to create its resulting image: the reddish-orange marker image, a nearly transparent version of that same image (for click detection on IE), and a mostly transparent shadow image. Figure 7-3 shows the parts of this pre-rendered icon.
Figure 7-3. Google Maps pushpin icon parts: (a) the pushpin image, (b) the shadow, (c) the click target for IE, and (d) the resulting icon
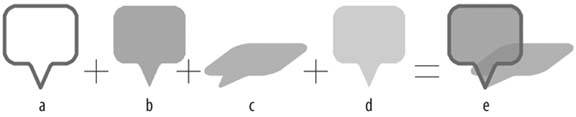
Instead of using pre-rendered images, an XIcon's images are created on the fly by using the existing (but unofficial) service that Google Maps already uses to draw polylines. Using this service, we can actually draw images of any color and opacity. By specifying the outline of the icon shape, the XIcon class can create the necessary images for you (including the shadow image). For example, if we wanted to create a rounded box icon, we could come up with a list of points for the outline, give them to XIcon, and get the set of images shown in Figure 7-4 for the icon.
Figure 7-4. Custom XMaps icon parts: (a) the box outline, (b) the filled box, (c) the shadow, (d) the click target, and (e) the final rounded box icon
Because we are creating an additional image in the set of images used for the icon, we cannot use the existing GMarker class in the Google Maps API, which can only use the images in a GIcon. Instead, we use the XMarker class, which can handle either GIcon or XIcon objects. XMarker gives us an additional ability that GMarker does not provide, namely the ability to place text or other HTML on top of the icon. When we create our icon, we will specify the bounds of any content that might be displayed on top of the icon, and an XMarker will use these bounds to place text or a generic HTML DOM element on top of the icon.
7.4.2. The Code
Suppose, for example, that we wanted to create a web site all about the Bermuda Triangle. What better icon to use for our map than a custom-made triangle pointing at our map! I'll assume you are familiar with the general layout of a Google Maps page. The fragments of code here require that there is an existing GMap object already created and assigned to a JavaScript variable called map.
The first thing we'll have to do is include the XMaps library along with the Google Maps API JavaScript files. Here's the code that should appear at the beginning of our page. Note that you will want to replace the API key with one for your site, and you will want to make sure you are using the most recent version of the XMaps library from http://xmaps.busmonster.com/.
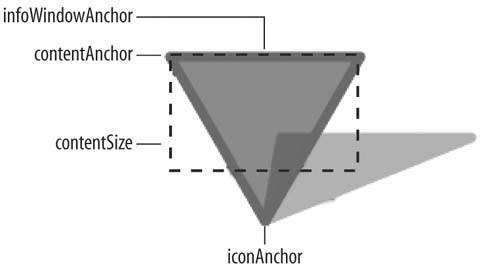
Next, let's define the icon's shape. Here I've specified a triangle approximately 30 pixels to a side.
	var triShape = {
	 iconAnchor: new GPoint(15, 26),
	 infoWindowAnchor: new GPoint(15, 0),
	 shadow: true,
	 contentAnchor: new GPoint(0, 0),
	 contentSize: new GSize(31, 20),
	 points: [0,0, 15,26, 30,0]
	};
As you'll see, we can scale this later, so the initial size does not matter too much. The shape description is contained in a simple associative array, with the following properties:
iconAnchor
This is the pixel of the icon's image, which should be tied to the point on the map. In this case, it is the bottom middle pixel (the triangle's bottom point).
infoWindowAnchor
This is the pixel on the icon's image, which should be tied to the bottom point of the info window.
shadow
This determines if the icon will have a shadow or not (the shadow is created for us automatically).
contentAnchor T
This is the top left pixel on the icon's image that should be used for any HTML content on top of the icon (e.g., text).
contentSize
This is the size, in pixels, of the box in which HTML content is allowed.
points
This is an array of x/y pairs that define the shape of the icon. In this case, we have the corners of an upside-down triangle.
You can see the purpose of some of these properties in Figure 7-5.
Now we are ready to give our shape a name. We do this so that XMaps can cache the URLs that are used to generate these shapes for better performance.
XIcon.shapes['triangle'] = triShape;
Our shape is now registered with the Xmaps API, and we are ready to use it. When we create an XIcon, we have a number of style properties we can specify. Each of these has defaults, so you will not always have to specify all of them, but I will do so here to show you an example of each property:
Figure 7-5. Triangle icon properties
	var triStyle = {
	 scale: 1.5,
	 outlineColor: '#ffffff',
	 outlineWeight: 2,
	 fillColor: '#7f00ff',
	 fillOpacity: 0.5
	};
Once again, the icon's style is defined with a simple associative array. Here's what each property does:
scale
Specifies how big we want our icon. Since I specified 1.5, we will end up with a triangle with approximately 30 * 1.5 = 45 pixels per side.
outlineColor
Specifies the color for the outline of the icon. Here, we are using a white outline.
outlineWeight
Specifies the width, in pixels, of the icon's outline.
fillColor
Specifies the color of the interior of the icon.
fillOpacity
Specifies the opacity of the interior of the icon; must be in the range 0 to 1.
We are ready to create our icon. The call to the constructor looks like this:
var triIcon = new XIcon('triangle', triStyle);
Now we have an icon we can use with any XMarker. Here, we'll plot one:
	var bermudaTriangle = new GPoint(-70.532227, 25.878994);
	var iconText = "?";
	var hoverText = "The Bermuda Triangle";
	var triMarker = new XMarker(bermudaTriangle, triIcon, iconText, hoverText);
	map.addOverlay(triMarker);
The XMarker constructor takes a point and a few optional arguments. We pass the icon we created as well as some text to be displayed on the icon and when the mouse hovers over the icon. The XMaps API allows us to pass the XMarker object directly to map.addOverlay( ), just as if it were an ordinary GMarker.
And we're done! With a minimum of effort, we have a new marker with a custom icon that has its own shadow, is scaled and colored like we want, and has the clickable region specified by the icon outline. To see the results, browse over to http://xmaps.busmonster.com/triangle.html and check it out.
We can follow these same steps to create lots of reusable icons. To give you a head start, XMaps comes with a few handy premade icons, including the rounded box you saw in Figure 7-4. You can play around with the web pages listed below to see more examples of custom icons with XMaps.
7.4.3. See Also
- The XMaps Library at http://xmaps.busmonster.com/ has links to the newest version of the library, full documentation, and many examples.
- The Bermuda Triangle example at http://xmaps.busmonster.com/triangle.html shows a completed version of our code fragments from above.
- The Icon Color Shades example at http://xmaps.busmonster.com/shades.html shows different icons of different colors.
- The Bermuda Triangle entry at http://en.wikipedia.org/wiki/Bermuda_triangle in Wikipedia has plenty of information about how and where to get lost at sea!
Chris Smoak
You Are Here: Introducing Google Maps
- Hacks 19: Introduction
- Hack 1. Get Around http://maps.google.com
- Hack 2. Find Yourself (and Others) on Google Maps
- Hack 3. Navigate the World in Your Web Browser
- Hack 4. Get the Birds-Eye View
- Hack 5. Driven to a Better User Interface
- Hack 6. Share Google Maps
- Hack 7. Inside Google Maps URLs
- Hack 8. Generate Links to Google Maps in a Spreadsheet
- Hack 9. Use del.icio.us to Keep Up with Google Maps
Introducing the Google Maps API
- Hacks 1016: Introduction
- Hack 10. Add a Google Map to Your Web Site
- Hack 11. Where Did the User Click?
- Hack 12. How Far Is That? Go Beyond Driving Directions
- Hack 13. Create a Route with a Click (or Two)
- Hack 14. Create Custom Map Markers
- Hack 15. Map a Slideshow of Your Travels
- Hack 16. How Big Is the World?
Mashing Up Google Maps
- Hacks 1728: Introduction
- Hack 17. Map the News
- Hack 18. Examine Patterns of Criminal Activity
- Hack 19. Map Local Weather Conditions
- Hack 20. Track Official Storm Reporting
- Hack 21. Track the International Space Station
- Hack 22. Witness the Effects of a Nuclear Explosion
- Hack 23. Find a Place to Live
- Hack 24. Search for Events by Location
- Hack 25. Track Your UPS Packages
- Hack 26. Follow Your Packets Across the Internet
- Hack 27. Add Google Maps to Any Web Site
- Hack 28. How Big Is That, Exactly?
On the Road with Google Maps
- Hacks 2941: Introduction
- Hack 29. Find the Best Gasoline Prices
- Hack 30. Stay Out of Traffic Jams
- Hack 31. Navigate Public Transportation
- Hack 32. Locate a Phone Number
- Hack 33. Why Your Cell Phone Doesnt Work There
- Hack 34. Publish Your Own Hiking Trail Maps
- Hack 35. Load Driving Directions into Your GPS
- Hack 36. Get Driving Directions for More Than Two Locations
- Hack 37. View Your GPS Tracklogs in Google Maps
- Hack 38. Map Your Wardriving Expeditions
- Hack 39. Track Your Every Move with Google Earth
- Hack 40. The Ghost in Google Ride Finder
- Hack 41. How Google Maps Got Me Out of a Traffic Ticket
Google Maps in Words and Pictures
- Hacks 4250: Introduction
- Hack 42. Get More out of What You Read
- Hack 43. Dont Believe Everything You Read on a Map
- Hack 44. You Got Your A9 Local in My Google Maps!
- Hack 45. Share Pictures with Your Community
- Hack 46. Browse Photography by Shooting Location
- Hack 47. Geotag Your Own Photos on Flickr
- Hack 48. Tell Your Communitys Story
- Hack 49. Generate Geocoded RSS from Any Google Map
- Hack 50. Geoblog with Google Maps in Thingster
API Tips and Tricks
- Hacks 5161: Introduction
- Hack 51. Make a Fullscreen Map the Right Way
- Hack 52. Put a Map and HTML into Your Info Windows
- Hack 53. Add Flash Applets to Your Google Maps
- Hack 54. Add a Nicer Info Window to Your Map with TLabel
- Hack 55. Put Photographs on Your Google Maps
- Hack 56. Pin Your Own Maps to Google Maps with TPhoto
- Hack 57. Do a Local Zoom with GxMagnifier
- Hack 58. Find the Right Zoom Level
- Hack 59. Show Lots of StuffQuickly
- Hack 60. Make Things Happen When the Map Moves
- Hack 61. Use the Right Developers Key Automatically
Extreme Google Maps Hacks
- Hacks 6270: Introduction
- Hack 62. Find the Latitude and Longitude of a Street Address
- Hack 63. Read and Write Markers from a MySQL Database
- Hack 64. Build Custom Icons on the Fly
- Hack 65. Add More Imagery with a WMS Interface
- Hack 66. Add Your Own Custom Map
- Hack 67. Serve Custom Map Imagery
- Hack 68. Automatically Cut and Name Custom Map Tiles
- Hack 69. Cluster Markers at High Zoom Levels
- Hack 70. Will the Kids Barf? (and Other Cool Ways to Use Google Maps)
EAN: 2147483647
Pages: 131
