| Another option for mixing your sequence is using the four Automation modesRead, Write, Touch, and Latchwhich save live track adjustments as keyframes into the track being adjusted. Every track-based volume adjustment, left or right pan, or effect change, such as increasing the pre-delay of a Reverb, can be seen visually in the form of assigned keyframes in the adjusted track. Instead of using the Pen tool and manipulating keyframe handles, you can use Automation to adjust the knobs, sliders, and interface controls live, while translating those adjustments into track-based keyframes. In this lesson, you will create a track volume adjustment using Read Automation mode, then investigate the other modes. You will also make a panning adjustment using the Pen tool, then create another using automation. Although I can give you plenty of step-by-step instructions for automation, the important part of this next lesson is to understand the basic foundation and expected behavior with automation so you can use it dynamically to explore it further. | | 1. | Open the Automation_Start.prproj file from the APPST2 Lesson Files/Chapter 20 folder.
All of the files for this project are in the primary Chapter 20 folder and its SFX subfolder.
| 2. | Expand the VO track, and turn on the track display for Show Track Volume. In the full Audio Mixer, solo the VO track by clicking the Solo Horn above its Volume fader. Click Play to play back the timeline while you monitor the sound level registering in the master VU meter. Using the Volume slider in the VO track of the Audio Mixer, raise and lower the volume to get the master VU meter registering a peak halfway between 0dB and -6dB. The level that I found to be about right is -1.7dB for the VO track volume; set the Volume fader to -1.7dB. Notice that the VO track is in Read Automation mode.
Get a feel for making live adjustments and knowing where to look to see how much effect your adjustment is making to the sequence's VO track. It's a good idea to monitor the sound work in this section with headphones or good speakers.
As noted in the last chapter, when adjusting track volume in the Audio Mixer the displayed track volume line in the timeline will match the value set in the mixer.
| | | 3. | Collapse the VO track, and click the Lock icon in the track header to lock it. Expand the Music track. Set the Track Display to Show Track Volume. With the Timeline window active and no clips selected, press the Home key to get the Edit Line back to the head of the sequence. Click the Solo Horn for the Music track so that you can hear both the Music and VO only. Set the Automation mode of the Music track to Touch. Position the Volume fader at -oodB, activate the Timeline panel, press the Home key, and then press the spacebar to play. While the timeline plays back, click and drag the Volume fader for the music up and down between -oodB and 0dB. Continue holding the mouse down as you adjust the volume so that you can hear it fading in and out. Once you get near the end of the disclaimer, release the mouse and let playback stop at the end of the sequence.
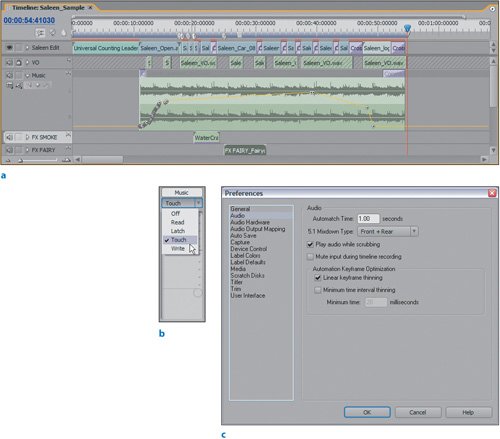
Touch Automation writes keyframes on the parameters that you are adjusting while you play back. Unique to Touch mode is that whenever you click off your mouse and release the parameter you were adjusting, the parameter automatically goes back to its start position. In this case, you started the volume at -oodB, so when you released the mouse during the disclaimer it dropped from the current volume position down to -oodB. This is called Automatch. When you release a knob or fader in Touch mode it automatically shifts back to its start position. You can dictate the amount of time it takes to Automatch in the Edit > Preferences > Audio > Automatch Time field (see Figures 20.7a, b, and c).
Figures 20.7a, b and c. After you play back your timeline and adjust a track in either Write, Touch, or Latch Automation mode, you will have keyframes written into the automated track that reflect the live adjustments you made. Here, the volume keyframes reflect the fading up, leveling off, and fading out at the end (a). Although these keyframes could be assigned manually with the Pen tool, automation assigns them automatically based on the dynamic value you are assigning in the mixer. The Touch mode you select (b) remembers the control values for the track being adjusted. As long as you hold down the mouse while adjusting, it will modify those values. Once you release the mouse, Touch mode automatically resets each value to its original state (Automatch) 
| 4. | Press the Home key, and then click Play to play back the timeline with your new fade adjustment. Watch the Music Volume fader in the Audio Mixer. Once the timeline finishes playing back, press Ctrl+Z to undo the volume adjustments you previously applied.
If you watch the Music track's Volume fader in the Audio Mixer, you will see its position automatically update and move in accordance with the adjustments you defined in the previous step. Notice how your Volume fader now automatically adjusts over the course of playing back, and you can see the moving fader live during playback. In Automation mode, you essentially can create a mixing road map for the mixer to follow automatically.
| | | 5. | Switch the Automation mode to Latch in the Audio Mixer for the Music track. Set the Volume fader to -oodB. Press the Home key to get to the head of your sequence, and click Play in the Audio Mixer. While the timeline plays, adjust the Volume fader so that you fade your music up as the music comes in. After you have faded it up, you can release the mouse. When the Disclaimer comes on, slowly click and drag the Volume fader back down to -oodB.
Latch mode is different from Touch mode in that when you click off the fader, it will latch onto its current position until you click and drag to modify it again. If you don't have a steady hand, but want to fade up your volume, keep it level, then fade it back down, Latch mode is your best bet for manual adjusting.
| 6. | Using either Latch or Touch mode with the Music track, automate the volume level so that the music has a good presence beneath the voiceover. Once you are finished, lock the Music track and then click the Solo Horn for the FX Smoke track, so you can hear all three tracks together.
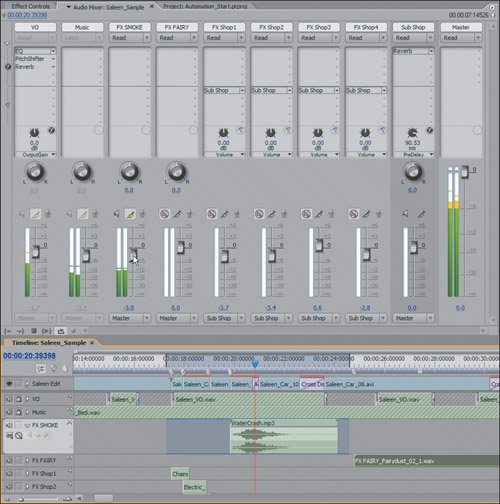
| | | 7. | Position your Edit Line at approximately 17;00000 in the timeline, and press the I key. Move the Edit Line to 24;37000, and press the O key. Leave the FX Smoke track in Read mode. Click Loop in the Audio Mixer, and then click Play. While the In/Out instance plays, adjust the volume level for the FX Smoke track so that the sound effect is present, but not overwhelming (Figure 20.8). The volume I found to be perfect was -3.0dB.
Figure 20.8. This In/Out instance is looping while the audio level is being adjusted. Read mode allows for the setting of a static track level, whereas Latch and Touch mode write keyframes for any adjustment made. If you were in Write mode, every time you looped, Premiere would update the keyframes with the adjusted values. In Latch and Touch, once you release the mouse button and looping reengages, you will not overwrite the previous assigned automation 
This is a perfect example of how well looping supports the tweaking and finding of adjustment levels. Because Read mode just updates the volume on a static level, you can keep sliding the fader up and down to find the sweet spot. Additionally if you pad your In and Out points around the area you want to adjust, you have ample pre-roll and post-roll time to start and end your effect, then listen, and try again if you decide.
Tip As you remember from Chapter 18, "Recording and Editing a Voiceover," you can use the Pen tool to group/marquee select and move groups or sections of keyframes. If you have automated a fade that starts too late, you can use the Pen tool to grab the group of keyframes that make up the fade and drag them left so that they start earlier. | | | 8. | Collapse and lock the FX Smoke track. Click the Solo button for the FX Fairy track. Expand the FX Fairy track in the timeline. Create a new In point at 24;00000 and an Out point at 32;46000. Using the same technique of adjusting the volume in Read mode, find the right volume level for the Fairy effect. I used -5.1 dB. Instead of automating a fade for the end of the clip, add the Audio Transition Constant Power at the tail of the clip to fade it out. I gave the transition a duration of 1 second.
After setting the proper volume for this track, you quickly slapped on a transition to accommodate a quick one second fade out. Now the Fairy FX audio plays and then fades out seamlessly.
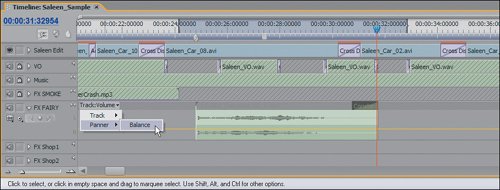
| 9. | In the track header for the FX Fairy track, change the Keyframe Display to Show Track Keyframes. From the Track drop-down menu, select to show the keyframes for Panning > Balance (Figure 20.9). In the Audio Mixer, twist the Panning knob for the FX Fairy track all the way to the right. Using Latch or Touch mode, click Play and slowly pan the knob from its full right position to a full left position while the Fairy Dust effect plays.
Figure 20.9. Depending on the display mode, if there are multiple keyframe parameters to view, you will be able to pick them individually from the selected track's drop-down menu. Using the Pen tool, you can also remove, add, or modify automation keyframes once you are displaying them 
If your mixer is still in Loop mode, you can let the loop reengage to hear your adjustment. If you don't like it, then wait for the loop to reengage again and click and adjust the pan for another pass.
What you have done here is adjusted the panning of the sound so that it "moves" with the image of the car on the screen.
| | | 10. | Collapse and lock the FX Fairy track. Solo each of the FX Shop tracks. Using this lesson's technique, set timeline In and Out points around the Shop Sound effects and adjust their overall volume by sliding the Volume fader in the Sub Shop submix track. If you want their volume level to have a static adjustment, use Read mode. To keyframe or have an automated volume fade, use either Latch or Touch mode.
Because you are stemming the output of each track to the fade and pan controls of the submix Sub Shop track, you don't have to adjust each track's Volume fader individually. In the last lesson, you preset each level within the group, and you now can bring the entire group up or down accordingly for your final mix. I used -11.4dB for the Sub Shop track's Volume fader level.
|
After you make all of these adjustments, clear your timeline In and Out points, turn up your speakers, and listen to what you have mixed. If you want to see my finished result, open the Automation_Finish.prproj file from the APPST Lesson Files/Chapter 20 folder. If you encounter any stuttering playback, be sure to press Enter to render any necessary preview files. Write Mode Automation Write mode is a bit different from Read, Latch, and Touch. In Write mode, every parameter is overwritten during automation, even parameters you are not adjusting. The safe way of using Write mode is to lock any track you don't want adjusted. Even then you will need to mind which parameters are being set. If you do have any existing automation on, for example on the panning properties of a track, and you are adjusting volume in Write mode, the pan automation will be overwritten by the value from the pan knob despite the fact that you are adjusting volume only. Because it can be very destructive to your mix, I don't recommend using Write mode, unless you are familiar with its behavior. The only time to use Write mode is if you want to delete all the automation on a specific track; in that case, lock all the other tracks, set the current track parameters to the exact values you want, and overwrite it in one pass. |
