RRAS Tools and Utilities
| Several tools and utilities are available for Windows Server 2003 Routing and Remote Access Service. The following utilities allow administrators to configure and obtain information for accounting, auditing, and troubleshooting RRAS:
Routing and Remote Access MMC Snap-inThe Routing and Remote Access snap-in, shown in Figure 26.11, is located in the Administrative Tools folder. It is the primary management tool for configuring Windows Server 2003 RRAS. Figure 26.11. Administering RRAS through the Routing and Remote Access snap-in.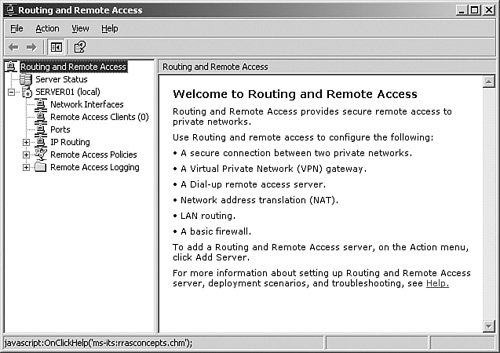 Within the RRAS snap-in is a series of floating windows that display table entries or statistics. After a floating window is displayed, you can move it anywhere on the screen, and it remains on top of the Routing and Remote Access snap-in. Table 26.1 lists the floating windows in the Routing and Remote Access snap-in and includes their location.
The Netsh Command-Line ToolNetsh is a command-line and scripting tool used to configure Windows Server 2003 networking components on local or remote computers. Windows Server 2003 Netsh also enables you to save a configuration script in a text file for archiving or for configuring other servers. Netsh is installed with the Windows Server 2003 operating system. Netsh is a shell that can support multiple Windows Server 2003 components through the addition of Netsh helper DLLs. A Netsh helper DLL extends Netsh functionality by providing additional commands to monitor or configure a specific Windows Server 2003 networking component. Each Netsh helper DLL provides a context or group of commands for a specific networking component. Subcontexts can exist within each context; for example, within the routing context, the subcontexts IP and IPX exist to group IP routing and IPX routing commands together. Netsh command-line options include the following:
You can abbreviate Netsh commands to the shortest unambiguous string. For example, typing the command ro ip sh int is equivalent to typing routing ip show interface. Netsh commands can be either global or context specific. You can issue global commands in any context and use them for general Netsh functions. Context-specific commands vary according to the context. Table 26.2 lists the global commands for Netsh.
Netsh can function in two modes: Online and Offline. In Online mode, commands executed by Netsh are carried out immediately. In Offline mode, commands executed at the Netsh prompt are accumulated and carried out as a batch by using the commit global command. The flush global command discards the batch commands. Netsh commands can also run through a script. You can run the script by using the f option or by executing the exec global command at the Netsh command prompt. The dump command can be used to generate a script that captures the current RRAS configuration. This command generates the current running configuration in terms of Netsh commands. The generated script can be used to configure a new RRAS server or modify the current one. For the Routing and Remote Access Service, Netsh has the following contexts:
Authentication and Accounting LoggingThe Routing and Remote Access Service can log authentication and accounting information for PPP-based connection attempts. This logging is separate from the events found in the system event log and can assist in tracking remote access usage and authentication attempts. Authentication and accounting logging is useful for troubleshooting remote access policy issues; the result of each authentication attempt is recorded, as is the remote access policy that was applied. The authentication and accounting information is stored in a configurable log file or in files stored in the %systemroot%\System32\LogFiles folder. The log files are saved in Internet Authentication Service (IAS) or in database-compatible format, which can allow database programs to read the log file directly for analysis. Logging can be configured for the type of activity you want to log (accounting or authentication activity). The log file settings can be configured from the properties of the Local File object in the Remote Access Logging folder in the Routing and Remote Access snap-in. Event LoggingWindows Server 2003 RRAS also performs extensive error logging in the system event log. You can use information in the event logs to troubleshoot routing or remote access problems. The following four levels of logging are available:
You can set the level of event logging on the General tab of the following property pages:
Note Logging uses system resources; therefore, you should use it sparingly to help identify network problems. After you identify the problem, reset the logging to its default setting (log errors only). TracingRRAS for Windows Server 2003 provides extensive tracing capability that can be used to troubleshoot complex network problems. By enabling file tracing, you can record internal component variables, function calls, and interactions. File tracing can be enabled on various RRAS components to log tracing information to files. Enabling file tracing requires changing settings in the Windows Server 2003 Registry. Caution Do not edit the Registry unless you have no alternative. The Registry Editor bypasses standard safeguards, allowing settings that can damage your system or even require you to reinstall Windows. Each installed routing protocol or component is capable of tracing, and each appears as a subkey, such as OSPF and RIPV2. Similar to the authentication and accounting logging, tracing consumes system resources; therefore, you should use it sparingly to help identify network problems. After the trace is complete or the problem is identified, immediately disable tracing. Do not leave tracing enabled on multiprocessor computers. The tracing information can be complex and detailed. Often, this information is useful only to Microsoft support engineers or network administrators who are experts in using the Windows Server 2003 Routing and Remote Access service. To enable file tracing for each component, do the following:
To set the location of the trace file, right-click the FileDirectory entry, click Modify, and then type the location of the log file as a path. The filename for the log file is the name of the component for which tracing is enabled. By default, log files are placed in the %windir%\Tracing directory. To set the level of file tracing, right-click the FileTracingMask entry, click Modify, and then type a value for the tracing level. The tracing level can be from 0 to 0xFFFF0000. By default, the level of file tracing is set to 0xFFFF0000, which is the maximum level of tracing. To set the maximum size of a log file, right-click the MaxFileSize entry, click Modify, and then type a size for the log file. The default value is 0x00100000, or 64KB. |
EAN: 2147483647
Pages: 499