Using True Spline Curves
So far, you've been working with polylines to generate spline curves. The advantage to using polylines for curves is that they can be enhanced in other ways. You can modify their width, for instance, or join several curves together. But at times you will need a more exact representation of a curve. The spline object, created by choosing Draw Spline, produces a more accurate model of a spline curve, as well as giving you more control over its shape.
The splines are true NURBS curves. NURBS stands for Non-Uniform Rational B-Splines. A full description of NURBS is beyond the scope of this book, but basically, NURBS are a standard mathematical form used to represent shapes .
Drawing a Spline
The following exercise shows you how to create a spline curve:
-
Undo the changes made in the previous two exercises.
-
Turn the Data layer on so you can view the data points.
-
Adjust your view so you can see all the data points with the elevation of 250.00 (see Figure 13.19).
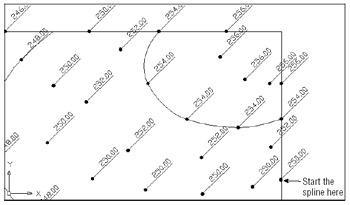
Figure 13.19: Starting the spline curve at the first data point -
Choose Draw Spline or type Spl
 .
. -
At the Specify first point or [Object]: prompt, use the Center Osnap to start the curve on the first data point in the lower-right corner (see Figure 13.19). The prompt changes to Specify next point .
-
Continue to select the 250.00 data points until you reach the last one. Notice that as you pick points, a curve appears, and it bends and flows as you move your cursor.
-
After you've selected the last point, press
 . Notice that the prompt changes to Specify start tangent: . Also, a rubber-banding line appears from the first point of the curve to the cursor. As you move the cursor, the curve adjusts to the direction of the rubber-banding line. Here, you can set the tangency of the first point of the curve (see the first image in Figure 13.20).
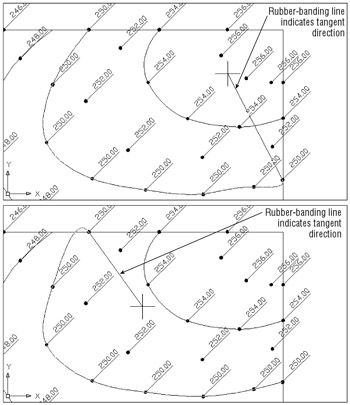
Figure 13.20: The last two prompts of the Spline command let you determine the tangent direction of the spline. -
Press
 . This causes AutoCAD to determine the first point's tangency based on the current shape of the curve. A rubber-banding line appears from the last point of the curve. As with the first point, you can indicate a tangent direction for the last point of the curve (see the second image in Figure 13.20).
 -
Press
 to exit the Spline command without changing the endpoint tangent direction.
You now have a smooth curve that passes through the points you selected. These points are called the control points. If you click the curve, you'll see the grips appear at the location of these control points, and you can adjust the curve simply by clicking the grip points and moving them. (You might need to turn off the Data layer to see the grips clearly.)
| Tip | See Chapter 2 for more detailed information on grip editing. |
You might have noticed two other options ”Fit Tolerance and Close ”as you were selecting points for the spline in the previous exercise. Here is a description of these options:
Fit Tolerance Lets you change the curve so that it doesn't actually pass through the points you pick. When you select this option, you get the prompt Enter Fit Tolerance <0.0000> . Any value greater than 0 causes the curve to pass close to, but not through, the points. A value of 0 causes the curve to pass through the points. (You'll see how this works in a later exercise.)
Close Lets you close the curve into a loop. If you choose this option, you are prompted to indicate a tangent direction for the closing point.
Fine-Tuning Spline Curves
Spline curves are different from other types of objects, and many of the standard editing commands won't work on splines. AutoCAD offers the Modify Object Spline option (Splinedit command) for making changes to splines. The following exercises will give you some practice with this command. You'll start by focusing on Splinedit's Fit Data option, which lets you fine-tune the spline curve.
Controlling the Fit Data of a Spline
The following exercise demonstrates how the Fit Data option lets you control some of the general characteristics of the curve:
-
Choose Modify Object Spline or type Spe
 at the command prompt.
 -
At the Select Spline: prompt, select the spline you drew in the previous exercise.
-
At the prompt
Enter an option [Fit data/Close/Move vertex/Refine/rEverse/Undo]:
type F
 to select the Fit Data option.
 Tip Like the Edit Vertex option of the Pedit command, the Fit Data option offers a subset of options that let you edit certain properties of the spline.
Controlling Tangency at the Beginning Points and Endpoints
Next, let's see how you can adjust the tangency of the first and last points of a spline:
-
At the prompt
[Add/Close/Delete/Move/Purge/Tangents/toLerance/eXit] <eXit>:
type T
 to select the Tangents option. Move the cursor and notice that the curve changes tangency through the first point, just as it did when you first created the spline (see Figure 13.20).
 -
Press
 . You can now edit the other endpoint tangency.
 -
Press
 again. You return to the prompt
 [Add/Close/Delete/Move/Purge/Tangents/toLerance/eXit] <eXit>:
Adding New Control Points
Now add another control point to the spline curve:
-
At the prompt
[Add/Close/Delete/Move/Purge/Tangents/toLerance/eXit] <eXit>:
type A
 to access the Add option.
 -
At the Specify control point <exit>: prompt, click the third grip point from the bottom end of the spline (see the top image in Figure 13.21). A rubber-banding line appears from the point you selected. That point and the next point are highlighted. The two highlighted points tell you that the next point you select will fall between these two points. You also see the Specify new point <exit>: prompt.
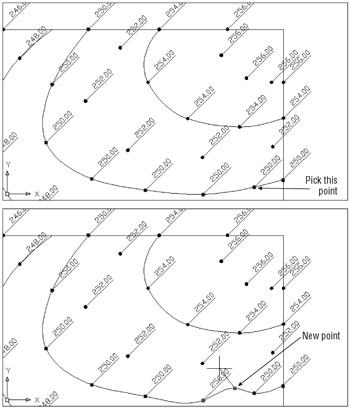
Figure 13.21: Adding a new control point to a spline -
Click a new point. The curve changes to include that point. In addition, the new point becomes the highlighted point, indicating that you can continue to add more points between it and the other highlighted point (see the bottom image in Figure 13.21).
-
Press
 . The Specify control point <exit>: prompt appears, enabling you to select another point if you so desire .
 -
Press
 again to return to the prompt
 [Add/Close/Delete/Move/Purge/Tangents/toLerance/eXit] <eXit>:
Type X
 to exit.
Adjusting the Spline Tolerance Setting
Before ending the description of the Fit Data options, let's look at how Tolerance works:
-
At the prompt
[Add/Close/Delete/Move/Purge/Tangents/toLerance/eXit] <eXit>:
type L
 to select the Tolerance option. This option sets the tolerance between the control point and the curve.
 -
At the Enter fit tolerance <0.0000>: prompt, type 30
 . Notice how the curve no longer passes through the control points, except for the beginning point and endpoints (see Figure 13.22). The fit tolerance value you enter determines the maximum distance away from any control point the spline can be.
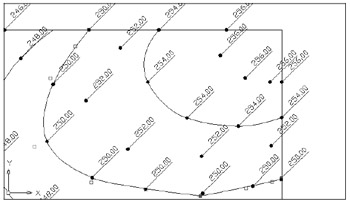
Figure 13.22: The spline after setting the control point tolerance to 30 -
Type X
 to exit the Fit Data option.
You've seen how you can control many of the shape properties of a spline through the Fit Data option. Here are descriptions of the other Fit Data options you didn't try in these exercises:
Delete Removes a control point in the spline.
Close Lets you close the spline into a loop.
Move Lets you move a control point.
Purge Deletes the fit data of the spline, thereby eliminating the Fit Data option for the purged spline.
When Can't You Use Fit Data?
The Fit Data option of the Splinedit command offers many ways to edit a spline; however, this option is not available to all spline curves. When you invoke certain of the other Splinedit options, a spline curve will lose its fit data, thereby disabling the Fit Data option. These operations are as follows :
-
Fitting a spline to a tolerance (Spline/Fit Tolerance) and moving its control vertices
-
Fitting a spline to a tolerance (Spline/Fit Tolerance) and opening or closing it
-
Refining the spline
-
Purging the spline of its fit data by using the Purge option of the Splinedit command (choose Modify Object Spline or enter Splinedit
 , and then select the spline and enter F
  P
P  )
)
Also, note that the Fit Data option is not available when you edit spline curves that have been created from polyline splines. See the "Turning Objects into Polylines and Polylines into Splines" side- bar earlier in this chapter.
Adjusting the Control Points with the Refine Option
While you are still in the Splinedit command, let's look at another of its options, Refine, which you can use to fine-tune the curve:
-
Type U
 to undo the changes you made in the previous exercise.
 -
At the prompt
[Fit data/Close/Move vertex/Refine/rEverse/Undo]:
type R
 . The Refine option lets you control the "pull" exerted on a spline by an individual control point. This isn't quite the same effect as the Fit Tolerance option you used in the previous exercise.
 -
At the prompt
Enter a refine option [Add control point/Elevate order/Weight/eXit] <eXit>:
type W
 . The first control point is highlighted.
 -
At the next prompt
Enter new weight (current = 1.000) or [Next/Previous/Select Point/eXit] <N>:
press
 three times to move the highlight to the fourth control point.
 -
Type 25
 . The curve not only moves closer to the control point, it also bends around the control point in a tighter arc (see Figure 13.23).
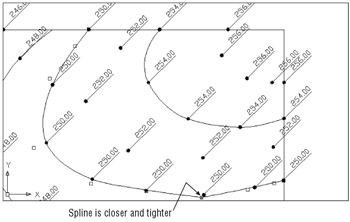
Figure 13.23: The spline after increasing the Weight value of a control point
You can use the Weight value of Splinedit's Refine option to pull the spine in tighter. Think of it as a way to increase the "gravity" of the control point, causing the curve to be pulled closer and tighter to the control point.
Continue your look at the Splinedit command by adding more control points ”without actually changing the shape of the curve. You do this using Refine's Add Control Point and Elevate Order options:
-
Type 1
 to return the spline to its former shape.
 -
Type X
 to exit the Weight option; then type A
  to select the Add Control Point option.
 -
At the Specify a point on the spline <exit>: prompt, click the second-to-last control point toward the top end of the spline (see the top image in Figure 13.24). The point you select disappears and is replaced by two control points roughly equidistant from the one you selected (see the bottom image in Figure 13.24). The curve remains unchanged. Two new control points now replace the one control point you selected.
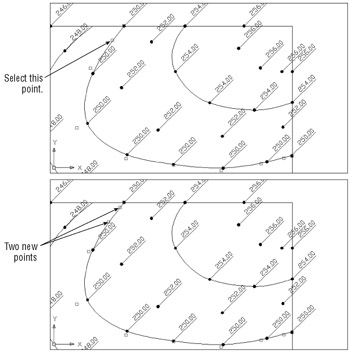
Figure 13.24: Adding a single control point by using the Refine option -
Press
 to exit the Add Control Point option.
 -
Now type E
 to select the Elevate Order option.
 -
At the Enter new order <4>: prompt, type 6
 . The number of control points increases , leaving the curve itself untouched.
 -
Type X
 twice to exit the Refine option and then the Splinedit command.
You will probably never edit the contour lines of a topographical map in quite the way these exercises have shown. But by following this tutorial, you have explored all the potential of AutoCAD's spline object. Aside from its usefulness for drawing contours , it can be a great tool for drawing free- form illustrations. It is also an excellent tool for mechanical applications, in which precise, nonuniform curves are required, such as drawings of cams or sheet metal work.
EAN: 2147483647
Pages: 261