| In addition to using shortcuts and menu options, you can also make changes to video transitions in the Transition Editor, which appears as a tab over the Viewer window. Most of the time, you will make changes to your cross dissolves using the methods covered earlier in this lesson. But if you apply more complex transitions to your edit points, as you will in the next exercise, the Transition Editor is the only place to make changes to those parameters. 1. | In the current Intro Cuts sequence, Ctrl-click one side of the cross-dissolve icon between the city street and ruin steps clips, and choose Open 'Cross Dissolve' from the shortcut menu. You can also double-click one side of the icon.
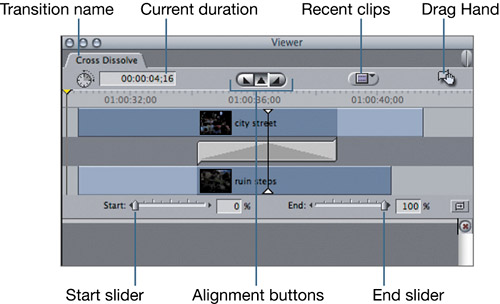 The Transition Editor opens in the Viewer with a graphic representation of the current transition. You have already adjusted or selected some of the options that appear here, such as duration and alignment, but the Transition Editor offers a few more options. The Transition Editor opens in the Viewer with a graphic representation of the current transition. You have already adjusted or selected some of the options that appear here, such as duration and alignment, but the Transition Editor offers a few more options.
| 2. | To use the current cross dissolve on another edit point, drag the Drag Hand icon in the upper-right corner of the window to the edit point between the canyon runner and amanda rushing clips.
Dragging the transition from the Transition Editor to this edit point replaces whatever transition was there previously with all the current transition parameters displayed in the Transition Editor.
| 3. | In the Transition Editor, click the End On Edit alignment button (on the right) and then the Center On Edit alignment button (in the center).

The graphic representation of the dissolve in the Transition Editor changes, as does the transition on the edit point in the Timeline.
NOTE Clicking the Start On Edit alignment button opens a dialog indicating there isn't enough material to align the current transition in that way. Click Cancel. | 4. | In the Transition Editor, move the pointer over the transition icon.

The pointer turns into the Roll tool, allowing you to adjust or roll the edit point left or right to improve the timing of the edit without changing the transition. Notice the light blue area on the outer edge of each clip. This represents the clip's handles.
| 5. | Drag the transition icon left about two seconds, where the camera is static in the right frame of the Canvas two-up display. Release the mouse, and play the transition.
In the Timeline, the edit point and transition appear earlier in the sequence.
| 6. | Beneath the transition graphic in the Transition Editor, enter 50 in the Start field, and press Tab. In the End field, enter 50, and press Tab again. Drag the playhead through the transition in the Timeline.
Most transitions create a mix between clips from 0% to 100%. With the Start and End each at 50%, the mix between the clips is not transitional, but fixed, creating a static blend of the two images at the edit point.
| 7. | From the Effects tab in the Browser, drag the Dip To Color Dissolve onto the current edit point, between the city street and ruin steps clip. Play the transition.

In the Timeline, the new transition replaces the previous one but maintains the previous transition's duration. The outgoing clip dips to black as it transitions to the incoming clip.
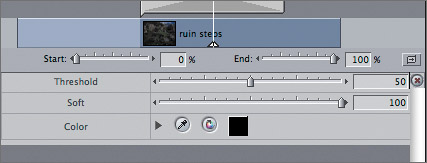
In the Transition Editor, since this effect involves color, additional color parameters appear with sliders and entry fields you can change.

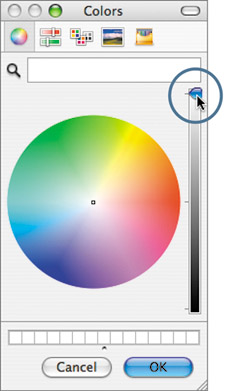
| 8. | Click the black color tile on the Color parameter line. In the Colors window, if a color wheel appears, and it's black, drag the control on the vertical slider all the way up to see the brightest colors.

At the top of the Colors window are icons representing five color-picking layouts: Color Wheel, Color Sliders, Color Palettes, Image Palettes, and Crayons.
| 9. | Click each icon to see how that option displays color choices. Then click the Crayons option. Click the lower-right crayon named Snow, and click OK.
The color tile changes to reflect your most recent selection.
| 10. | Play the transition with the color change. To shorten this transition, click in the Transition Editor Duration field, enter 20, and press Return. Play the transition again.

A shortened version of the Dip To Color Dissolve is often used between still images along with a camera-clicking sound effect. Anytime you create a transition effect you particularly like and may want to use again, you can save it as a favorite.
| 11. | Before you save this transition, make sure you can see the Favorites bin in the Effects tab in the Browser. Click the disclosure triangle next to the Favorites bin to display its contents.
Unless you have added your own favorite effects to this bin, it will be empty.
| 12. | Click the Viewer window, and choose Effects > Make Favorite, or press Option-F.
NOTE You can also drag the Drag Hand icon to the Favorites bin and release the mouse when the bin becomes highlighted. 
In the Favorites folder, a new Dip To Color Dissolve with all of your changes appears. Notice in the Length column that the duration is 20 frames, not the default 1:00.
| 13. | Click in the name field for this transition, and rename it dip to white.
|
TIP Although all transitions have a default 1-second duration, you can change the default duration for any transition by clicking in the Length column in the Effects tab and entering a new duration.
|
 The Transition Editor opens in the Viewer with a graphic representation of the current transition. You have already adjusted or selected some of the options that appear here, such as duration and alignment, but the Transition Editor offers a few more options.


