WORKING WITH THE SELECTION TOOLS
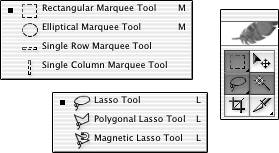
| Photoshop has a collection of tools used to make selections. As shown in Figure 7.3, there are eight primary selection tools: four Marquee selection tools, three Lasso tools, and the Magic Wand. Figure 7.3. Click and hold on an icon to show the tools on the fly-out palettes. Hold down the Shift key and use the keyboard shortcut shown in the fly-out to rotate among the related tools.
When creating a selection, remember that the Shift key can be used with selection tools to add to an existing selection. Likewise, the Option (on the Mac) or the Alt key (in Windows) can be used with a selection tool to subtract from an existing selection. When both modifier keys are used with a selection tool, anything outside the new selection border is deselected, and anything inside remains selected (see Figure 7.4). Figure 7.4. The Shift and Option (Mac users) or Alt (Windows users) keys are pressed down; therefore, when the mouse button is released, nothing outside the loop being dragged is selected. Within the loop, only what is already selected stays selected.
Using the Marquee Tools
Remember that you can convert any selection to a path by using the Make Work Path button at the bottom of the Paths palette. Likewise, you can convert any selection to an alpha channel by using the Select, Save Selection command. Photoshop offers two major and two minor marquee selection tools. The Rectangular Marquee and Elliptical Marquee tools have several options and a great deal of flexibility. The Single Row Marquee and Single Column Marquee selection tools are one-trick ponies, with a specific job to do and few options. Using the Rectangular and Elliptical Marquee Selection ToolsThe Rectangular Marquee tool is used to make rectangular and square selections. Its round counterpart, the Elliptical Marquee tool, creates oval and circular selections. To select squares and circles, respectively, hold down the Shift key while dragging. This constrains the selection to a 1:1 aspect ratio, forcing an identical width and height. You can also hold down the Option key (Mac users) or the Alt key (Windows users) to drag the selection from the center with either tool. The Options bar enables you to use the tools in several modes (see Figure 7.5). Figure 7.5. The pop-up menu is part of the Options bar when the Rectangular or Elliptical Marquee tool is active.
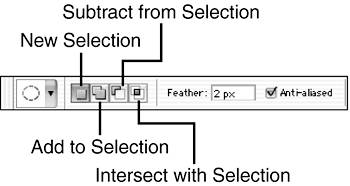
You can reposition a selection border while creating it. Continue to hold down the mouse button when using a Marquee tool and press the spacebar. You can now move the selection in the image. Release the spacebar and continue dragging. Release the mouse button to finish the selection. In Normal mode, the tool can be dragged as you want, creating a selection of whatever proportions you desire. The Fixed Aspect Ratio option gives you the opportunity to establish a width-to-height ratio in the numeric fields to the right. A ratio of 1:1 creates a square (Rectangular Marquee) or a circle (Elliptical Marquee). You can specify any ratio, constraining the shape of the selection. When you use the Fixed Aspect Ratio option, no matter what size the marquee, the proportions remain the same. The button between the Width and Height fields swaps their values, offering a quick way to switch between landscape and portrait orientations. The Fixed Size option not only restricts the selection to a set aspect ratio but also determines the selection's actual dimensions. Set the desired size in the Options bar and then click once with the selection tool. The selection is made to the lower right of the clicked point. The Options bar assumes the unit of measure specified in the Preferences dialog box. You can use another unit of measure by including the appropriate abbreviation in the fields of the Options bar. The button between Width and Height is also available in Fixed Size mode to swap the values in the two fields. The Options bar also offers several other variables for the marquee selection tools. Normally, the tools are used to create a selection. If a selection already exists in the image, the tool can be set to add to, subtract from, or intersect with that selection (see Figure 7.6). Figure 7.6. Feathering and the tool behavior options are the same for both the Rectangular Marquee tool and the Elliptical Marquee tool. With no active selection, the tools create a new selection with any of the four behaviors selected.
The Feather field enables you to specify how "soft" to make the edges of the selection. (Remember that feathering lessens the effect of whatever you do on the edges of a selection, whether it's adding a fill, deleting, or applying a filter or an adjustment.) Feathering can be as high as 250 pixels and is always measured in pixels, regardless of the document's unit of measure. Keep in mind that feathering actually affects several times as many pixels as the number specified. To ensure that the effect appears seamless, a feather of 2 pixels actually affects a band that is approximately 10 pixels wide along the selection border.
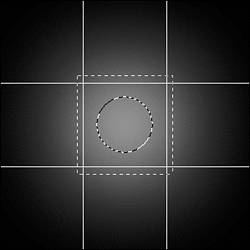
The Fixed Aspect Ratio option is invaluable in preparing images for Picture Package and other photograph printing. Dragging with a 5:7 or 4:6 aspect ratio ensures that the image can be properly cropped with the menu command Image, Crop. In Figure 7.7, a square selection border is visible, measuring slightly more than 100 by 100 pixels. With feathering set to 50 pixels, the actual selection border when the mouse button is released is shown by the circular selection within. (Remember that the marching ants are drawn around pixels at least 50% selected.) When the heavily feathered selection is filled with white on a black background, the impact extends far beyond the selection border, as you can see. Figure 7.7. The square selection border indicates where the Rectangular Marquee tool (set to Feather: 50 pixels) was dragged. The circular selection edges indicate pixels at least 50% selected. Filling with white affects pixels almost to the corners of the 300- by 300-pixel black square.
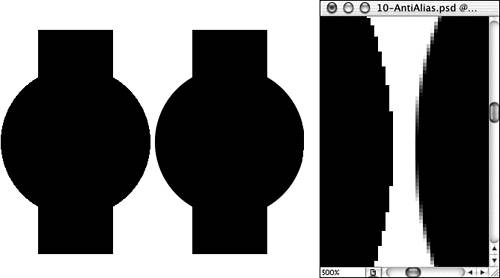
Anti-aliasing softens the edges of curves. It is not available for the Rectangular Marquee, the Single Row Marquee, and the Single Column Marquee selection tools because these tools make selections with straight edges. When an anti-aliased selection is filled with color or deleted, the appearance of the edges is softened by using pixels that are intermediate in color between the selected area and the background. For example, filling an anti-aliased selection with black on a white background results in gray pixels to soften the curves (see Figure 7.8). Figure 7.8. On the left, the selection was not anti-aliased. The selection on the right was. Both were filled with black. The inset shows a close-up comparison of the edges.
The stair-step appearance of curves without anti-aliasing is often referred to as the jaggies. Notice, too, that the straight edges of the filled selections form perfect horizontal and vertical lines with and without anti-aliasing. Selecting Single Rows and ColumnsPhotoshop offers two additional marquee selection tools: the Single Row Marquee and the Single Column Marquee. As their names indicate, they select a row or column of pixels exactly 1 pixel high or wide. The row or column extends from edge to edge of the image and is made at the point where you click the mouse. These tools, set to Feather: 0, are excellent for creating grid lines 1 pixel thick. Click to place the first line and then fill with the foreground color. With the tool still selected and the selection still active, you can use the arrow keys (with or without the Shift key) to reposition the selection for the second line. Each line will be perfectly horizontal or vertical and exactly 1 pixel in width or height. Although designed to work with 1-pixel selections, the Single Row and Single Column tools offer the option of feathering. Any feathering with these tools generates a warning that no pixels are more than 50% selected. Making Irregularly Shaped SelectionsThe marquee selection tools are fine for making regularly shaped selections. However, they lack the kind of flexibility needed for many selection jobs. Photoshop's Lasso tools are designed to help you make irregular selections, with and without assistance. The Lasso ToolThe Lasso tool itself is a freeform tool. Drag it in any shape or direction. When you release the mouse button, the selection is established. You need not move the mouse back to the point from which you started; the Lasso finishes a selection with a straight line from the point where you release the mouse button to the point where you started to drag. Like the Marquee selection tools, the three Lasso tools offer buttons in the Options bar to make new selections or to have the tools add to, subtract from, or intersect with an existing selection. Anti-aliasing and feathering are also options for the Lasso tools.
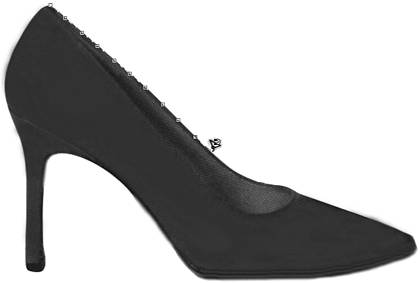
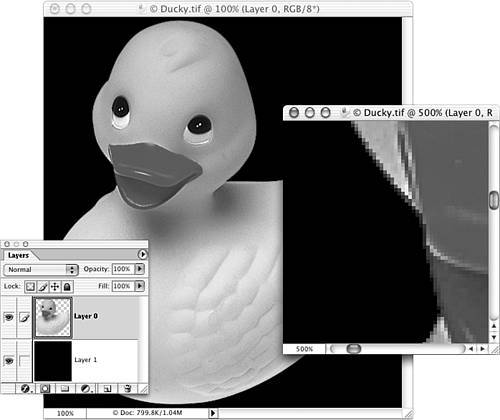
Use the Option key (Mac users) or the Alt key (Windows users) to switch between the Lasso tool and the Polygonal Lasso tool on the fly. While dragging the Lasso, hold down the modifier key and click-move-click to place straight selection edges. When working with the Polygonal Lasso tool, hold down the key and drag to make freeform selections. The Polygonal Lasso ToolThe Polygonal Lasso tool is not a freeform tool. Rather than drag the tool, you click, move, click, move, click to establish a selection with straight sides. Although the edges of the selection are straight, they can be at any angle, not just horizontal and vertical. Using the anti-aliasing option can help prevent jaggies along angled edges. To complete a selection with the Polygonal Lasso tool, position the tool over the start point and click. When the cursor is directly over the start point, a small circle appears to the lower right of the tool's icon. Alternatively, double-click or press the Return or Enter key to complete the selection with a straight segment from the cursor's location to the selection start point. Use The Magnetic Lasso ToolThe third Lasso tool is a bit more complex. The Magnetic Lasso tool attempts to follow existing edges in an image to make a selection. Using contrast to identify edges, the Magnetic Lasso is best suited for use on images that have uncomplicated backgrounds (see Figure 7.9). Figure 7.9. This image is a perfect candidate for the Magnetic Lasso tool because of the strong contrast between the foreground and background.
While working, the Magnetic Lasso tool places a series of temporary anchor points as it follows the path you trace. (Note that the tool does not create a path; the anchor points disappear when the selection is completed.) Double-clicking, clicking the start point, and pressing the Return or Enter key all close the selection. As you move the mouse (or drag it), you can click the mouse button to place anchor points manually at spots where the edge you're tracing takes a sharp turn. If the tool places an anchor point in an incorrect location, press the Delete key (on the Mac) or the Backspace key (in Windows) to remove it. You can also back up along the edge to retrace a segment. In addition to the options common to all three lasso tools, the Magnetic Lasso tool has four options of its own (see Figure 7.10). Figure 7.10. The first three of these four options are unique to the Magnetic Lasso tool.
Width determines the Magnetic Lasso's search area. It is always measured in pixels and can range from 1 to 256. It follows the line of pixels with the highest contrast within this radius. If the image has few edges, a high Width setting enables you to move quickly and requires less precision. If there are multiple areas of contrast closely placed in the image, a lower width is required, forcing you to keep the cursor precisely along the desired edge. When Photoshop's Preferences are set to Precise for Other Cursors, the width is displayed as a circle around the tool's crosshair. If you see the tool's icon as the cursor, you need not change the Preferences. Before you start working with the tool, press the Caps Lock key to show the width cursor.
Using the Option key (on the Mac) or the Alt key (in Windows) with the Magnetic Lasso tool gives you access to both the Lasso and the Polygonal Lasso tools. With the key pressed, drag for a freeform selection or click-move-click to create straight selection edges. Edge Contrast can be considered the sensitivity setting for the Magnetic Lasso tool. It ranges from 1% to 100%. Lower values reduce the amount of contrast required to define an edge. However, that can also lead to the selection border being placed along false edgesareas where a texture or shadow/highlight create contrast. Likewise, too high a setting might lead to the tool not finding any edge at all and a very confused selection border.
You can change the Width setting for the Magnetic Lasso on the fly. Think of it as a brush size. The left and right bracket keys increase and decrease the width by 1 pixel. Add the Shift key to jump to the maximum (256 pixels) and minimum (1 pixel) widths. Frequency determines the automatic placement of anchor points as you drag. Ranging from 0% to 100%, the higher numbers produce more anchor points. Remember that you can manually add anchor points by clicking. The Pen Pressure check box is used with pressure-sensitive tablets, such as those from Wacom. Increased pressure on the tablet constricts the tool's width, and lighter pressure results in a higher Width setting. The width varies from twice the value in the Options Bar (very light pressure) to 1 (very hard pressure). Using the Magic Wand ToolDesigned to select similar colors throughout an image, the Magic Wand enables you to specify a tolerance (the range of sensitivity) and click on a sample. Pixels similar in color to that on which you clicked will be selected. Depending on choices in the Options bar, you can restrict the Magic Wand to the active layer or use all visible layers. (Although the check box is labeled Use All Layers, hidden layers are excluded.) The Magic Wand can also create a selection of all similar pixels throughout the image or only those similar pixels contiguous to the pixel you click.
Because the Magic Wand selects in a range that extends to both the high and low, you should click a pixel that's in the midtones of the color you want to select. When Contiguous is selected in the Options bar, clicking selects only pixels that adjoin pixels of the selected color. If pixels of another color are between the clicked pixel and similarly colored pixels, those pixels are not selected (see Figure 7.11). Figure 7.11. To the left, the Magic Wand was set to Contiguous-onlysimilarly colored pixels adjacent to the clicked pixel are selected. On the right, Contiguous was not selectedall similarly colored pixels throughout the image were selected.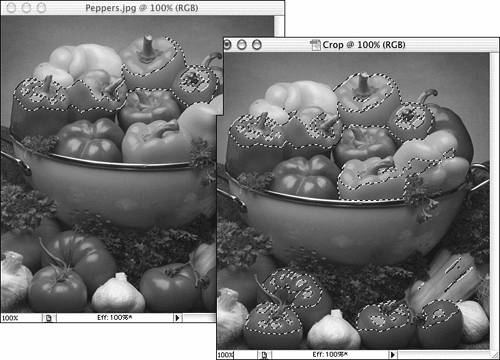 You can Shift-click with the Magic Wand to add to a selection and Option-click (on the Mac) or Alt-click (in Windows) to subtract from a selection. The Options bar also enables you to set the tool to add to or subtract from a selection. The tolerance can be changed between clicks as well. Removing a White Background
When you select a uniformly colored background for deletion or want to extract an image, it's usually a good idea to use the Select, Modify, Expand command with a setting of 1 or 2 pixels. This helps eliminate any fringe or halo from anti-aliasing. There are a number of ways to extract a subject from a plain white background. One of the simplest uses the Magic Wand:
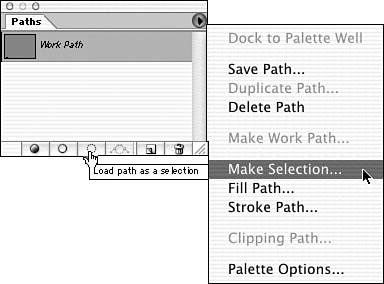
Making Selections from PathsPaths can be used to create extremely precise selections. Any path, including work paths and those created with Photoshop's shape tools, can be used to create selections. With the path selected in the Paths palette, either click the Load Path as a Selection button at the bottom of the palette or use the Paths palette menu command Make Selection (see Figure 7.13). Figure 7.13. Simply clicking the button makes an active selection from the path; the menu command opens a dialog box.
You can also When you choose the Make Selection command, you're presented with the Make Selection dialog box. If a selection is already active in the image, you can add to, subtract from, intersect with, or replace the selection (see Figure 7.14). You also can specify feathering and choose or forgo anti-aliasing. Figure 7.14. The Make Selection dialog box can also be opened by Option-clicking (Mac users) or Alt-clicking (Windows users) the Load Path as a Selection button at the bottom of the Paths palette.
|


EAN: 2147483647
Pages: 426