Word Macros
| This section takes you through a few useful macros that you can use when working with Word documents. Saving FrequentlyWord enables you to save AutoRecovery info at specified intervals (select Tools, Options, Save and set the number of minutes using the Save AutoRecovery Info Every spin box). However, the shortest interval is one minute, and fast writers could still lose work. If you want a way to automatically save your work at a faster interval, use Word's handy OnTime method, which enables you to run a procedure at a specified time. Here's the syntax: Application.OnTime(When, Name [, Tolerance])
The easiest way to enter a time serial number for When is to use the TimeValue function: TimeValue(Time)
For example, the following code runs a procedure called MakeBackup at 5:00 p.m.: Application.OnTime _ When:=TimeValue("5:00PM"), _ Name:="MakeBackup" If you want the OnTime method to run after a specified time interval (for example, an hour from now), use Now + TimeValue (Time) for When (where Time is the interval you want to use). For example, if you want to save your work every 10 seconds, use the OnTime method as shown in Listing 12.1.
Listing 12.1. A Macro That Saves the Active Document Every 10 Seconds Public Sub FileSave() ActiveDocument.Save DoEvents Application.OnTime _ When:=Now + TimeValue("00:00:10"), _ name:="FileSave" Application.StatusBar = "Saved: " & ActiveDocument.name End Sub The FileSave procedure saves the current document by running the Save method on the ActiveDocument object. The DoEvents method processes any keystrokes that occurred during the save, and then the OnTime method sets up the FileSave procedure to run again in 10 seconds. To remind you that the procedure is on the job, the procedure closes by displaying a message in the status bar.
Making Backups as You WorkWe've all learned from hard experience not only to save our work regularly, but also to make periodic backup copies. The macro I use most often in Word is one that does both in a single procedure! That is, the macro not only saves your work, but it also makes a backup copy on another drive, such as a removable disk, a second hard drive, or a network folder. Listing 12.2 shows the code. Listing 12.2. A Procedure That Creates a Backup Copy of the Active Document on Another DriveSub MakeBackup() Dim currFile As String Dim backupFile As String Const BACKUP_FOLDER = "A:\" With ActiveDocument ' ' Don't bother if the document is unchanged or new ' If .Saved Or .Path = "" Then Exit Sub ' ' Mark current position in document ' .Bookmarks.Add Name:="LastPosition" ' ' Turn off screen updating ' Application.ScreenUpdating = False ' ' Save the file ' .Save ' ' Store the current file path, construct the path for the ' backup file, and then save it to the backup drive ' currFile = .FullName backupFile = BACKUP_FOLDER + .Name .SaveAs FileName:=backupFile End With ' ' Close the backup copy (which is now active) ' ActiveDocument.Close ' ' Reopen the current file ' Documents.Open FileName:=currFile ' ' Return to pre-backup position ' Selection.GoTo What:=wdGoToBookmark, Name:="LastPosition" End Sub The backupFile and currFile variables are strings that store the full pathnames for the active document and the backup version of the document. Use the BACKUP_FOLDER constant to specify the folder in which you want the backup stored. The procedures first check to see if the backup operation is necessary. In other words, if the document has no unsaved changes (the Saved property returns TRue) or if it's a new, unsaved document (the Path property returns ""), bail out of the procedure (by running Exit Sub). Otherwise, a new Bookmark object is created to save the current position in the document, screen updating is turned off, and the file is saved. We're now ready to perform the backup. First, the currFile variable is used to stored the full pathname of the document, and the pathname of the backup file is built with the following statement: backupFile = BACKUP_FOLDER + .Name This will be used to save the file to the specified folder. The actual backup takes place via the SaveAs method, which saves the document to the path given by backupFile. From there, the procedure closes the backup file, reopens the original file, and uses the GoTo method to return to the original position within the document.
Opening the Most Recently Used Document at StartupWord's RecentFiles object represents the collection of most-recently used files displayed near the bottom of Word's File menu. Each item on this list is a RecentFile object. You specify a RecentFile object by using RecentFiles (Index), where Index is an integer that specifies the file you want to work with. The most-recently used file is 1, the second most-recently used file is 2, and so on. It would be handy to have Word open the most-recently used file each time you start the program. If you want Word to run some code each time it's started, open the Normal project in the VBA Editor's Project Explorer and then create a new module name AutoExec. In this module, create a Sub procedure named Main and enter your code in that procedure. Listing 12.3 shows such a procedure: Listing 12.3. A Procedure That Opens the Most-Recently Used DocumentSub Main() With RecentFiles(1) Documents.Open .Path & "\" & .Name End With End Sub Creating and Opening a Word WorkspaceIn Excel, you can define a workspace of files. When you then open that workspace, Excel opens all the files at once. If you often work with two or more files as a group, you can use VBA to create your own workspace functionality. Listing 12.4 shows two procedures that act as a workspace function for Word:
Listing 12.4. Procedures That Create and Open a Workspace of Files ' CreateWorkspace() ' Saves the path and filename data of all the ' open files to the Windows Registry. Before ' running this procedure, make sure only the ' files you want in the workspace are open. ' Sub CreateWorkspace() Dim total As Integer Dim doc As Document Dim i As Integer ' ' Delete the old workspace Registry settings ' First, get the total number of files ' total = GetSetting("Word", "Workspace", "TotalFiles", 0) For i = 1 To total ' ' Delete each Registry setting ' DeleteSetting "Word", "Workspace", "Document" & i Next 'i ' ' Create the new workspace ' i = 0 For Each doc In Documents ' ' Make sure it's not a new, unsaved file ' If doc.Path <> "" then ' ' Use i to create unique Registry setting names ' i = i + 1 ' ' Save the FullName (path and filename) to the Registry ' SaveSetting "Word", "Workspace", "Document" & i, doc.FullName End If Next 'doc ' ' Save the total number of files to the Registry ' SaveSetting "Word", "Workspace", "TotalFiles", i End Sub ' ' OpenWorkspace() ' Accesses the Registry's workspace settings ' and then opens each workspace file. ' Sub OpenWorkspace() Dim total As Integer Dim i As Integer Dim filePath As String Dim doc As Document Dim fileAlreadyOpen As Boolean ' ' Get the total number of files from the Registry ' total = GetSetting("Word", "Workspace", "TotalFiles", 0) For i = 1 To total ' ' Get the path and filename ' filePath = GetSetting("Word", "Workspace", "Document" & i) ' ' Make sure the file isn't already open ' fileAlreadyOpen = False For Each doc In Documents If filePath = doc.FullName Then fileAlreadyOpen = True Exit For End If Next 'doc ' ' Open it ' If Not fileAlreadyOpen Then Documents.Open filePath End If Next 'i End Sub
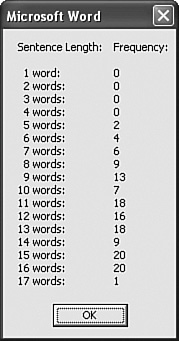
Displaying Sentence Word CountsWhen you grammar check a document, you can elect to display the document's readability statistics. (Select Tools, Options, Spelling & Grammar, and activate the Show Readability Statistics check box.) Among other values, the Readability Statistics dialog box offers the average number of words per sentence. This is useful because you don't want your average sentence to be too long or too short. However, writing gurus also stress that you should have a variety of sentence lengths in your prose, with some shorter and longer sentences thrown in for reading variety. Unfortunately, the Readability Statistics dialog box doesn't tell you the lengths of your sentences, but it's easy enough to get a VBA macro to do it for you, as shown in Listing 12.5. Listing 12.5. A Macro That Displays the Lengths of Sentences in the Active DocumentSub DisplaySentenceLengths() Dim s As Range Dim maxWords As Integer Dim i As Integer Dim sentenceLengths() As Integer Dim str As String With ActiveDocument ' ' Run through all the sentences to find the longest ' maxWords = 0 For Each s In .Sentences If s.Words.Count > maxWords Then maxWords = s.Words.Count End If Next 's ' ' Redimension the array of sentence lengths ' ReDim sentenceLengths(maxWords) ' ' Run through the sentences again to count ' the number of sentences for each length ' For Each s In .Sentences sentenceLengths(s.Words.Count - 1) = sentenceLengths(s.Words Using the ActiveDocument object, the macro makes a first pass through all the sentences to find the one with the most words. The macro then uses this maximum word count to redimension the sentenceLengths array, which is used to hold the number of occurrences of each sentence length within the document. To calculate these frequencies, the macro then runs through all the sentences again and increments the array values for each length. The macro finishes by constructing and then displaying a string that holds the sentence lengths and frequencies. Figure 12.1 shows an example. Figure 12.1. The DisplaySentenceLengths macro displays a message box such as this to show you the document's sentence lengths and the frequency with which each length occurs.
Finding the Longest SentenceOne of the hallmarks of good business writing is that it's succinct and to the point: no digressions, minimal adjectives and adverbs, and no run-on sentences. If you use the code in Listing 12.5 to study the sentence lengths of your document, you may find one sentence that's quite a bit longer than the others. For example, all your sentences might be fewer than 25 words, but there may be one that's 50 words. That one sentence is obviously far too long, and the problem may be mistaken punctuation (such as a comma instead of a period) or a too-long sentence that needs to be broken up into two or three smaller sentences. Either way, you need to find the problem sentence, and the code in Listing 12.6 does just that. Listing 12.6. Finding the Longest Sentence in a DocumentSub FindLongestSentence() Dim s As Range Dim maxWords As Integer Dim longestSentence As String With ActiveDocument ' ' Run through all the sentences to find the longest ' maxWords = 0 For Each s In .Sentences If s.Words.Count > maxWords Then maxWords = s.Words.Count longestSentence = s.Text End If Next 's ' ' Move to the top of the document ' Selection.HomeKey Unit:=wdStory ' ' Set up the Find object ' With Selection.Find ' ' Clear Find object formatting ' .ClearFormatting ' ' Check the length of the sentence ' If Len(longestSentence) <= 256 Then ' ' The length of the sentence is okay, ' so go ahead and find the text. ' .Text = longestSentence .Execute Else ' The sentence is too long for the Text ' property, so find just the first 256 characters ' .Text = Left(longestSentence, 256) .Execute ' ' Extend the selection to the entire sentence ' Selection.MoveEnd Unit:=wdSentence End If End With ' ' Display a message ' MsgBox "The selected sentence is the longest in the document " & _ "at " & maxWords & " words." End With End Sub As in Listing 12.5, the FindLongestSentence macro runs through the active document's sentences to find the longest one. In this case, however, the macro stores not only the length of the longest sentence, but its text, as well. The macro then uses this text to locate the sentence using the Find object. Note, however, that the Find object's Text property can accept only up to 256 characters. Because a long sentence can easily have more characters than that, the macro checks the length of the sentence: if it's too long, the Find object is set up to look for only the first 256 characters in the sentence. Toggling Hidden Codes and Text
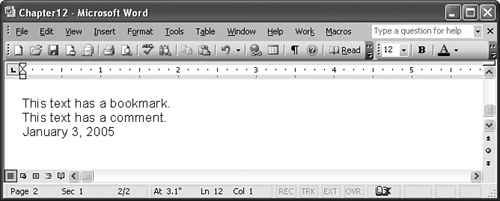
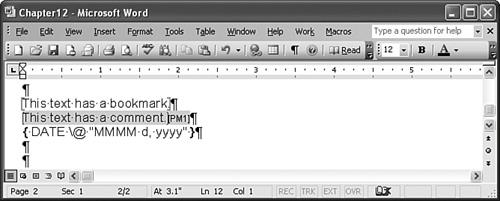
Listing 12.7. Toggling Hidden Codes and TextPublic Sub ShowAll() Dim currentState As Boolean With ActiveWindow.View currentState = .ShowBookmarks .ShowBookmarks = Not currentState .ShowComments = Not currentState .ShowFieldCodes = Not currentState .ShowHiddenText = Not currentState .ShowHyphens = Not currentState .ShowOptionalBreaks = Not currentState .ShowParagraphs = Not currentState .ShowRevisionsAndComments = Not currentState .ShowSpaces = Not currentState .ShowTabs = Not currentState .Type = wdNormalView End With End Sub The procedure is named ShowAll, which is the internal name of the command that Word runs when you click the Show/Hide button. Therefore, clicking Show/Hide will then run the ShowAll procedure. Using the active window's View object, the program first checks the current state of the ShowBookmarks property and stores the state in the currentState variable. Then each of the View properties is set to the opposite value. Figure 12.2 and 12.3 show the two states produced by the procedure. Figure 12.2. The document view with the hidden codes and text turned off. Figure 12.3. The document view with the hidden codes and text turned on. |
EAN: 2147483647
Pages: 129
