| This tutorial starts from photographs of a female model taken from the front and side. These images were taken from some distance with a zoom lens to try to minimize perspective distortion, so they approximate the Front and Side views in Maya. Before starting, you should load the hotkeys from Chapter 5. You can load the scene file ch06tut01start.mb noted next to the DVD icon, but this tutorial starts with an empty scene, so it's not necessary. Finally, confirm that the history is active by making sure the Construction History button at the right of the Status Line is pushed in. Tutorial: Setting Up the Image Planes Start a new project (Hotbox | File | Projects | New). Name the project HeadModel, click the Use Defaults button to use the default directory, and click the Accept button. On the DVD  Chapter_06\movies\ch06tut01.wmv |
Copy the two image files for this chapter from the DVD-ROM to the source images folder under the HeadModel project folder. This is the default place that Maya looks for image files. On the DVD  Chapter_06\ch06tut01start.mb |
To make more onscreen room, hide the parts of the interface you aren't using during this project. Use the Hotbox to open Display | UI Elements, and clear the check boxes for the Time Slider, the Range Slider, the Shelf, and the Tool Box. On the DVD  Chapter_06\headFRONT.jpg |
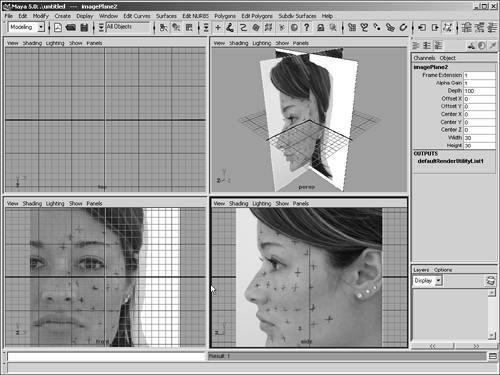
Switch to Four View mode by tapping the spacebar while the full-screen Perspective view is active. Now, right-click the Front view to activate it. Choose View | Image Plane | Import Image from the panel menu. Select the image file headFRONT.jpg (noted next to the DVD icon). Do the same with the Side view, but use the file headSIDE.jpg. This places these images into the 3D views, as shown in Figure 6.1. Figure 6.1. Image planes have been loaded in the Front and Side views. 
On the DVD  Chapter_06\headSIDE.jpg |
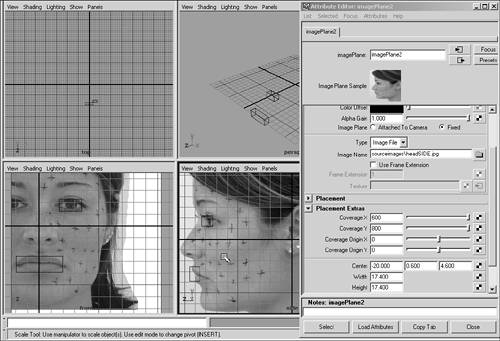
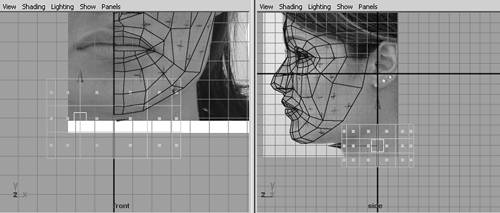
Choose View | Image Plane | Image Plane Attributes | imageplane1 from the panel menu to open the Attribute Editor for the image plane. Expand the Placement Extras section. The three values next to the Center entry are for X, Y and Z positioning. First, you'll adjust the X value to put the nose center on the vertical Y axis the bold vertical line in the Front view. You could type values into this text box and see where the image plane moves, but there is a faster way: Ctrl+LMB-click directly in each text box to interactively fine-tune placement. Next, set the Center Z value to 20, which pushes the image plane back so that it's not intersecting the head model. Finally, set Center X and Y to 3.95 and 0.7 and Width and Height to 16.9 to make the image planes match the figures shown in this chapter. tip You can also make medium and coarse adjustments of values interactively. Ctrl+click directly over a displayed value, using LMB for fine, MMB for medium, and RMB for coarse adjustment. In the Image Plane Attributes section, set the Display Mode to RGB. Also, set the Display Mode to Look Through Camera instead of In All Views so that the image plane is visible only in the Front view. To make it easy to line things up, you'll create some alignment boxes. Create a cube (Create | Polygon Primitives | Cube). Next, interactively scale (hotkey: r) and move (hotkey: w) to create a box that surrounds the eye in the Front view. Repeat this step to create a similar box for the lips in the Front view. Now, you can adjust the Side view image plane to get the boxes to line up. Choose View | Image Plane | Image Plane Attributes | imageplane2 from the panel menu to adjust the values of this image plane. In the Attribute Editor, you can adjust the placement and scale of the two image planes to achieve a match. Sometimes, this isn't possible because the model's chin is tilted slightly downward in one image or because of other minor differences. When the images don't match, you try to split the difference. For continuity, the values used for the figures in this chapter have been provided. To set the scale for this image, enter 17.4 for Width and Height in the Placement Extras section. Next, enter the placement settings in the Center text boxes: Set X, Y, and Z to 20, 0.6, and 4.6. As in step 6, set the Display Mode in the Image Plane Attributes to RGB, and set the Display Mode to Look Through Camera. The boxes are then aligned, as shown in Figure 6.2. Figure 6.2. Alignment boxes aid in placing the image plane for the Front view. 
Select and delete the alignment boxes.
Tutorial: Creating the Eye With the image planes in place, it's time to start modeling the head. Artists choose from several different techniques for modeling heads. Some start with a large ball and add definition and detail. This tutorial works in steps: First, you model the eye area, and then the nose and mouth. Then, you add other areas and stitch the parts together. Continue from the previous tutorial or load the scene file listed next to the DVD icon. On the DVD  Chapter_06\movies\ch06tut02.wmv |
On the DVD  Chapter_06\ch06tut01end.mb |
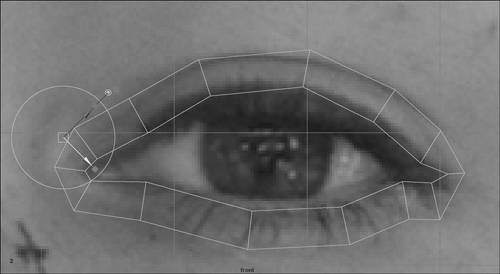
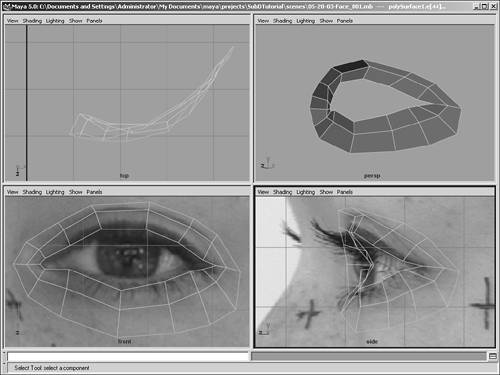
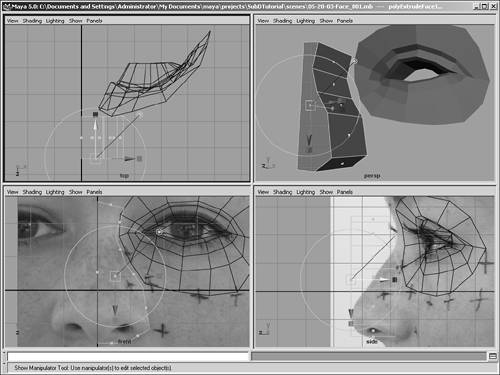
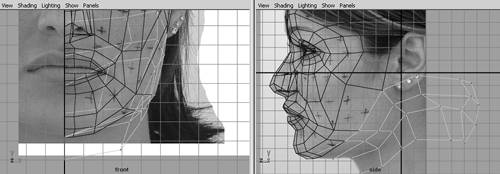
To begin modeling the face, you'll start with the eye. Choose Polygons | Create Polygon Tool | option box and reset the settings. Now, you're ready to click to draw a polygon. Maximize the Front view and zoom to the eye area. Create a perimeter around the outer ridge of the eyelid by starting at the point closest to the nose and clicking around clockwise. Make 14 points around the eye, including a point at each corner of the eye. Use Figure 6.3 as a guide. After the 14th point, press Enter to finish drawing this polygon. You can then fine-tune vertex placement by switching to Component mode (hotkey: F8). Drag a marquee around a vertex or click directly on one to select it. Using the Move tool (hotkey: w), you can adjust the placement of the vertices to follow any natural lines around the eye. Figure 6.3. Extruding the eye polygon edges. 
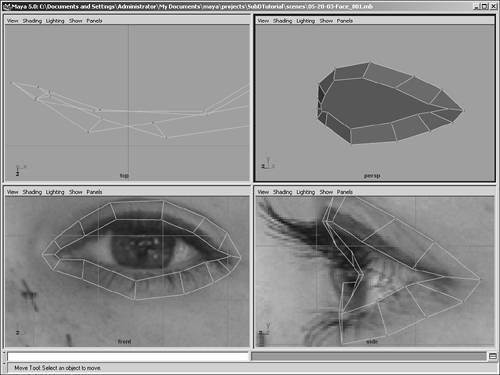
tip Immediately after placing a point while drawing with the Create Polygon tool, you can move the point with the MMB. First, make sure the the Keep Faces Together option is selected in the Polygon Tool Options dialog box. Also, make sure that Construction History is enabled. Go to Component mode for edges (hotkey: F10), and then drag a marquee around the entire eye to select all the edges. Now, choose Edit Polygons | Extrude Edge to extrude outward (hotkey: Ctrl+e), creating the actual eyelid. Set Local Translate Y to about -.25 by moving the green arrow manipulator. (You can check the value in the Channel Box.) Exit Component mode with F8. Switch back to Four View mode, and in the Side view, move the eye you just created to the right to place it near the eye in the Side view image plane. Zoom the Front and Side views to frame the eye area. Switch to Component mode with F8. Right-click over the edge of the polygonal eye object, and choose Vertex. Switch to Move mode, and move the vertices around to form the eye shape by aligning each vertex with the facial contours in the image planes. Use the Front view to select a vertex and then move its depth on the Z-axis in relationship to the facial contours, using the Side view. It takes a while to move all 28 vertices. Use Figure 6.4 as a reference. Figure 6.4. Each vertex is adjusted to a "best guess" position corresponding to the photograph. 
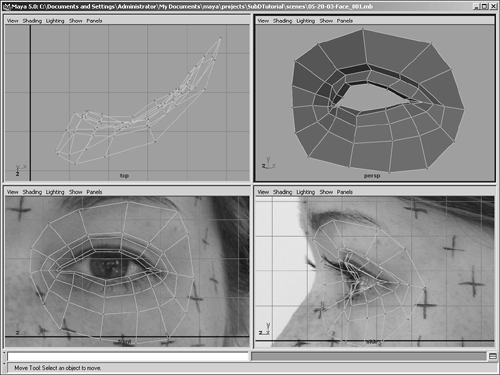
Right-click on the model, and choose Face. Select the face in the center of the eye model, and delete it to create a hole for the eyeball. Right-click on the eye object and choose Edge. Select the outer edge of the eye by Shift-clicking on each edge segment. Extrude the edges as in step 3 to create more surface for the eyelid. This time, you can use a local Translate Y of approximately 0.4, as displayed in the Channel Box during extrusion. Depending on which direction your normals are facing, this value might be .4 instead of -.4. You can check the direction for your normals by choosing Display | Polygon Components | Normals. If they are pointing inward, your values will be negative throughout this chapter. Select the 14 new vertices at the perimeter of the eye object individually, and adjust them in the Side view to align with the image plane, as in step 4. Use Figure 6.5 as a reference. It will take some time to get them just right don't hurry. Figure 6.5. The outer vertices have been adjusted to approximate the face topography. 
Select the new outer edges and extrude them again to create more surface for the eyebrow and cheek. This time, you can use a local Translate Y value of about 0.3 (or .3, depending on the direction of your normals), as displayed in the Channel Box during extrusion. Adjust the vertices as before with the new surface. Use Figure 6.6 for guidance. Now that the vertices are farther away from the eye, you can use points of comparison to keep them consistent in placement. That is, you can check that a vertex is at the edge of the + signs marked on the human model's face, as shown in both Front and Side views. You can also use freckles, eyelashes, and other facial landmarks for your visual marker points. Figure 6.6. The inner vertices of the eyelid edge have been adjusted to match the image. 
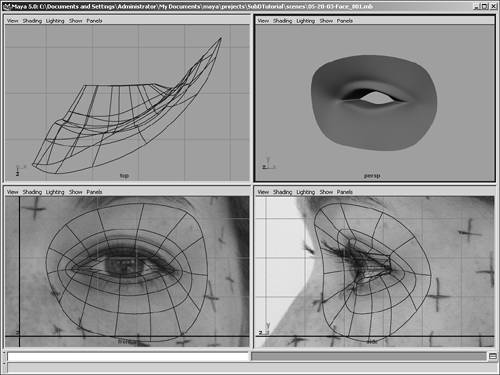
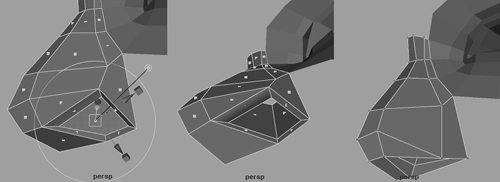
Select the edges in the center of the eyelid, the first edges you created, and use Extrude Edges to extrude them inward. This adds some thickness to the eyelids. Before you begin moving the new edges back, click on the blue dot (at the end of the diagonal line in the extrusion manipulator) that pops up along with the Extrude Edges tool to move the manipulator to the center of the eye, showing that it will extrude all edges along the same central axis instead of being based on their local coordinates so that they don't converge. Extrude with the blue Z-axis manipulator this time. As you extrude, watch the local Translate Z value in the Channel Box; it should be about 0.25. Select these new vertices and move them inward (hotkey: w) so that they align where the eyeball rests and connects to the eyelid, as shown in Figure 6.6. Now, you'll extrude the inner edge of the eyelid one more time to help make sure that any gaps occurring later between the eyelid and the eyeball are indeed filled. Select the edge, and Ctrl+RMB to select contiguous edges. If selecting contiguous edges doesn't select the entire ring of edges (also known as an edgeloop), you need to increase the Max 2D Angle setting in the Select Contiguous Edges Options dialog box (choose Edit Polygons | Selection | Select Contiguous Edges | option box, and try a setting of around 60 for this step). After selecting the edgeloop, use the Extrude Edges tool. Click the blue handle, and then use the extrude manipulator to scale and move these edges to match the figure. Exit Vertex mode with F8. Select the eye object, and then convert it to a Subdivision Surface just to examine it (choose Modify | Convert | Polygons to Subdiv from the menu). Then, press 3 for high detail. (As with NURBS, you can set the smoothing level in the viewports for an object with the 1, 2 and 3 keys.) Deselect the object to examine and orbit the smoothed SubD object in the Perspective view, as shown in Figure 6.7. You can see how the polygonal "cage" will be smoothed using this technique. Figure 6.7. The finished eye section, converted to Subdivision Surfaces, reveals the smoothing that will occur based on the polygonal layout. 
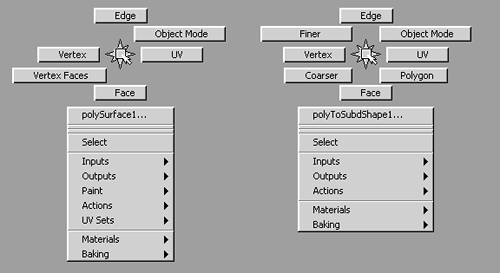
When you're finished, use the undo function to get back to the polygon object before the Subdivision Surfaces conversion. Press Ctrl+z until the object looks faceted. Confirm that the object has returned to polygonal by right-clicking on it. The Polygon marking menu should appear, not the SubD marking menu (compared in Figure 6.8). Figure 6.8. The marking menu for polygons (left) is different from the marking menu for subdivision surfaces (right). 
Tutorial: Creating the Nose Now that the eye area is in place, you'll rough in the nose shape. While building the nose, observe the eye object and make sure the nose will connect to the eye area seamlessly. Continue from the previous tutorial or load the scene file listed next to the DVD icon. On the DVD  Chapter_06\movies\ch06tut03.wmv |
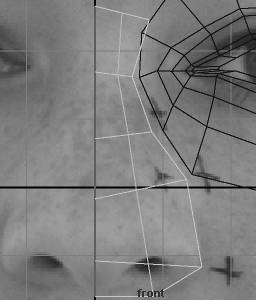
As in the previous tutorial, use the Create Polygon tool again to outline the nose in the Front viewport. To take advantage of symmetry, you need to create only half of the face, so you have to draw only the right half of the nose. The nose shape is created in eight clicks. The first click is at the bridge of the nose, then the next four clicks snap to points along the eye, and the remaining three round off the nose and finish at the center vertical line, as shown in Figure 6.9. Figure 6.9. Extruding the nose shape. 
On the DVD  Chapter_06\ch06tut02end.mb |
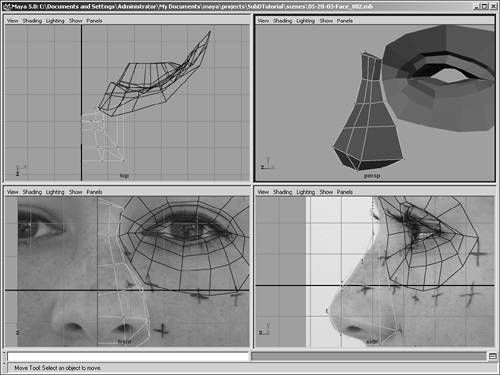
Move the new shape forward in the Side view to roughly match the location of the nose in the image plane: Align the bottom vertex to the back of the nostril in the Side view. Right-click on the nose, choose Vertex, and then switch to Move mode (hotkey: w). Now, you'll use temporary grid snapping to make sure the two center vertices are exactly on the vertical axis in the Front view. Select one of the center vertices, and then hold down the x key. The manipulator center changes from a square to a circle. Use the X-axis manipulator only (red arrow) so that grid snapping is purely horizontal. Move the vertex so that it's dead center, and then repeat this step on the other center vertex. Right-click on the nose and choose Face. Select the single face of the polygon you created. In the Side view, extrude this face (Hotbox | Edit Polygons | Extrude Face) in the Z-axis outward to the tip of the nose to give it some volume, about 1.5 units for Translate Z in the Channel Box, as shown in Figure 6.9. Now, select the center vertical face, the top face, and the back face of the nose object, and delete them so that only the right-side extrusion, the nose underside, and the front flat faces remain. In the Perspective view, tumble around so that you're looking up at the nose from the front, and use the Split Polygon tool to create edges from the front of the nose on the right side going across to the centerline. See Figure 6.10. For each split, click and drag the split point until it snaps to the nearest vertex on the edge. This locks the start of the split to that vertex and doesn't create unnecessary additional edges. Then, click again at the centerline, and press Enter to complete the split. Use the g hotkey to repeat the last command and make the next split. Create four horizontal splits, as shown in Figure 6.10. Figure 6.10. Splitting the nose extrusion. 
Use the Split Polygon tool again to create a vertical line going from the bottom of the nose to the top. Start the split where the two edges meet on the right side of the front of the nose (see Figure 6.10). Here, you can start at the bottom: Click on an edge and drag the mouse to start at the bottom vertex, and then click at the centers of the five horizontal lines running up the front of the nose. Press Enter to complete the new splits. Quickly rough in the shape of the nose in the Side viewport with vertex edits, using Figure 6.11 as a reference. Figure 6.11. Roughing in the nose shape with the split extrusions. 
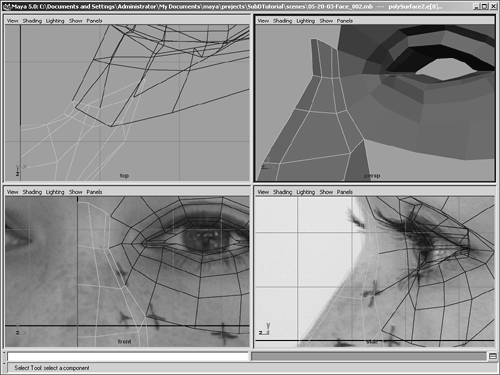
Now, you'll use vertex snapping again to position the top four vertices of the right side of the nose next to the corresponding portions of the eye so that the nose and eye fit together. In the Perspective view and while still in Vertex mode, select one of the four vertices near the eye. Switch to Move mode. Hold down the v key and drag the vertex to a position near the vertex at the edge of the eye area. The vertex should snap to its intended position, guaranteeing that the vertices are precisely on top of one another. Refine the rest of the nose vertices to make the nose look more like the reference image (see Figure 6.12). Do this quickly and roughly; you'll make more splits later to further tweak the shape. Figure 6.12. The finished nose shape. 
Pay attention to how the lines flow from the eye area to the nose area. This flow is important to observe when modeling organic objects. Polygonal edge flow is illustrated in Figure 6.13. The red lines indicate how polygon edges flow radially out from the eye area, but gently transition to horizontal directions for the nose. Figure 6.13. Geometry flow lines for the nose-eye transition. 
Right-click over the nose and choose Face. Select the bottom-right face to form the nostril. Choose Edit Polygons | Extrude Face and scale the face inward to leave a rim. Using the active manipulator, raise this rim slightly. Use the g hotkey to redo the last command. For the new extrusion, extrude upward and scale inward slightly to form the nostril. Scale the new face smaller with the active manipulator, and move it so that the inside of the nose isn't passing through the outside of the skin. Then, delete the top face of the nostril extrusion. Right-click on the nose and choose Vertex. Adjust the vertices to more accurately form the nostril shape of the nostril, aiming for a quick rough shaping at this point. See Figure 6.14 for reference. Be careful when editing the centerline vertices to constrain movement to just the Y and Z axes so that the points remain perfectly on the centerline. Figure 6.14. Creating the nostril: scaling in the first extrusion to create the nostril rim, and then extruding this rim into the nose. 
Tutorial: Creating the Mouth With the eye and nose roughed in, it's time to begin working on the other major facial feature the mouth. The procedures for the mouth are largely the same as for other facial features: Create a shape and use edge extrusion to expand the coverage, and then fine-tune with vertex edits. Continue from the previous tutorial or load the scene file noted next to the DVD icon. On the DVD  Chapter_06\movies\ch06tut04.wmv |
On the DVD  Chapter_06\ch06tut03end.mb |
In the Front view, use the Create Polygon tool to create the shape for the right half of the lips, exactly as in step 1 of the previous tutorial. Create a point at the top left of the upper-lip centerline, and then create points 2, 3, and 4 along the top rim of the upper-lip. Click a fifth point at the corner of the mouth. Now, click points 6, 7, and 8 along the lower lip before placing the final point at the centerline (nine points total). Press Enter to finish creating the shape. Use grid snapping (hotkey: g) in Vertex mode to move the two center vertices to the centerline. In the Side view, move the new mouth shape forward to just under the right side of the nose. Switch to Edge mode (hotkey: F10) and select the outer rim of edges. Don't select the edge on the centerline, however. Next, use Edit Polygon | Extrude Edge and extrude the edges outward to create more surface around the lips (see Figure 6.15). Use a local Translate Y value of about -.7 in the Channel Box. Figure 6.15. The lips boundary is edge-extruded to fill the nearby area. 
Move the vertices to shape the outer rim of the mouth, using Figure 6.16 as a guide. As with points in the centerline of the nose, be sure to use grid snapping in the Front viewport on centerline vertices to ensure that the mirrored shapes won't overlap. Figure 6.16. The repositioned mouth vertices. 
Delete the large center face in middle of the mouth object the face that was originally created. Select the outer ring of edges (again, excluding the centerline edge) and extrude them outward to create more surface area. Use a local Translate Y of about 0.7 so that the top edge is about to touch the bottom of the nose. Move these vertices around to match the face reference image, as shown in Figure 6.17. Point-snap the upper three vertices to the bottom portion of the nose shape, as in step 7 of the nose tutorial. You might have noticed that geometry flow from the mouth to the nose could be improved, but don't worry about that at this point, because you'll add more detail in a later tutorial. Figure 6.17. The repositioned mouth vertices for the second extrusion. 
Select the inner edges of the mouth, excluding the centerline edge. Extrude these edges inward to begin creating the actual lips use a local Translate Y of about 0.25. Pay attention to any overlap that occurs during the extrusion; this is likely to occur at the corner of the mouth. Remember to remedy the overlap when you're adjusting vertices in the next step. Tweak the vertices to shape the lips, using the image planes for reference. In the Side view, the vertices should be placed about halfway to where the lips hit their leftmost peak, as shown in Figure 6.18. Figure 6.18. Creating the lips the edited vertices for the first edge extrusion. 
Extrude the new edges again to create the rest of the outer part of the lips. Adjust these vertices to match the image planes (see Figure 6.19). Figure 6.19. Creating the lips the edited vertices for the second edge extrusion. 
Tutorial: Forehead, Chin, and Cheek Continue from the previous tutorial or load the scene file listed next to the DVD icon. With eye, nose, and mouth, you have the basics of a face and can connect the pieces after making a few other parts of the face, starting with the forehead and moving to the chin and cheek. On the DVD  Chapter_06\movies\ch06tut05.wmv |
On the DVD  Chapter_06\ch06tut04end.mb |
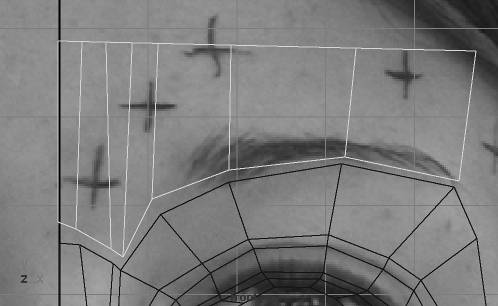
Forehead Use the Create Polygon tool to create a surface for the forehead. Create a polygon point for each horizontal edge making up the nose and top portion of the eye so that you can snap the vertices for the forehead directly to the top of the nose and eye (see Figure 6.20). In the Side view, move the polygon to just above the nose. Figure 6.20. The forehead shape after using the Split Polygon tool to add vertical divisions. 
Use the Split Polygon tool to add edges to the top of the polygon so that the top and bottom of the forehead have an equal number of edges (see Figure 6.20). As with the nose, be sure to drag the new split point along the edge to the nearest vertex to split at vertex points only. tip The tutorials in this chapter use several types of snapping to ensure accuracy. Beside snapping to the grid and other vertexes, the Split Polygon tool also snaps to the midpoint of any edge. Notice that when you move the split point back and forth on a edge, it sticks to the midpoint. Begin shaping the forehead, making sure to point-snap the bottom part of the forehead to the existing top part of the nose and eye. Also, be careful to grid-snap the forehead's centerline vertices to the center of the grid in the Front viewport. Again, you'll rework the geometry flow in a later tutorial, so don't concern yourself with it now. Select the top edges of the forehead, and choose Edit Polygons | Extrude Edges. Switch to world coordinates by clicking the blue-dot handle (as you did with the eyelid rim) to extrude the forehead's top edges upward to add more surface area to the forehead. Move these vertices around to form the forehead shape, as shown in Figure 6.21. Figure 6.21. The forehead extruded and sculpted to follow the reference images. 
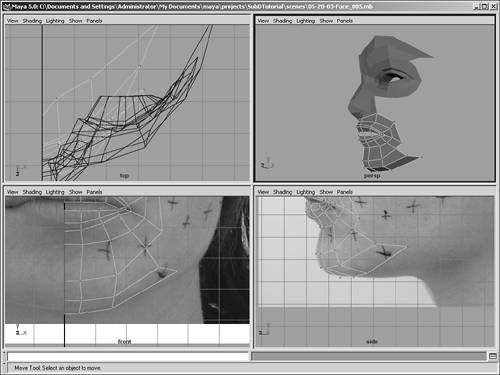
Chin In this tutorial, you'll take the lower area of the lips created earlier and extrude a portion of edges to fill out the chin. Select the bottom three edges of the mouth shape and extrude them downward to begin forming the chin. Move the new vertices into place. Repeat step 5 for the new edges to create the underside of the jaw (see Figure 6.22). Make the vertices nearly horizontal in the Top view. Figure 6.22. The chin, built from two extrusions of the three bottom edges of the lips. 
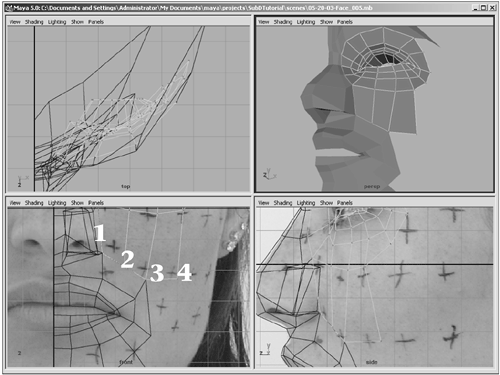
Cheek Select the bottom three edges of the eye (where the eye breaks away from the nose) and extrude them downward to the top part of the mouth. Use a local Translate Y value of about 1.7. Vertex-snap the first and third vertices to the top-right polygon at the top of the mouth shape. Then, curve-snap the second vertex to the edge between the first two vertices. This is done just like vertex snapping, except you use the c key to activate curve snapping. Manually place the fourth vertex as shown in Figure 6.23. Figure 6.23. Connecting the lower part of the eye to the top of the lip. 
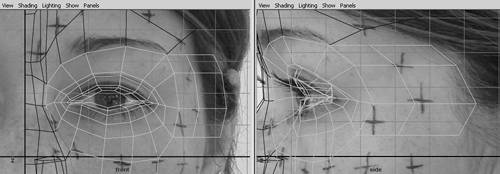
Extrude the three edges on the far side of the eye to create the side of the forehead. Repeat this step so that you can snap the vertices of this new area to the lower part of the forehead (see Figure 6.24). Figure 6.24. Three eye edges, extruded twice. 
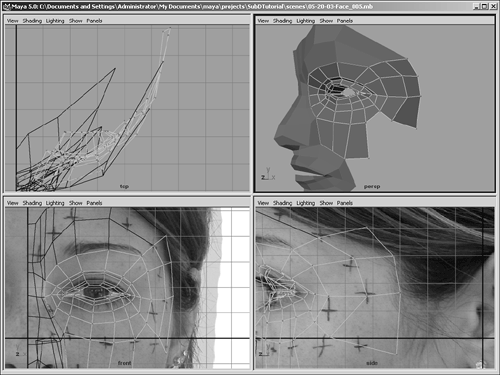
Vertex-snap the boundary vertices to the forehead, and manually position the middle and bottom edges of the new area as shown in Figure 6.25. Figure 6.25. Vertices of the new area adjusted to conform to the shape of the face. 
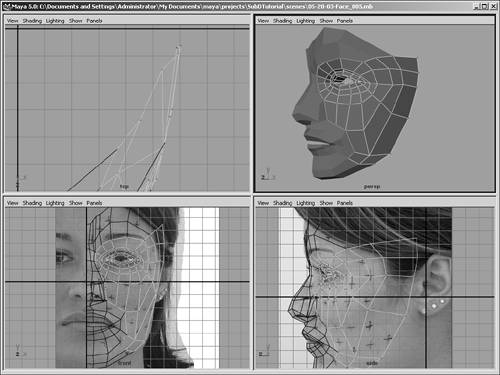
Now, extrude the two leftmost edges of the area you just extruded to close the first gap in the cheek, as shown in the leftmost image in Figure 6.26. Vertex-snap the points from the new edges to the original cheek. Figure 6.26. Closing the face in three stages. 
Extrude the next two edges toward the mouth to close the final gap between the two pieces, and point-snap the vertices to part of the mouth. See the middle two images in Figure 6.26 for reference. Extrude the bottom edge of the new piece downward and connect it to the chin area, as shown in the two rightmost images in Figure 6.26. Select all the outside right edges of the eye area, and extrude them back. Then, position the vertices as shown in Figure 6.27. The surfaces have less topographical detail, so fewer polygons are needed to define the surface. Figure 6.27. Extruding the outer edge of the face. 
Tutorial: Neck and Head Continue from the previous tutorial or load the scene file listed next to the DVD icon. Next, you'll create the neck and then complete the polygons needed to make the head. On the DVD  Chapter_06\movies\ch06tut06.wmv |
Neck On the DVD  Chapter_06\ch06tut05end.mb |
Create a polygon cylinder and place it into position to serve as the neck, being careful not to move it in the X-axis so that it remains centered. In the Channel Box, set Subdivision Axis to 16 and Subdivision Height to 3. Delete the top and bottom faces of the cylinder. Delete the faces making up the left half of the cylinder, as shown in Figure 6.28. Figure 6.28. Deleting half of the cylinder that will form the neck. 
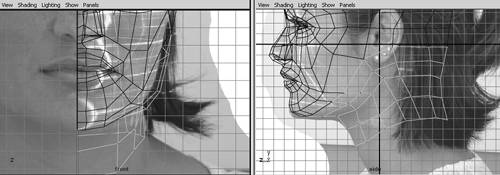
Rough in the shape of the neck and under the jaw with this cylinder (see Figure 6.29). You'll need to guess at the back of the neck until you change reference images to see the entire head. Figure 6.29. Repositioning the vertices to form the neck. 
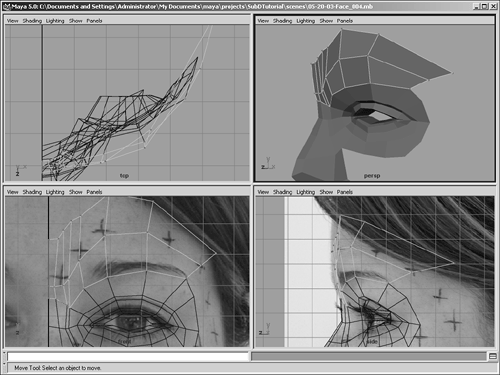
Head Select the top edges of the forehead piece and extrude them upward once to build up the forehead. Use global coordinates by clicking on the blue dot on the diagonal manipulator handle. After extrusion, adjust the vertices to match what's shown later in this tutorial in Figure 6.32. Point-snap the rightmost vertex of the new extrusion to the adjacent corner of the surface that makes up the eye. Grid-snap the center vertex to make sure it's located at the mirror point. Figure 6.32. The refined forehead. 
Next, you'll switch the two image planes to use a different picture of the model that includes the entire head, so that you can model the neck and the rest of the head. Create a new image plane for the Front view by choosing View | Image Plane | Import Image and selecting headgridFRONT.jpg. Adjust the Image Plane Attributes to set the Display Mode to RGB and Look Through Camera. In the Placement Extras section, set Center X, Y, and Z to 1.05, 0.2, and 19. This last value puts the image plane slightly in front of the original image plane at 20, so you can easily select which plane is visible by changing this value to -21. Set Scale to 31.5. Repeat for the Side view, loading the headgridSIDE.jpg file and setting Center X, Y, and Z to 19, 0.4, and 0.7 and Width and Height to 32.2. On the DVD  Chapter_06\headgridFRONT.jpg |
On the DVD  Chapter_06\headgridSIDE.jpg |
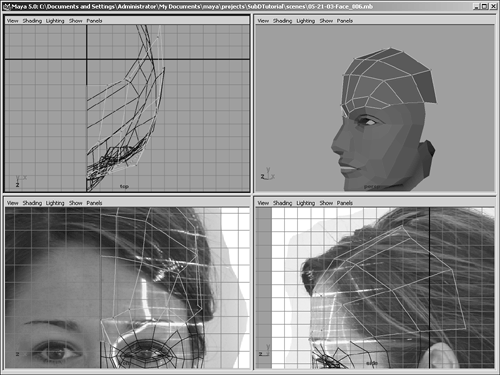
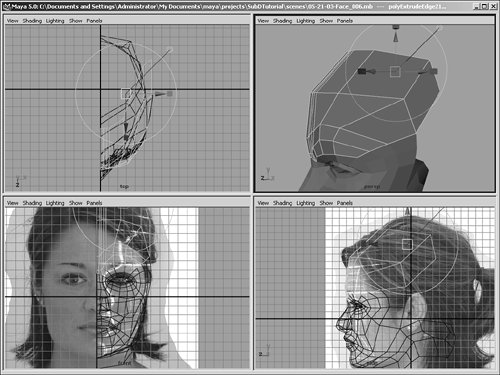
Select the edges for the top and side of the forehead and extrude them outward again, using Figure 6.30 as a guide. As in step 4, use global coordinates by clicking on the blue dot on the diagonal manipulator handle. Figure 6.30. Extruding the top of the forehead to continue the shape of the head. 
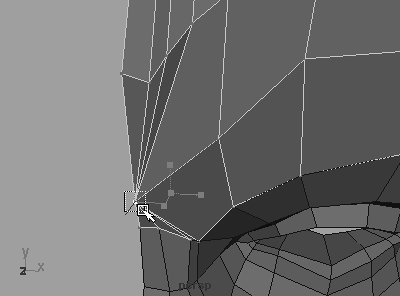
Notice a number of parallel lines coming up from the bridge of the nose near the centerline. To simplify the head from the bridge of the nose back, you'll snap the three nearby vertices to the centerline vertex for each point around the head, above the bridge of the nose. Double-click the Move tool to open its Tool Settings dialog box and deselect the Retain Component Spacing check box so that you can select three different points and have them all converge on a snap point instantaneously (otherwise, the points move as a group). Now, work your way up the head, moving groups of three vertices at a time: Select the vertices, hold down the v key to enable point-snapping, click over the points, and drag to the snap-to vertex (see Figure 6.31). Leave the bottom row of vertices for the eye shape unchanged so that it still connects to the nose properly. Figure 6.31. Snapping three vertices at a time. 
Tweak all the vertices in the forehead to get a more accurate shape in relation to the reference images. Position the rest of the vertices to help shape this part of the head, making the vertex over the ear flow down to where it will connect below (see Figure 6.32). Extrude the edge currently hanging above the ear downward three times using the two left images in Figure 6.33 as a reference. Point-snap the vertices on the left side of these new extruded faces to the vertices of the mesh that makes up the temple, next to the eye. Adjust the vertices on the right to match the reference images. Figure 6.33. Extruding edges to fill in the side of the head. 
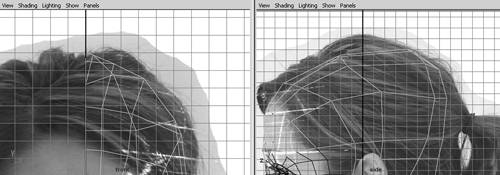
In the Side view, extrude the four edges of the temple mesh to create more of the side of the head behind the jawline. Use the two middle images in Figure 6.33 as a reference. Snap the vertices on the left side of these new faces. Position the hanging vertices of the new faces to match the reference images. Repeat step 10 with the new edges to create the lower back of the head. Use the two images on the right in Figure 6.33 as a guide. Again, snap the left vertices of the new faces and reposition the hanging vertices. Extrude the top edges to fill the gap, as shown in the left two images in Figure 6.34. Point-snap the bottom vertex to the existing vertex there. Place the other vertices to match the reference images. Adjust centerline vertices with grid snapping to confirm that they're placed at the center. Figure 6.34. Completing the head in three extrudes. 
Extrude the third edge down from the top point, as shown in the two middle images in Figure 6.34. Use grid snapping for centerline vertices. Extrude the last two edges, as shown in the two images on the right in Figure 6.34, and point-snap the hanging vertices to the back edge of the head to close the hole. Congratulations! The head polygons are in place. Compare your head to Figure 6.35. Figure 6.35. The back of the head with adjusted vertices matched to the image planes. 
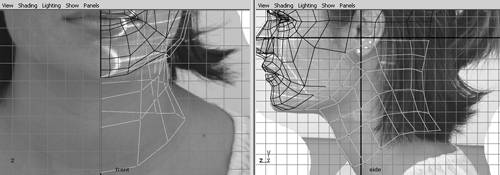
Now, you'll add to the neck. Extrude the bottom row of edges in the neck downward, about halfway down the neck. Shape the new neck vertices as shown in Figure 6.36. Figure 6.36. Extruding the bottom edge of the neck. 
Repeat step 15, going down to the end of the neck this time to complete the neck shape. Use Figure 6.37 as a guide. Figure 6.37. Completing the neck with one more extrude. 
With all the head polygons in place, the next steps are to connect all the pieces and finalize the head in Chapter 7. Then, you'll create the ear, convert the polygon cage to a Subdivision Surfaces model, and make the final tweaks to create this human head. On the DVD  Chapter_06\ch06tut06end.mb |
|
