Speaking in Code
One of the features of Reporting Services that gives it a tremendous amount of power and flexibility is its capability to speak in code—Visual Basic .NET code, that is. Valid Visual Basic .NET expressions can be used to control many of the properties of report items. They can even be used to control the query you are using to create your dataset.
For more complex tasks, you can embed whole Visual Basic .NET functions in your report. If that isn’t enough, you can access methods from .NET assemblies. These assemblies are not limited to Visual Basic .NET. They can be written in any .NET language, such as C#.
Let’s write some
-.-. --- -.. .
and have some
..-. ..- -.
| Note | For those of you who may not be familiar with it, the previous sentence contains two words in Morse Code. If you want to know what it says, do what I did: Look it up on the Internet. |
The Delivery Status Report
Features Highlighted
-
Using the Label property of a parameter
-
Using multiline headers and footers
-
Using Visual Basic .NET expressions to control properties
-
Specifying scope in aggregate functions
Business Need The customer service department at Galactic Delivery Services would like a report to check on the status of deliveries for a customer. The customer service representative should be able to select a customer and a year, and then see all the deliveries for that customer in that year. The hubs each package went through as it was in transit should be listed.
The status for packages that have been delivered should show up in green. The status for packages still en route should be blue. The status for packages that have been lost should be red. In case of a problem, the name and e-mail address of the person to be contacted at that customer site should appear below the entry for each lost package.
Task Overview
-
Create the Chapter08 Project, a Shared Data Source, a New Report, and Two Datasets
-
Set Up the Report Parameters and Place the Titles on the Report Layout
-
Add a Table to the Report
-
Add the Expressions
Delivery Status Report, Task 1: Create the Chapter08 Project, a Shared Data Source, a New Report, and Two Datasets
-
Create a new Reporting Services project called Chapter08 in the MSSQLRS folder.
-
Create a shared data source called Galactic for the Galactic database.
-
Create a new report called DeliveryStatus using the GDSReport template.
-
Create a new dataset called DeliveryStatus that calls the stp_DeliveryStatus stored procedure.
-
Run the stored procedure using 263722 for @CustomerNumber and 2005 for @Year.
-
Create a second dataset called Customers that uses the following query:
SELECT CustomerNumber, Name FROM Customer ORDER BY Name
Task Notes You probably noticed the instructions are a bit sketchy here. Now that you have reached the level of advanced report authoring, you can handle these basic tasks on your own. If you have any trouble with these steps, refer to the previous chapters for a refresher.
Delivery Status Report, Task 2: Set Up the Report Parameters and Place the Titles on the Report Layout
-
Select the Layout tab.
-
Use the Main menu to open the Report Parameters dialog box.
-
Configure the report parameters as follows:
Property
Value
For the CustomerNumber parameter:
Prompt
Customer
Available values
From query
Dataset
Customers
Value field
CustomerNumber
Label field
Name
For the Year parameter:
Available values
(Enter the values from the following table)
Default values
Nonqueried
Default values text area
2005
Set the Available Values property for the Year parameter as follows:
Label
Value
2003
2003
2004
2004
2005
2005
-
Click OK to exit the Report Parameters dialog box.
-
Place a text box onto the body of the report. Modify the following properties of this text box:
Property
Value
Font: FontSize
16pt
Font: FontWeight
Bold
Location: Left
0in
Location: Top
0in
Size: Width
3.5in
Size: Height
0.375in
Value
=“Delivery Status for” & Parameters!Year.Value
-
Place a second text box onto the body of the report. Modify the following properties of this text box:
Property
Value
Font: FontSize
16pt
Font: FontWeight
Bold
Location: Left
0in
Location: Top
0.375in
Size: Width
4.75in
Size: Height
0.375in
-
Right-click this text box and select Expression from the Context menu. The Expression Edit dialog box appears.
-
Select Parameters in the list on the left and double-click CustomerNumber in the list on the right.
-
Delete the word “Value” at the end of the expression. (Do not delete the period.) You see a Context menu showing you the available properties of the CustomerNumber parameter.
-
Double-click Label in the Context menu.
-
Click OK to exit the Expression Edit dialog box.
Task Notes We have two parameters for this report. The CustomerNumber parameter is selected from a drop-down list created by a dataset. The customer names are displayed in the drop-down list because Name was chosen as the Label field. However, the customer number is the value assigned to this parameter because CustomerNumber is chosen as the Value field. The Year parameter is selected from a drop-down list created by a static list of values we entered. The Label and Value are the same for each entry in this list.
The items placed on the report thus far were put there to provide a heading for the report and to indicate which parameters were selected to create the report. This is pretty straightforward for the Year parameter. All we need is a text box that displays the value of this parameter, with a little explanatory text thrown in for good measure.
The CustomerNumber parameter presents a bit of a problem, though. When we select a parameter in an expression, the value property of the parameter is selected by default. The value property of the CustomerNumber parameter contains the customer number of the selected customer. However, it makes more sense to the user if the customer's name is displayed at the top of the report. To accomplish this, we use the label property rather than the value property. The label property contains the text that appears in the parameter drop-down list for the selected item. In this case, the label property contains the customer's name.
Delivery Status Report, Task 3: Add a Table to the Report
-
Add a table to the body of the report immediately below the text boxes.
-
Expand the DeliveryStatus dataset in the Datasets window and drag the Hub field onto the leftmost cell in the details row of the table.
-
Drag the TimeIn and TimeOut fields onto each of the two remaining cells in the details row of the table.
-
Right-click the gray square to the left of the details row and select Insert Group from the Context menu. The Grouping and Sorting Properties dialog box appears.
-
Select =Fields !DeliveryNumber.Value from the Expression drop-down list. We are now grouping the information in the table by the values in the DeliveryNumber field.
-
Select the Sorting tab.
-
Select =Fields !DeliveryNumber.Value from the Expression drop-down list.
-
Click OK to exit the Grouping and Sorting Properties dialog box.
-
We need to move the labels in the table header row to the group header row. Select the text box that contains the word “Hub.” Do this by clicking once in this text box. If you can see a text-editing cursor blinking in this cell, you clicked too many times. If you see the blinking cursor, click elsewhere, and then try again.
-
Press CTRL-X to cut the text box from this table header cell. Click in the group header cell immediately below it and press CTRL-V to paste the text box there.
-
Repeat this for the text boxes containing Time In and Time Out.
-
Right-click any gray square to the left of the table and select Table Header from the Context menu. This turns off the table header option for this table. The table header row disappears. Do the same for the table footer.
-
Right-click the gray square to the left of the group header row and select Insert Row Above from the Context menu. An additional group header row appears. This is not a new grouping, but rather an additional row for the current grouping.
-
Drag the ServiceType field to the leftmost cell in the new group header row.
-
Drag the StatusName field to the next cell in the new group header row.
-
Right-click the gray square to the left of the new group header row and select Insert Row Above from the Context menu. Another new group header row appears.
-
Right-click the gray rectangle at the top of the first column in the table and select Insert Column to the Left from the Context menu. A new column is added to the table.
-
Drag the DeliveryNumber field to the leftmost cell in the new group header row. Modify the following property of the text box in this cell:
Property
Value
TextAlign
Left
-
Double-click the next cell in the new group header row and type Pickup:.
-
Drag the PickupPlanet field to the next cell in the new group header row.
-
Drag the PickupDateTime field to the rightmost cell in the new group header row.
-
Double-click in the group footer cell below =Fields!Hub.Value and type Delivery:.
-
Drag the DeliveryPlanet field to the next cell in the group footer row.
-
Drag the DeliveryDateTime field to the rightmost cell in the group footer row.
-
Right-click the gray square to the left of the group footer row and select Insert Row Below from the Context menu. A new group footer row appears.
-
Double-click in the group footer cell below Delivery and type Problem Contact:.
-
Drag the ProblemContact field to the next cell in the new group footer row.
-
Drag the ProblemEMail field to the rightmost cell in the new group footer row.
-
Right-click the gray square to the left of the new group footer row and select Insert Row Below from the Context menu. A new group footer row appears. This row is left blank.
-
Click in the leftmost cell of the top group header row and hold down the mouse button. Drag the mouse to the rightmost cell of the bottom group header row and release the mouse button. You have selected all the cells in the group header.
-
Modify the following property for these cells:
Property
Value
Font: FontWeight
Bold
-
Repeat Steps 30 and 31 for all the cells in the group footer. Your report layout should appear similar to Figure 8–1.
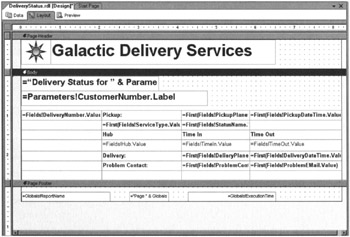
Figure 8–1: The Delivery Status Report layout after Task 3 -
Select the Preview tab. Select Bolimite, Mfg from the Customer drop-down list. Select 2005 from the Year drop-down list. Click View Report. Your report should appear similar to Figure 8–2.
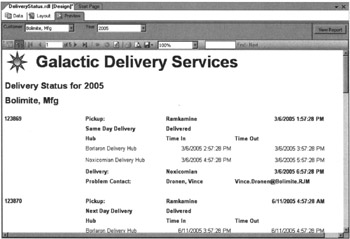
Figure 8–2: The Delivery Status Report preview after Task 3
Task Notes If you are observant, you will notice the expressions created for all but one of the fields placed in the group header and footer rows include the First() aggregate function. Only the expression for the DeliveryNumber field does not include this function. This aggregate function must be used because there are many records in each group. Somehow, we need to specify which of these records should be used to supply the values for these fields. By default, the first record in the group is used by including the First() aggregate function with each field expression. However, you could replace the First() aggregate function with any of the other Reporting Services aggregate functions that work with a text or datetime data type, if you desired.
Why is there no aggregate function included in the DeliveryNumber field expression? In Step 5, we selected the DeliveryNumber field as the grouping field. Because the table is grouped on this field, the value of the DeliveryNumber field must be the same for each record in the group. In short, it does not make a difference which record the DeliveryNumber field comes from because it will be the same value for each record in the group.
| Note | As it turns out, each of the fields we placed in the group header and footer is directly related to the DeliveryNumber field. Therefore, all these fields have the same value for all the records in the group. The Report Designer cannot determine this at the time you are designing the report, so it puts the aggregate functions in these expressions. |
We were able to add rows to both the group header and footer. This let us create more complex group header and footer layouts. In the same fashion, you can add rows to the table header, table footer, or detail line, as needed.
We now have the proper layout for our report, but we do not have the proper behavior of some of the report items. The delivery status is supposed to appear in color. The problem contact information is only supposed to be displayed with lost deliveries. Some additional formatting lines would also make the report more readable. All of this is accomplished in the next task with the aid of expressions.
Delivery Status Report, Task 4: Add the Expressions
-
Select the Layout tab.
-
Enter the following expression for the Color property of the cell containing the StatusName field:
= IIF(Fields!StatusName.Value = "Delivered", "Green", IIF(Fields!StatusName.Value = "In Route", "Blue", "Red"))
Note When entering each of the expressions, you probably want to select <Expression... > from the drop-down list for the property and enter this expression in the Edit Expression dialog box. Also, remember, the Edit Expression dialog box offers help for finding the correct function, and for inserting fields and parameters. Note, expressions involving the Globals, Parameters, and Fields collections are case-sensitive.
-
Click the gray square to the left of the top group header row, so the entire row is selected.
-
Enter the following expression for the BorderStyle: Top property:
= IIF(Fields!DeliveryNumber.Value = FIRST(Fields!DeliveryNumber.Value, "DeliveryStatus") , "Solid", "None")
Note “DeliveryStatus” is case-sensitive in this expression.
-
Click and hold down the left mouse button in the cell containing the word “Hub.” Continue to hold down the left mouse button and drag the cursor through the Time In cell to the Time Out cell. All three cells should now be selected. Modify the following property for these cells:
Property
Value
BorderStyle: Bottom
Solid
-
Select the following three cells using the same method as in Step 5: “Delivery:”, “=First(Fields !DeliveryPlanet.Value)”, “=First(FieldsIDeliveryDateTime.Value)”. Modify the following property for these cells:
Property
Value
BorderStyle: Top
Solid
-
Click the gray square to the left of the top group footer row, so the entire row is selected. Enter the following expression for the BorderStyle: Bottom property for this row:
= IIF(Fields!StatusName.Value = "Lost", "None", "Solid")
-
Click the gray square to the left of the middle group footer row, so the entire row is selected. Enter the following expression for the BorderStyle: Bottom property:
= IIF(Fields!StatusName.Value <> "Lost", "Solid", "None")
-
Enter the following expression for the Visibility: Hidden property for this same row:
= IIF(Fields!StatusName.Value = "Lost", false, true)
-
Select the Preview tab. Select Bolimite, Mfg from the Customer drop-down list and 2005 from the Year drop-down list, if they are not already selected. Click View Report if the report does not appear. Your report should appear similar to Figure 8–3.
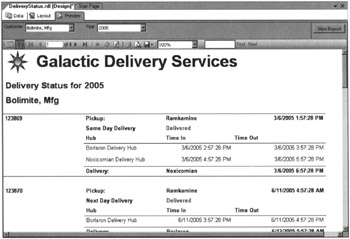
Figure 8–3: The Delivery Status Report preview after Task 4 -
Select Save All in the toolbar.
Task Notes If you scroll through the pages of the report, you see the report now meets the business needs specified. Let's look at what each expression is doing. The expression entered in Step 2 returns green when the status is Delivered, and blue when the status is In Route. Otherwise, it returns red.
The expression in Step 4 is a bit more complex. It checks whether the current value of the DeliveryNumber field is equal to the first value of the DeliveryNumber field in the DeliveryStatus dataset. As you saw in Chapter 7, aggregate functions act within a scope. By default, the First() aggregate function would return the value for the first record in the current scope. Because this expression is in the group header, by default it would return the value for the first record in each group.
However, in this expression, the First() aggregate function includes a second parameter that specifies the scope it should use. This parameter specifies that the First() aggregate function should use the scope of the entire DeliveryStatus dataset rather than just the current group. Therefore, it returns the first record in the dataset. When the current delivery number is equal to the first delivery number in the dataset, a solid border is created across the top of these text boxes. When the current delivery number is not equal to the first delivery number in the dataset, no border is created.
The expressions in Step 7 and Step 8 use the value of the StatusName field to control the border across the bottom of each grouping. If the row with the problem contact is displayed, the border should appear across the bottom of this row. However, if the row with the problem contact is not displayed, the border should appear across the bottom of the row above it. The expression in Step 9 controls whether the grouping row containing the problem contact is displayed. This is also based on the value of the StatusName field.
As you can see, expressions can be useful when the formatting or even the visibility of a report item needs to change depending on some condition in the report. Expressions can also be used to calculate the values to appear in a text box, as you see in the next report.
The Lost Delivery Report
Features Highlighted
-
Using Visual Basic .NET expressions to calculate values in a text box
-
Adding static columns to a matrix
-
Adding totals to a matrix
-
Formatting total cells in a matrix
Business Need The quality assurance department at Galactic Delivery Services would like a report to help them analyze the packages lost during delivery. The report should show the number of packages lost each year at each processing hub. It should break down these numbers by the cause for each loss. It should also show the number of losses by cause as a percentage of the total number of packages lost for each hub.
Task Overview
-
Create a New Report, Create a Dataset, and Add a Matrix to the Report
-
Add a Calculated Column to the Matrix
-
Add Totals to the Matrix
Lost Delivery Report, Task 1: Create a New Report, Create a Dataset, and Add a Matrix to the Report
-
Reopen the Chapter08 project if it was closed.
-
Create a new report called LostDelivery using the GDSReport template.
-
Create a new dataset called LostDelivery that calls the stp_LostDeliveries stored procedure.
-
Place a matrix onto the body of the report. Drag the DeliveryNumber field into the Data cell. Edit the aggregate function in the resulting expression to change it from Sum to Count.
-
Drag the Cause field into the Rows cell. Drag the Hub field into the Columns cell.
-
Open the Matrix Properties dialog box and select the Groups tab.
-
Click Add in the Columns area. The Grouping and Sorting Properties dialog box appears.
-
Type the following for Expression to group the values by year:
=Year(Fields!PickupDateTime.Value)
-
Click OK to exit the Grouping and Sorting Properties dialog box.
-
Click Up in the Columns area.
-
Click OK to exit the Matrix Properties dialog box.
-
Modify the following properties of the text box in the upper-left corner of the matrix:
Property
Value
BackgroundColor
Gainsboro (A light gray, near the top of the list)
Font: FontSize
18pt
Font: FontWeight
Bold
Size: Width
2in
Value
Lost Deliveries by Cause
-
Modify the following property of the text box in the lower-left corner of the matrix:
Property
Value
BackgroundColor
Gainsboro
-
Modify the following properties of the text box in the upper-right corner of the matrix:
Property
Value
BackgroundColor
Gainsboro
BorderStyle: Left
Solid
Font: FontSize
14pt
Font: FontWeight
Bold
TextAlign
Center
-
Modify the following properties of the text box in the center of the right-hand column of the matrix:
Property
Value
BackgroundColor
Gainsboro
BorderStyle: Left
Solid
BorderStyle: Bottom
Solid
Font: FontWeight
Bold
TextAlign
Center
-
Modify the following property of the text box in the lower-right corner of the matrix:
Property
Value
BorderStyle: Left
Solid
Task Notes So far, we have a fairly straightforward matrix report. Let's see what happens when we add another column and totals to the matrix.
Lost Delivery Report, Task 2: Add a Calculated Column to the Matrix
-
Right-click the text box in the lower-right corner of the matrix and select Add Column from the Context menu. A new column and a new set of column headings appear.
-
Modify the following properties of the new text box in the lower-right corner of the matrix:
Property
Value
BorderStyle: Left
Solid
Format
###.00%
TextAlign
Right
Value
=Count(Fields!DeliveryNumber.Value)/ Count(Fields!DeliveryNumber.Value, “matrixl_Hub”)
-
Modify the following properties of the text box immediately above the text box modified in Step 2:
Property
Value
BackgroundColor
Transparent
BorderStyle: Left
Solid
BorderStyle: Bottom
None
Font: FontWeight
Normal
TextAlign
Right
TextDecoration
Underline
Value
% of Column
-
Modify the following properties of the text box immediately to the left of the text box modified in Step 3:
Property
Value
BackgroundColor
Transparent
BorderStyle: Left
Solid
BorderStyle: Bottom
None
Font: FontWeight
Normal
TextAlign
Right
TextDecoration
Underline
Value
#Lost
-
Your report layout should appear similar to Figure 8–4.
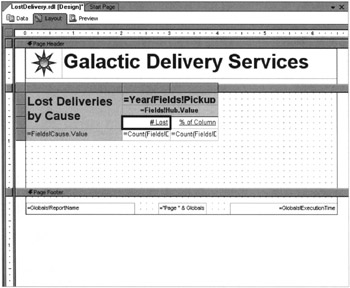
Figure 8–4: The Lost Delivery Report layout after Task 2 -
Select the Preview tab. Your report should appear similar to Figure 8–5.
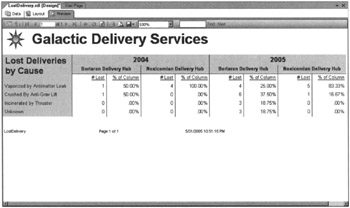
Figure 8–5: The Lost Delivery Report preview after Task 2
Task Notes In the previous report, we created a multirow group header and a multirow group footer in a table. In this report, we created a multicolumn detail section in a matrix. When we add the second column, a new set of headers is added, so we can identify the contents of each column.
Our new column takes the count from the current row and calculates it as a percentage of the total for the column. This is done, once again, through the magic of scope. The first Count() aggregate function does not have a scope parameter, so it defaults to the scope of the current cell. In other words, it counts the number of lost deliveries in the current cell. The second Count() aggregate function has a scope parameter of matrix1_Hub. This is the name of the column group that creates the column for each hub. Therefore, this aggregate function counts the number of lost deliveries in the entire column. We then divide and use the ##.00% format string to create a percentage.
Lost Delivery Report, Task 3: Add Totals to the Matrix
-
Select the Layout tab.
-
Right-click the text box in the lower-left corner of the matrix and select Subtotal from the Context menu. A Total cell is added to the bottom of the matrix.
-
Modify the following property of the text box in this new cell:
Property
Value
BorderStyle: Top
Solid
BorderWidth
2pt
-
Select the Preview tab. Notice the border we added to the top of the text box only affects the text box with the word "Total" in it. It did not affect any of the text boxes that contain the actual totals.
-
Select the Layout tab.
-
Click the green triangle in the upper-right corner of the text box with the word “Total” in it. It may take a few tries to click the green triangle and not the Total cell text box. When you have done it correctly, the drop-down list at the top of the Properties window changes to Subtotal. Modify the following properties:
Property
Value
BorderStyle: Left
Solid
BorderStyle: Top
Solid
-
Select the Preview tab. We now have the desired format, with the border at the top of each text box that contains a total.
-
Select the Layout tab.
-
Right-click the text box in the upper-right corner of the matrix. Select Subtotal from the Context menu. A Total cell is added to the right of the matrix.
-
Modify the following properties of the text box in this new cell:
Property
Value
BorderStyle: Left
Solid
BorderStyle: Bottom
Solid
-
Your report layout should appear similar to Figure 8–6.
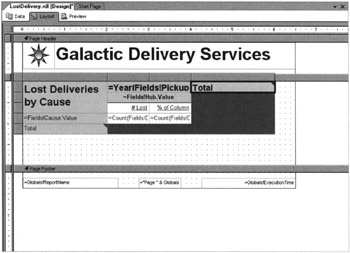
Figure 8–6: The Lost Delivery Report layout after Task 3 -
Select the Preview tab. Your report should appear similar to Figure 8–7.
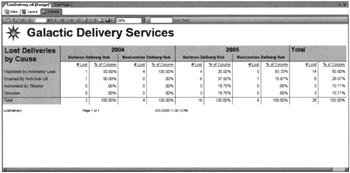
Figure 8–7: The Lost Delivery Report preview after Task 3 -
Select Save All in the toolbar.
Task Notes As you just saw, adding subtotals to a row or column in a matrix involves just a couple clicks. However, formatting the text boxes that contain those totals can be a little trickier. When you add a total to a matrix row or column, the text box in the new cell is the header for the total row or total column. Changing the properties of this text box only affects the header. You have to click the green triangle to modify the properties for the text boxes that contain the totals.
You have seen how expressions can be used to control properties and to provide the calculated contents of a text box. Now let’s look at using an expression in the query definition for a dataset.
The Customer List Report—Revisited
Features Highlighted
-
Copying a report between projects
-
Using Visual Basic .NET expressions to specify a dataset query
Business Need The Customer List Report you developed for the Galactic Delivery Services accounting department (in Chapter 4) has proved to be popular. Several other departments would like similar reports to help them track their own lists of e-mail contacts. Rather than create separate reports for each department, which would be hard to maintain, the IT Manager has asked for one report that enables the user to select which type of contact they want to view.
Task Overview
-
Copy the Report from the Chapter04 Project and Add It to the Chapter08 Project
-
Add a Report Parameter and Modify the Dataset to Use the Report Parameter
Customer List Report—Revisited, Task 1: Copy the Report from the Chapter04 Project and Add It to the Chapter08 Project
-
Use Windows Explorer to copy the report definition file for the Customer List Report (Customer List.rdl) from the Chapter04 project folder and paste it in the Chapter08 project folder. Both of these folders should be found under My Documents in the Visual Studio 2005\Projects\MSSQLRS folder.
-
In Report Designer, reopen the Chapter08 project if it was closed.
-
Right-click the Reports folder in the Solution Explorer and select Add|Existing Item from the Context menu. The Add Existing Item—Chapter08 dialog box appears.
-
Make sure you are looking at the Chapter08 folder in the dialog box and select the CustomerList.rdl file. Click Add to exit the Add Existing Item—Chapter08 dialog box.
-
Double-click the CustomerList.rdl entry in the Solution Explorer to open the report definition.
-
Select the Preview tab to show this report is functioning properly in the Chapter08 project.
Task Notes Because the entire definition of a report is contained within a single RDL file, it is easy to copy reports to different locations. As you saw here, we can even add them to a project other than the project within which they were originally created. The Customer List Report uses a shared data source called Galactic. We did not need to copy the shared data source because we already have a shared data source with the same name and the same properties in the Chapter08 project. If this was not the case, we could have copied the shared data source file (Galactic.rds) along with the report file and added that to our new project as well.
Customer List Report—Revisited, Task 2: Add a Report Parameter and Modify the Dataset to Use the Report Parameter
-
Select the Data tab. Make sure you are in the Generic Query Designer and not the Graphical Query Designer.
-
Open the Report Parameters dialog box.
-
Add a new report parameter and modify the properties for this new parameter as follows:
Property
Value
Name
ListType
Prompt
Select a List
Allow blank value
unchecked
Available Values
(See the following table)
Set the Available Values property for the ListType parameter as follows:
Label
Value
Billing Contacts
B
Manufacturer Contacts
M
Problem Contacts
P
-
Click OK to exit the Report Parameters dialog box.
-
Replace the entire select statement with the following expression:
=IIF(Parameters!ListType.Value="B", "EXEC stp_BillingContacts", IIF(Parameters !ListType.Value="M", "EXEC stp_ManufacturerContacts", "EXEC stp_ProblemContacts"))
-
Click the… button in the Generic Query Designer toolbar. The Dataset dialog box appears. You may receive an error message indicating the query cannot be parsed. Ignore this error message.
-
Select the Fields tab.
-
Change the Fields table to match the following:
Field Name
Type
Value
Name
Database Field
Name
Email
Database Field
Email
Contact
Database Field
Contact
-
Click OK to exit the Dataset dialog box.
-
Select the Layout tab.
-
Drag the Contact field and drop it on the text box that currently contains the expression for the BillingContact field.
-
Double-click the table header cell directly above the text box from Step 11 and change the text to Contact.
-
Drag the Email field and drop it on the text box that currently contains the expression for the BillingEmail field.
-
Double-click the table header cell directly above the text box from Step 13 and change the text to Email.
-
Select Save All in the toolbar.
-
Select the Preview tab. Try selecting each of the list types. Remember to click View Report.
| Note | The database does not contain a contact name for each manufacturer, so no contact names are in the manufacturer list. |
Task Notes Rather than specifying the query in the Generic Query Designer, we used an expression to choose among three possible queries (in this case, three stored procedure calls). This is known as a dynamic query. The name comes from the fact that the query that is run depends on input from the user at the time the report is run.
Because the content of the query is not known until run time, the Report Designer cannot “pre-run” the query to determine the fields that will result. Instead, we need to manually specify the fields that will result from our dynamic query. All the possible queries that could be run should return result sets with the same field names for your report to work properly.
At this point, you may be ready to suggest two or three alternative approaches to creating this report. It is certainly not unusual to come up with a number of possible ways to meet the business needs of a report. When this happens, use the following criteria to evaluate the possible solutions:
-
Efficiency of operation
-
Your comfort with implementing and debugging a given solution in a reasonable amount of time
-
Maintainability
-
Your need to illustrate a certain point in a book chapter
Well, maybe that last point won’t apply to you, but it was, in fact, the overriding reason for choosing this approach for this particular report.
Payroll Checks
Features Highlighted
-
Using Visual Basic .NET functions embedded in the report to create reusable code
-
Using a stored procedure that updates data
-
Grouping in the details row of a data region
-
Using nested data regions
Business Need The Galactic Delivery Services accounting department needs a report to print payroll checks for its hourly employees. The checks should have the check portion in the top one-third of the page and the check register in the bottom two-thirds of the page. The check register should list the work hours included in this check. The user should be able to select a week for which unpaid time is entered and receive the payroll checks for that week. The planetary system tax amount (25 percent) and state tax amount (5 percent) must be deducted from the amount being paid.
Task Overview
-
Create a New Report, Create Two Datasets, Add a List to the Report Layout, and Populate It
-
Add a Table to the Report Layout and Populate It
-
Configure the Report Parameter and Add Embedded Code to the Report
Payroll Checks, Task 1: Create a New Report, Create Two Datasets, Add a List to the Report Layout, and Populate It
-
Reopen the Chapter08 project if it was closed.
-
Create a new report called PayrollChecks. Do not use the GDSReport template.
-
Create a new dataset called PayrollChecks that calls the stp_PayrollChecks stored procedure. Do not run the stored procedure in the Query Designer. This marks records as having been paid.
-
Create a new dataset called WeekNumbers that calls the stp_WeekNumbers stored procedure.
-
Select the Layout tab.
-
Place a list onto the body of the report. Modify the following properties of this list in the Properties window:
Property
Value
BackgroundColor
LightGreen
BorderStyle
Solid
DataSetName
PayrollChecks
PageBreakAtStart
True
-
Open the List Properties dialog box. Click Edit Details Group. The Details Grouping dialog box appears.
-
Select =Fields!PayrollCheckNumber.Value from the Expression drop-down list.
-
Click OK to exit the Details Grouping dialog box. Click OK to exit the List Properties dialog box.
-
Add text boxes to the list to get the layout shown in Figure 8–8. You can create text boxes containing fields by dragging the fields from the Datasets window. You can create a text box containing a constant string by dragging a text box from the Toolbox and typing the constant string in the new text box. Enlarge the report body and the list report item, if necessary.
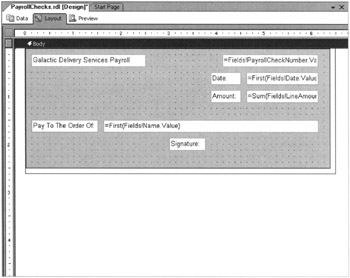
Figure 8–8: The payroll check layout after Task 1 -
Right-click the text box containing the LineAmount field and select Properties from the Context menu. The Textbox Properties dialog box appears.
-
Select the Format tab.
-
Click the ellipsis button(…) next to Format code. The Choose Format dialog box appears.
-
Select Currency in the list on the left.
-
Click OK to exit the Choose Format dialog box.
-
Click OK to exit the Textbox Properties dialog box.
Task Notes Our payroll check has two separate parts: the check itself and the check register. The check register contains a line showing the amount paid for each day worked during the selected workweek. The check is essentially a summary of the information in the check register. The check amount is the sum of the amount to be paid for all the days worked.
We could use two different datasets to provide data to these two areas. To be a little more efficient with our database resources, however, we are going to use a single dataset. The dataset includes all the detail information required by the check register. It is going to have one row for each date worked. However, we do not want to create a check for each date worked. We only want one check for all the days worked by a given employee in the week.
To accomplish this, we need to group the detail data to print the check. We did this by adding the details grouping in Steps 7 through 9. Because we want one check per check number, the PayrollCheckNumber field seems an obvious choice for grouping. (The number in the PayrollCheckNumber field is generated by the stored procedure.) With this details grouping, our list receives one record for each check number; therefore, we get one check per check number.
Payroll Checks, Task 2: Add a Table to the Report Layout and Populate It
-
Increase the height of the report body and the list.
-
Place a table inside the list below the signature text box.
-
Drag the WorkDate, Hours Worked, and LineAmount fields from the Datasets window into the cells in the details row of the table.
-
Drag the LineAmount field from the Datasets window into the rightmost table footer cell and set the following properties for this new text box:
Property
Value
BorderStyle: Top
Solid
Format
C
-
Set the following property for the text box in the rightmost details row cell:
Property
Value
Format
C
Note Entering C for the Format property is the same as selecting Currency on the Choose Format dialog box.
-
Set the following properties for the table:
Property
Value
BackgroundColor
White
PageBreakAtEnd
True
-
Drag the bottom of the list and the bottom of the report body up, so they are the same as the bottom of the table. Your report layout appears similar to Figure 8–9.
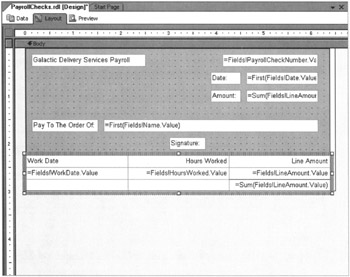
Figure 8–9: The payroll check layout after Task 2
Task Notes In Task 1, we created a list with a detail grouping to create the check portion of our payroll checks. In Task 2, we created a table to provide the detail information for the check register. The table data region must be nested inside of the list data region so that we get one set of detail information for each check. If the table was placed below the list, we would get all the checks first and then all the check register information at the end.
The PageBreakAtEnd property was set on the table so there is a page break immediately after the table. This keeps our output to one check per page.
Payroll Checks, Task 3: Configure the Report Parameter and Add Embedded Code to the Report
-
Open the Report Parameters dialog box.
-
Modify the following properties for the WeekNumber parameter:
Property
Value
Prompt
Week Number
Available values
From query
Dataset
WeekNumbers
Value field
WeekNumber
Label field
WeekNumber
-
Click OK to exit the Report Parameters dialog box.
-
Open the Report Properties dialog box.
-
Select the Code tab.
-
Enter the following in the Custom Code area:
' State and Planetary System Tax Deductions Public Function TaxDeductions(ByVal Amount As Double) As Double ' Planetary System Tax = 25% ' State Tax = 5% TaxDeductions=Amount * .25 + Amount * .05 End Function
-
Click OK to exit the Report Properties dialog box.
-
Right-click the text box in the list, but not in the table, containing the sum of the LineAmount values and select Expression from the Context menu. The Edit Expression dialog box appears.
-
Replace the contents of the Expression area with the following:
=Sum(Fields!LineAmount.Value) - Code.TaxDeductions(Sum(Fields!LineAmount.Value))
-
Click OK to exit the Edit Expression dialog box.
-
Repeat Steps 8 through 10 with the text box in the table containing the sum of the LineAmount values.
-
Right-click the text box in the details row of the table containing the LineAmount value and select Expression from the Context menu. The Edit Expression dialog box appears.
-
Replace the contents of the Expression area with the following:
=Fields!LineAmount.Value—Code.TaxDeductions(Fields!LineAmount.Value)
-
Click OK to exit the Edit Expression dialog box.
-
Select the Preview tab.
-
Select 09–2006 from the Week Number drop-down list and click View Report. Your report should appear similar to Figure 8–10. Remember, once checks have been run for a given week, you cannot produce checks for that week again. Each time you enter the report, the Week Number drop-down list only contains entries for weeks that have not been run. (The check number you see on the first page in your preview may be different from the check number shown in the figure. This is normal.)
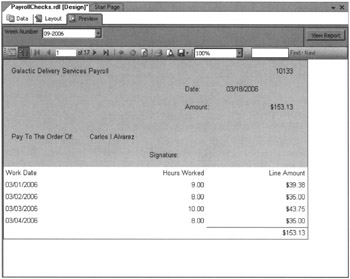
Figure 8–10: The payroll check preview -
Select Save All from the toolbar.
Task Notes Payroll tax calculations are straightforward on the planets where Galactic Delivery Services operates. Everyone pays 25 percent of their pay to the planetary system government and 5 percent of their pay to the state government. Even though this is a simple formula, we need to use it in three different places. Using the embedded code feature of Reporting Services, we are able to put this formula in one location and use it in several locations. This also makes things easier to change when one or the other of these tax amounts is increased.
We created a function called TaxDeductions on the Code tab in the Report Properties dialog box. This is simply a valid Visual Basic .NET function definition. We access this function by using the key word “Code” followed by a period and the name of the function. You can see this in the expression we entered in Step 9.
The Weather Report
Features Highlighted
-
Referencing .NET assemblies in the report
-
Using a multivalued parameter
Business Need The Galactic Delivery Services flight control department needs a way to quickly list the current weather conditions at selected planets served by GDS. (After all, space transports have to go through the atmosphere to take off and land.) One of the GDS programmers has created a .NET assembly that uses a web service to get the weather from various locations. The user should be able to select one or more planets from a list and see the weather for all selected planets. A call must be made to a method of the .NET assembly for each of the selected planets and the results must be incorporated into the report.
Task Overview
-
Copy the .NET Assembly into the Appropriate Location, Create a New Report, and Create a Reference to the Assembly
-
Create a Dataset, Add a Table to the Report Layout, and Populate It
Weather Report, Task 1: Copy the .NET Assembly into the Appropriate Location, Create a New Report, and Create a Reference to the Assembly
-
If you have not already done so, download the WeatherInfo.dll assembly from the website for this book.
-
Copy this file to the Report Designer folder. The default path for the Report Designer folder is
C:\Program Files\Microsoft Visual Studio 8\Common7\IDE\PublicAssemblies
-
Launch the Microsoft .NET Framework 2.0 Configuration program from the Administrative Tools section of your Control Panel.
-
Click the Configure Code Access Security Policy link.
-
Click the Increase Assembly Trust link.
-
Select Make Changes to This Computer and click Next.
-
Click Browse and go to the PublicAssemblies folder. Select WeatherInfo.dll, click Open, and then click Next.
-
Select This One Assembly and click Next.
-
Change the Trust Level slider to Full Trust, and then click Next.
-
Click Finish.
-
Close the Microsoft .NET Configuration 2.0 program.
-
Reopen the Chapter08 project in the Report Designer if it was closed.
-
Create a new report called WeatherReport using the GDSReport template.
-
Open the Report Properties dialog box and select the References tab.
-
Click…next to the References area. The Add Reference dialog box appears.
-
Scroll down to the entry for the WeatherInfo assembly and select it. Click Add to add this file to the Selected Projects and Components list.
-
Click OK to exit the Add Reference dialog box. Click OK to exit the Report Properties dialog box.
Task Notes For a custom assembly to be used in our reports, the assembly must be in a location where it can be found by the Report Designer. When you are designing reports, the assembly must be either in the Public Assemblies folder or in the Global Assembly Cache. We placed the WeatherInfo.dll assembly in the Public Assemblies folder in Step 2. Consult your .NET documentation for information on placing an assembly in the Global Assembly Cache.
We are using a class from the WeatherInfo assembly called PlanetaryWeather and a method from that class called GetWeather. The GetWeather method is a shared method. This means you do not need to create an instance of the PlanetaryWeather class to use the GetWeather method.
To use a method that is not a shared method, you need to use the Classes area of the Report Properties dialog box. First, create a reference in the References area, as we did in Steps 15 and 16. Then, under Class name, specify the name of the class within that assembly you want to instantiate. Finally, provide a name for the instance of that class. Reporting Services creates an instance of the class with the name you provide when the report is run.
Once the assembly is in the correct location and you have created a reference to that assembly, you can use the methods of this assembly in your reports. When referencing a shared method in an assembly, use the following syntax:
Namespace.ClassName.MethodName (Parameters…) For the WeatherInfo assembly, the syntax is
WeatherInfo.PlanetaryWeather.GetWeather(PlanetAbbrv)
To use a nonshared method from a class you instantiated, use the syntax
Code.InstanceName.MethodName (Parameters...)
Weather Report, Task 2: Create a Dataset, Add a Table to the Report Layout, and Populate It
-
Create a new dataset called Planets. Use the following for the query string:
SELECT Name, PlanetAbbrv FROM Planet ORDER BY Name
-
Select the Layout tab.
-
Place two text boxes and a table onto the body of the report. Complete your report layout so it is similar to Figure 8–11.
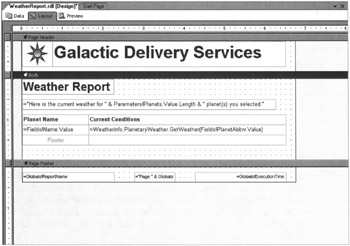
Figure 8–11: Weather Report layout -
Open the Report Parameters dialog box.
-
Click Add to create a new report parameter. Set the properties of this new parameter as follows:
Property
Value
Name
Planets
Prompt
Select Planets
Multivalue
checked
Allow blank value
unchecked
Available values
From query
Dataset
Planets
Value field
PlanetAbbrv
Label field
Name
Click OK to exit the Report Parameters dialog box.
-
Open the Table Properties dialog box. Select the Filters tab.
-
Enter the following expression in the first row of the Expression column:
=Array.IndexOf(Parameters!Planets.Value, Fields!PlanetAbbrv.Value)
-
Select >= in the Operator column.
-
Enter the following expression in the first row of the Value column:
=CInt(0)
-
Click OK to exit the Table Properties dialog box.
-
Select the Preview tab.
-
Use the Select Planets drop-down list to check Borlaron and Stilation. Click View Report. Your report should appear similar to Figure 8–12.
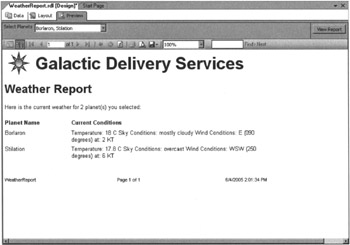
Figure 8–12: Weather Report previewNote Remember, the GetWeather method is going out to the Internet and retrieving weather conditions when you run the report. Because of this, you must be connected to the Internet when you run this report. This process may take some time if you are using a slow Internet connection and have selected a number of planets to report on. Also, the weather conditions you see in your report vary from those shown in Figure 8–12. Finally, some locations may show “null” for a certain condition if that condition has not been reported in the past hour.
-
Select Save All from the toolbar.
Task Notes The Weather Report makes use of a special type of parameter that allows for more than one value to be selected. Rather than requiring the user to select a single value from the Available Values drop-down list, a multivalued parameter enables the user to check off a number of values to be used when creating the report. Then, it is up to the Report Designer to figure out how to use those multiple values to return a report with the desired information.
The properties of the report parameter change when that parameter becomes multivalued. Instead of containing single values, the Value and Label properties become arrays. The arrays have one element for each of the items selected by the user. If the user checks three items in the drop-down list, the Value and Label arrays each have three elements. (These are zero-based arrays, so they are elements 0, 1, and 2 in this case.) The Length property of each array contains the number of elements in that array.
In this report, we used the multivalue parameter in a table filter to determine which records would be output. (In the Transport Monitor report, we use a multivalue parameter to create a WHERE clause in a query.) We are using a shared method of the Array class called IndexOf, which searches an array for a value. In this case, the IndexOf method is searching for each planet abbreviation in the Parameters!Planets.Value array. If the abbreviation is found, the index of the element that contains the abbreviation is returned by the IndexOf method; otherwise, it returns–1. Therefore, we want only those records where the IndexOf method returns a value greater than or equal to 0 to be included in the table.
As previously stated, the filter expressions do not always behave as you might expect. If we simply put a 0 on the right side of the filter expression (Step 9), the expression would not function properly. This is because the filter will treat it as a string value of “0” rather than a numeric value of 0. This might work all right if we were only comparing positive numbers, but it definitely does not work correctly when the IndexOf method returns a negative one. To get around this, we put an equals sign in front of the 0 to make it an expression rather than a constant. The expression is then evaluated correctly as a numeric value.
When you first encountered filters in Chapter 7, you were cautioned to use them wisely. The filter makes sense here for three reasons. First, the dataset we are filtering is small. Selecting just two or three records versus selecting all six is not a significant time savings. Second, as with the example in Chapter 7, the filter enables us to use the same dataset to populate the drop-down list and the table in the report body. It would be inefficient to run two database queries, one without a WHERE clause to get the list of planets for the drop-down list and one with a WHERE clause to get the planets selected for the table in the report. Finally, the most time-consuming part of the report is not the database interaction, but the calls to the web service over the Internet. Because our filter is applied before we step through the table and make the web service call, we are in good shape.
The Delivery Analysis Report
Features Highlighted
-
Using an Analysis Services cube as a data source via an MDX query
-
Parameterizing an MDX query
-
Localizing the label strings in a report
Business Need The Galactic Delivery Services long-range planning committee is working on forecasting the equipment and work force needs necessary for future growth. They need a report showing the number of deliveries and the average weight of those deliveries grouped by customer by quarter. They would also like to select whether the data includes next day deliveries, same day deliveries, previous day deliveries, or some combination of the three. The data for this report should come from the GalacticDeliveriesDataMart cube hosted by Microsoft SQL Server Analysis Services.
There are committee members from a number of planets. Most speak English, but the committee does include several Spanish-speaking members. (I know it is rather strange that people in a galaxy far, far away should speak English and Spanish, but work with me here!)
Task Overview
-
Copy the .NET Assembly into the Appropriate Location, Create a New Report, Create a Reference to the Assembly, and Create a Dataset Using the MDX Query Designer
-
Add a Table to the Report Layout, Populate It, and Localize the Report Strings
Delivery Analysis Report, Task 1: Copy the .NET Assembly into the Appropriate Location, Create a New Report, Create a Reference to the Assembly, and Create a Dataset Using the MDX Query Designer
| Note | You need to download the GalacticOLAP project from the website for this book and deploy it to a SQL Server Analysis Services server before you can complete this report. If you do not have access to Analysis Services, skip this report and continue with the “Reports within Reports” section of this chapter. |
-
If you have not already done so, download the ReportUtil.dll assembly from the website for this book.
-
Copy this file to the Report Designer folder. The default path for the Report Designer folder is
C:\Program Files\Microsoft Visual Studio 8\Common7\IDE\PublicAssemblies
-
Launch the Microsoft .NET Framework 2.0 Configuration program from the Administrative Tools section of your Control Panel.
-
Click the Configure Code Access Security Policy link.
-
Click the Increase Assembly Trust link.
-
Select Make Changes for This Computer and click Next.
-
Click Browse. Browse to the PublicAssemblies folder and select ReportUtil.dll. Click Open, and then click Next.
-
Select This One Assembly and click Next.
-
Change the Trust Level slider to Full Trust and click Next.
-
Click Finish.
-
Close the .NET Framework 2.0 Configuration program.
-
Reopen the Chapter08 project in the Report Designer if it was closed.
-
Create a new report called Delivery Analysis using the GDSReport template.
-
Open the Report Properties dialog box. Select the References tab.
-
Click…next to the References area. The Add Reference dialog box appears.
-
Scroll down to the entry for ReportUtil Assembly and select it. Click Add to add this file to the Selected Projects and Components list.
-
Click OK to exit the Add Reference dialog box. Click OK to exit the Report Properties dialog box.
-
Create a new dataset called DeliveryInfo. Select New Data Source from the Data Source drop-down list. The Data Source dialog box appears.
-
Enter GalacticDM for the Name. Select Microsoft SQL Server Analysis Services from the Type drop-down list.
-
Click Edit next to the Connection String text box. The Connection Properties dialog box appears.
-
Enter the name of the SQL Server Analysis Services server for Server name.
-
Select GalacticOLAP from the Select or Enter a Database Name drop-down list. You can test the connection if you like, but if GalacticOLAP shows up in the drop-down list, the connection has already been tested.
-
Click OK to exit the Connection Properties dialog box. Click OK to exit the Data Source dialog box. Click OK one more time to exit the Dataset dialog box. The MDX Query Designer appears as shown in Figure 8–13.
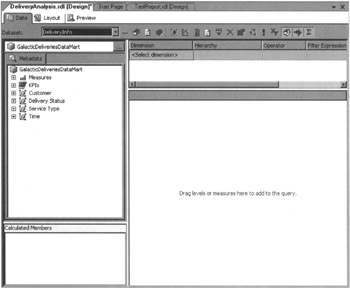
Figure 8–13: The MDX Query Designer -
Expand the Measures in the Metadata pane. Expand the Delivery measure group and then expand the Delivery entry within it.
-
Drag the Delivery Count measure onto the Results pane (the pane with the words “Drag levels or measures here to add to the query” in the center). The total count of all deliveries currently in the GalacticDeliveriesDataMart cube is shown in the Results pane.
-
Expand the Customer dimension in the Metadata pane. Drag the CustomerName attribute onto the Results pane to the left of the Delivery Count. The Results pane now shows the total count of all deliveries for each customer.
-
Expand the Time dimension in the Metadata pane. Drag the Delivery-Quarter attribute onto the Results pane to the left of the CustomerName column. The Results pane now shows the total count of all deliveries for each customer for each quarter.
-
Right-click in the Calculated Members pane and select New Calculated Member from the Context menu. The Calculated Member Builder dialog box appears.
-
Enter AvgWeight for the Name.
-
In the Expression area, enter ROUND(. Expand the Measures in the Metadata area, expand the Delivery measure group, and then expand the Delivery entry within it. Double-click Package Weight to add it to the expression.
-
Enter / at the end of the expression. Double-click Delivery Count to add it to the expression.
-
Enter ,2) at the end of the expression and click Check to check the syntax of the expression. Click OK to close the Check Syntax dialog box. Make any corrections to the expression, if a syntax error is encountered.
-
Click OK to exit the Calculated Member Builder dialog box.
-
Drag the AvgWeight calculated member onto the Results pane to the right of the Delivery Count.
-
In the Filter pane (the pane in the upper-right corner of the MDX Query Designer), select Service Type from the drop-down list in the Dimension column.
-
Select Description from the drop-down list in the Hierarchy column.
-
Equal should be selected from the drop-down list in the Operator column.
-
Examine the values in the drop-down window in the Filter Expression column, but do not make a selection. The Filter Expression column enables us to select one or more values for the right side of our filter expression. Instead of doing this at design time, we let our users make the selection at run time. Click Cancel to exit the drop-down window.
-
Check the box in the Parameters column. This selection enables the user to select the values of the filter expression at run time. The MDX Query Designer should appear as shown in Figure 8–14.
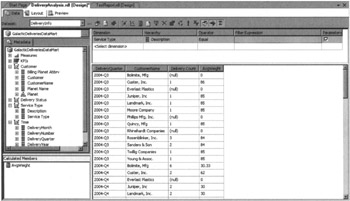
Figure 8–14: The MDX Query Designer containing the query for the Delivery Analysis Report
Task Notes The MDX Query Designer works almost entirely through drag-and-drop. We drag measures, dimensions, and hierarchies from the Metadata Browser pane and place them in the Results pane to create our query. We can define calculated members and add them to the results pane as well.
At the top of the Metadata pane is the name of the cube being queried. To select a different cube, click the…button and make a selection from the Cube Selection dialog box that appears.
Notice two refresh buttons are in the toolbar for the designer. The refresh button on the left refreshes the fields for this dataset in the Datasets window. The refresh button on the right refreshes the metadata from the cube. The toolbar button with the pickaxe switches from the MDX Query Designer to the DMX Query Designer. The toolbar button with the x-axis and y-axis switches back to the MDX Query Designer. Where the MDX Query Designer is used to query cubes in an Analysis Services database, the DMX Query Designer is used to query data mining models in an Analysis Services database. Because the same Analysis Services database may contain both cubes and data mining models, the Report Designer may not be able to tell which query designer you need simply by examining the database. Therefore, it is necessary to have a way to switch between the two.
The Show Empty Cells toolbar button toggles between showing and hiding empty cells in the Results pane. An empty cell is a combination of dimension and hierarchy members that have a null value for every measure, calculated or otherwise, in the Results pane. If empty cells are hidden in the Results pane, they are also hidden in the final report query. The Design Mode toolbar button enables you to toggle between the design view and the query view of the MDX query. If you are comfortable with MDX query syntax, you may want to type your queries into the query view rather than creating them through the drag-and-drop programming method of the design view. The Auto Execute toolbar button toggles autoexecute mode in the Query Designer. When autoexecute mode is on, the cube is requeried and the Results pane is updated every time an item is added to or removed from the Results pane.
The Filter pane enables us either to hardcode filter expressions at design time or use report parameters for the user to make selections at run time. When the Parameters check box is checked, a parameterized filter is created. Several things happen when we move from the Data tab to the Layout tab for the first time after a parameterized filter has been added to the query. When this occurs, the Report Designer creates a new dataset for each item being used in a parameterized filter. This dataset includes all the valid members of that item.
In addition to the datasets, new report parameters are created for each parameterized filter. The datasets are used to populate the available values for these report parameters. The report parameters are multivalued. Using this mechanism, the user is allowed to select one or more valid members to be used in the parameterized filters at the time the report is executed.
Delivery Analysis Report, Task 2: Add a Table to the Report Layout, Populate It, and Localize the Report Strings
-
Select the Layout tab.
-
Place a text box onto the body of the report and set its properties as follows:
Property
Value
Font:FontSize
20pt
Font: FontWeight
Bold
Location: Left
0in
Location: Top
0in
Size: Width
5.875in
Size: Height
0.375in
-
Set the content of the text box to the following expression:
=ReportUtil.Localization.LocalizedString("DeliveryReportTitle",User!Language) -
Place a matrix onto the report body.
-
Expand the DeliveryInfo dataset and drag DeliveryQuarter into the Columns cell. Click the Bold button and the Center button in the toolbar.
-
Drag CustomerName into the Rows cell. Click the Bold button in the toolbar.
-
Drag Delivery_Count into the Data cell.
-
Drag AvgWeight into the same cell where Delivery_Count was placed. Drag to the right side of the cell. This creates a second data column to the right of the first.
-
Enter the following expression in the text box that contains Delivery:
=ReportUtil.Localization.LocalizedString("DeliveryCountColHead",User!Language) -
Enter the following expression in the text box that contains avg weight:
=ReportUtil.Localization.LocalizedString("AvgWeightColHead",User!Language) -
Open the Report Parameters dialog box. You can see the ServiceTypeDescription report parameter, which was created to work with the parameterized filter.
-
Enter Select Service Types for the Prompt.
-
Click OK to exit the Report Parameters dialog box.
-
Select the Preview tab. Check All in the Select Service Types drop-down list and click View Report.
-
Select Save All from the toolbar.
Task Notes You may have noticed we did not type text strings for the report title and the two column headings on the report. Instead, we used expressions that call the LocalizedString method of the Localization class in the ReportUtil assembly. (Localization refers to the process of making a report or computer program appear in the language of a certain location.) This method requires two parameters: the name of the string to localize and the language it should be localized into. The string name is hardcoded in each expression. The language comes from the User!Language global variable. This global variable is populated with the language of the client application requesting the report.
The ReportUtil assembly uses multiple resource files to manage the localization. There is one resource file for each language it must support. In the demonstration code supplied for this example, the ReportUtil only has two resource files: one for English and one for Spanish. To support another language, you simply need to add another resource file and rebuild the project.
We used the LocalizedString method to get localized versions of the report title and the two column headers. The remainder of the report content is either proper names or numeric. Neither of these needs to be translated. If you are sharp, you will notice the report parameter prompt and the items in the report parameter drop-down list have not been localized. We cannot use expressions for either of these items, so we cannot use our nifty LocalizedString method.
The drop-down list content is selected from the database, so some localization of the data could be done as part of the query. The report parameter is a bigger problem. In fact, the current version of Reporting Services does not have a nice way to deal with this.
EAN: 2147483647
Pages: 115