Selecting with the Pen Tool
| If ever you find yourself stranded on a desert island and are granted oneand only onePhotoshop selection tool (useful on a desert island), my advice is to choose the Pen. It may not always be the fastest or the most convenient, but the Pen tool is the most versatile andonce you've mastered its seemingly strange behaviorthe most accurate. Technically the Pen tool is not really a selection tool. You don't use it to select pixels, but rather to draw pathsmathematically defined lines and curvesaround your subjects. Once you have a path, you're just a click away from a selection. The Pen tool is the best choice for making a selection in the following circumstances:
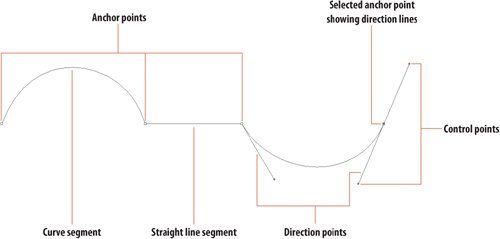
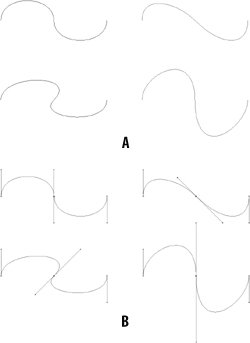
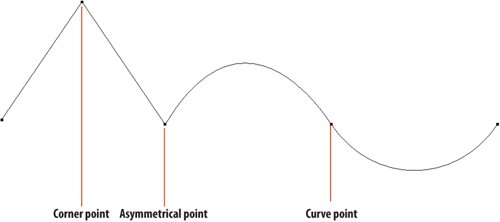
The paths we draw in Photoshop (and in Illustrator and InDesign) are made up of Bézier curves, named for their inventor Pierre Étienne Bézier (1910-1999). Bézier was a Renault car company engineer who, in the late 1960s, developed his curves as a way of drawing car body forms on computers. Bézier curves were at the heart of the desktop publishing revolution. They are the basis for vector graphics programs like Adobe Illustrator, and were adopted as the standard curve of Adobe's PostScript page description language. Most outline fonts are stored as Bézier curves. The Anatomy of a PathA path consists of path segments (straight line and curve), anchor points, direction points, and control points. The segments make up the path itself. The anchor points determine where the path segment will go. The direction lines, which are manipulated with the direction points, determine the shape of the segment. Figure 1.30. The anatomy of a path. Figure 1.31. These paths were copied from the path top left (example A). The direction lines of the center anchor point were adjusted (example B). Path segments can be joined by corner points, smooth points, or asymmetrical points. Figure 1.32. Corner points, curve points, and asymmetrical points. Paths can be open or closed. If you turn an open path into a selection, Photoshop will close the two end points with a straight line, so for accurate selections be sure to close the path by clicking again on the first anchor point. Once you start a path, it appears in the Paths palette as a Work Path, which is temporary and is discarded as soon as you start the next path. If there's even the remotest possibility you'll need the path again, save it by double-clicking Work Path in the Paths palette and giving it a name. Active paths are displayed as a gray outline, and if a path is active, it will be added to; if no path is active, a new Work Path will be started. This is significant if you're taking several goes to make your path. If you want all your subpaths to be part of the same path, then make sure you activate the path with the Direct Selection tool (so that you can see its anchor points) before you start drawing again. A subpath is a series of segments and anchor points created in a discrete Pen tool session. A path around a distinct shape will be made up of a single path; any interior areas will be separate subpaths of the same path. |
EAN: 2147483647
Pages: 93

