Reading and Writing Text Files
| The Registry is a handy place to store user options and program configuration settings. It's not a good place, however, to store a lot of data such as a text document. If you have a lot of text data to store and retrieve, a good old-fashioned text file is probably the best place to put it (assuming that a real database such as Microsoft SQL is not an option). Visual C# includes classes that makes it relatively easy to manipulate text files: StreamWriter and StreamReader. Notice that reading and writing text files are performed by two different objects, only one of which can access a file at any given time. If you want to simultaneously read and write to a single file, you're probably best off to use a real database. Writing to a Text FileWriting to text files is done using the StreamWriter class. The first step to using this class is to declare an object of type StreamWriter, like this: System.IO.StreamWriter objFile = new System.IO.StreamWriter(@"C:\test.txt"); Or like this: System.IO.StreamWriter objFile = new System.IO.StreamWriter(@"C:\test.txt", true); By the Way There are actually seven different forms of StreamWriter usage. I'm showing you the most common, but if you're going to do serious work with text files, you should read the MSDN document on the StreamWriter class. As you can see, the second parameter is optional, and it determines whether you want to append to the text file if it already exists. If you omit this second parameter, or supply false as its value, a brand-new text file is created. If the text file already exists, it gets replaced with a new file of the same name. If you pass true, as in the second example, the file is opened, and any write operations you perform on the file are tacked on to the end of the file. Did you Know? If you pass a file path/name that does not exist, Visual C# creates a new text file for you when you write data to the StreamWriter object. After you have an object that points to a StreamWriter object, you can store data in the text file using one of the following two methods:
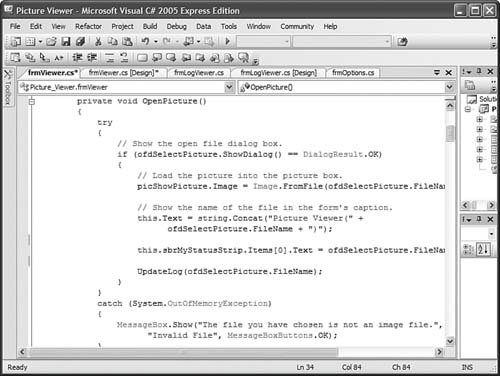
These two methods are best understood by example. Consider the following code snippet: System.IO.StreamWriter objFile = new System.IO.StreamWriter(@"C:\test.txt"); objFile.WriteLine("text1"); objFile.WriteLine("text2"); objFile.WriteLine("text3"); objFile.Close(); objFile.Dispose();This snippet would produce the following data in the text file: text1 text2 text3 By the Way Notice the last statement: objFile.Close(). It's absolutely vital that you close a text file when you're finished with it, and the Close() method does this. In addition, you should also call objFile.Dispose() to make sure the file is fully released. Now, consider the same code snippet that uses Write() instead of WriteLine(): System.IO.StreamWriter objFile = new System.IO.StreamWriter(@"C:\test.txt"); objFile.Write("text1"); objFile.Write("text2"); objFile.Write("text3"); objFile.Close(); objFile.Dispose();This snippet produces a text file that contains the following: text1text2text3 See how WriteLine() creates lines of data, while Write() simply streams the data into the file? This is an incredibly important distinction, and understanding the difference is crucial to your success writing text files. Which method you choose depends entirely on what you are trying to accomplish. I think perhaps that WriteLine() is the most common way. The following code illustrates how you could use WriteLine() to store a list of albums (assuming that you have the list in a list box titled lstAlbums): System.IO.StreamWriter objFile = new System.IO.StreamWriter(@"C:\albums.txt"); for (int intCounter = 0; intCounter <= lstAlbums.Items.Count -1; intCounter++) { objFile.WriteLine(Convert.ToString(lstAlbums.Items[intCounter])); } objFile.Close(); objFile.Dispose();Reading a Text FileReading a text file is handled by the StreamReader class, which behaves similarly to the StreamWriter class. First, you need to define an object of type StreamWriter, like this: System.IO.StreamReader objFile = new System.IO.StreamReader(@"C:\test.txt"); A key difference in declaring a StreamReader object versus a StreamWriter object is how the code behaves if the file is not found. The StreamWriter object is happy to create a new text file for you if the specified file isn't found. If the StreamReader can't find the specified file, it will throw an exceptionsomething you need to account for in your code. Just as StreamWriter lets you write the data to the file in one of seven ways, StreamReader also has multiple ways to read the data. The first of the most common two ways is using the ReadToEnd() method, which reads the entire file and is used to place the contents of the file into a variable. You would use ReadToEnd() like this: System.IO.StreamReader objFile = new System.IO.StreamReader(@"C:\test.txt"); string strContents; strContents = objFile.ReadToEnd(); objFile.Close(); objFile.Dispose(); MessageBox.Show(strContents); The ReadtoEnd() method can be handy, but sometimes you just want to get a single line of text at a time. For example, consider the text file created by the previous example, the one with a list of albums. Say that you wanted to read the text file and place all the albums found in the text file into a list box named lstAlbums. The ReadToEnd() method would allow you to get the data, but then you would have to find a way to parse each album name. The proper solution for reading one line at a time is to use the ReadLine() method. The following code shows how you could load the Albums.txt text file, one line at a time, and place each album name in a list box: System.IO.StreamReader objFile = new System.IO.StreamReader(@"C:\albums.txt"); string strAlbumName; strAlbumName = objFile.ReadLine(); while (strAlbumName != null) { lstAlbums.Items.Add(strAlbumName); strAlbumName = objFile.ReadLine(); } objFile.Close(); objFile.Dispose();A couple of important concepts in this example need discussing. The first is how do you know when you've reached the end of a text file? The answer is that the return result will be null. So, the first thing this code does (after creating the StreamReader object and the string variable) is get the first line from the text file. It's possible that the text file could be empty, so the while loop tests for this. If the string is null, the file is empty, so the loop doesn't execute. If the string is not null, the loop begins. The first statement in the loop adds the string to the list box. The next statement gets the next line from the file. This sends execution back to the while statement, which again tests to see whether we're at the end of the file. One thing this code doesn't test for is a zero-length string (""). If there is a blank line in the text file, the string variable will hold a zero-length string. You might want to test for a situation like this when working with text files in your code. That's it! Text files are not database files; you'll never get the power and flexibility from a text file that you would from a real database. With that said, text files are easy to work with and provide amazing and quick results within the context of their design. Modifying Your Picture Viewer Project to Use a Text FileIn this section, you're going to modify your Picture Viewer project to use a text file. What you'll be doing is have the Picture Viewer update a log (a text file) every time the user views a picture. You'll then create a simple dialog box that the user can open to view the log file. If you no longer have the Picture Viewer project open from earlier, open it now. Creating the Picture Viewer Log FileIn this section, you'll modify the Picture Viewer project to create the log file. Follow these steps to implement the log functionality:
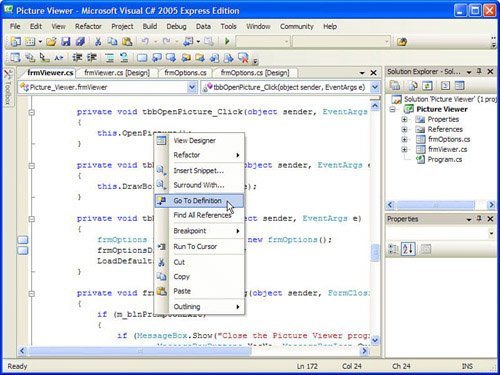
Most of this code should be recognizable, but consider this snippet: System.AppDomain.CurrentDomain.BaseDirectory + @"\PictureLog.txt" The method BaseDirectory() returns the path of the running program. This is a great trick to know! What you've done here is append the filename PictureLog.txt to the application path, so that the log file is always created in the application path. This makes it easy for the user to find it. In a robust application, you might let the user specify a path, perhaps storing it in the Registry. For our purposes, the application path works just fine. By the Way When debugging an application in the Visual C# IDE, the application path might not be exactly what you expect. When you compile and test your application, Visual C# creates a bin\Debug folder under the folder containing your project. This is where it places the temporary .exe it creates for debugging, and this is your application path. If you go looking for the log file in your project folder, you won't find it. You need to drill down into the \bin\Debug folder to get it. Displaying the Picture Viewer Log FileIn this section, you'll modify the Picture Viewer project to include a dialog box that the user can display to view the log file. Follow these steps to implement the log viewer functionality:
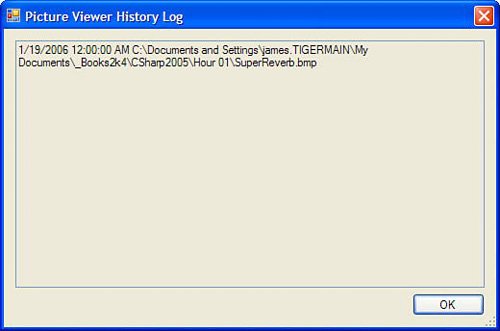
Testing Your Picture Viewer LogSave your project now and press F5 to run it. Follow these steps to test the project:
|
EAN: 2147483647
Pages: 248
- Structures, Processes and Relational Mechanisms for IT Governance
- Assessing Business-IT Alignment Maturity
- Linking the IT Balanced Scorecard to the Business Objectives at a Major Canadian Financial Group
- Measuring and Managing E-Business Initiatives Through the Balanced Scorecard
- Governing Information Technology Through COBIT