UVMapper
Earlier in this chapter, and even earlier than that in Chapter 9, we used the UVMapper program created by Steve Cox to help us skin a model. As promised, here is the section with the detailed information on UVMapper. We won't cover every detail. Instead, we will concentrate on those details that we can apply to our own needs here in this book.
The first thing to know about UVMapper is that it only operates on models saved in OBJ format, as created by the Alias Wavefront program. The UV unwrapping principles involved are the same for all similar tools. The author of UVMapper has also created UVMapper Pro, a newer release with many more features and greater flexibility. The companion CD includes a demo of UVMapper Pro, a restricted version (you can't save output, which, of course, we need to do). If you want to check out the enhanced features later, go ahead and poke around.
The File Menu
As is true in most programs, UVMapper's File menu provides commands for loading, saving, importing, and exporting files. See Table 13.17 for descriptions.
| Command | Description |
|---|---|
| Load Model | Load a Wavefront OBJ formatted model from file. After it is loaded, you will see the texture map layout in the UVMapper window. If you don't, then there are no texture coordinates included in the model. You can fix this by choosing Edit, New UV Map (see Table 13.18). |
| New Model | This command gives you a method for adding or creating your own models from shape primitives. The primitives are box, cone, cylinder, sphere, and torus. |
| Import UVs | With this command you can import UV coordinate data that has been saved separately from a model. |
| Save Model | Use this command to save the UV mapping data you've created along with the model you originally imported. |
| Save Texture Map | You can save the texture map image using this command. You can then load that image as a template into a program like Paint Shop Pro in order to apply that "artistic magic." |
| Export UVs | With this command you can export only the UV texture coordinates you've created using this program, without the rest of the model data. |
The Edit Menu
The Edit menu is where the real power of UVMapper resides. Table 13.18 provides more information.
| Command | Description |
|---|---|
| Settings | Here you can specify how many pixels on your screen correspond to a single measurement unit. The value you use depends on the scale of the model you are working with. |
| Select By | This command gives you the ability to select on-screen objects by facet (face) or by selecting the vertices. Usually you leave this set to Facet. |
| Color | This command will let you indicate how you want to discriminate the different parts of the display. Your choices are Black and White (no discrimination), by Group, by Material, and by Region. This capability is handy when dealing with a complex model. |
| | This command provides three different functions: Fix Seams, Split Vertices, and Weld Vertices. MilkShape offers these same abilities, but it's nice to know we have access to them here as well. |
| Select | With this command you can refine your object selection ability. There are five modes: All, None, by Group, by Material, and by Region. The by Group, by Material, and by Region options each provide a Selection dialog box if these entities actually exist in the model data. Judicious naming of groups (meshes) when in MilkShape can be a great boon when working here in UVMapper. |
| Assign | Use this command to assign selected objects to an existing group, material, or region. Again, you would normally do this in your modeling program, but it's nice to have the ability here if you realize you've forgotten to assign some faces to a particular group. |
| Rotate | This command allows you to rotate a selection around any of the three axes—or all three at once, if you want. |
| New UV Map | This command provides several different unwrapping methods: Planar, Box, Cylindrical, Cylindrical Cap, and Spherical. The options available here are quite extensive so they warrant coverage in their own section, called "UV Mapping," in this chapter. |
| Tile | This command is complementary to the Select command. Using Tile you can specify how the program displays the different parts of the model; they can be visually organized (tiled) according to group, material, or region. |
The Help Menu
The Help menu provides the user some assistance when working with the program. Table 13.19 provides more detail, and Table 13.20 provides a list of UVMapper hot keys.
| Command | Description |
|---|---|
| Statistics | This will report the current status of your model. This will tell you the total vertices, textures, normals, facets, groups, and materials. Bear in mind that while you are editing a model, UVMapper will temporarily increase the number of texture coordinates allocated to the model, and so this is not a good representation of the actual number of texture coordinates the model will have upon saving. A more accurate way to obtain this information is from within the MilkShape modeling tool. |
| Dimensions | This will give you the overall geometric dimensions of the model. This will report the minimum and maximum values along each of the three axes (X, Y, and Z). |
| Hot Keys | This command will give you a list of the available hot keys. Table 13.20 also contains a list of the UVMapper hot keys. |
| About UVMapper | This command gives you information about the version, how to contact the author, and where you can obtain an updated version of the program. |
| Key | Description |
|---|---|
| Esc | clears selection, undoes changes |
| Enter | clears selection, saves changes |
| Shift+number key | increases resize/movement amount |
| keypad * | quadruples size of selection |
| keypad / | quarters size of selection |
| keypad + | increases size of selection |
| keypad - | decreases size of selection |
| keypad # | moves selection |
| = | maximizes selection |
| . | snaps selection to facets |
| [ | hides selected facets |
| ] | shows selected facets |
| \ | toggles facets on and off |
| ' | hides unselected facets |
| uU/vV | resizes selection (fine) |
| x/X/y/Y | resizes selection (coarse) |
| Ctrl+x | inverts selection horizontally |
| Ctrl+y | inverts selection vertically |
| Ctrl+b | loads background |
| Ctrl+c | clears background |
| Ctrl+u | flips background horizontally |
| Ctrl+v | flips background vertically |
| Tab | toggles background display |
| t | triangulates object |
| Insert | checks for degenerate facets |
UV Mapping
When you choose Edit, New UV Map you will be presented with a choice of five different unwrapping methods:
-
Planar
-
Box
-
Cylindrical
-
Cylindrical Cap
-
Spherical
Each of these methods is described in more detail here. Sometimes, even when you know exactly what the unwrapping method is supposed to do, you will be surprised at the results, so don't be afraid to experiment. Once you've loaded a model, you can keep trying the different unwrapping methods with different settings. Each time you do it, the program begins from scratch, so you don't have to worry about undoing your previous efforts.
Planar
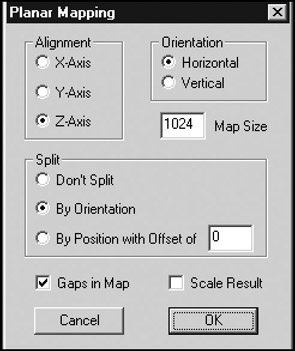
When you use the Planar method, you will be presented with the dialog box depicted in Figure 13.24. Table 13.21 provides details about using the Planar method.

Figure 13.24: The Planar Mapping dialog box.
| Option | Description |
|---|---|
| Alignment | This allows you to specify the axis along which the model will be mapped. |
| Orientation | This allows you to alter the layout of the texture map template. It only has an effect when using the Split option (described later in this table). If you select Don't Split, the Orientation option has no effect. When splitting the model into front and back sections, you can have the two halves side by side (Horizontal) or above and below each other (Vertical). Which you want to use really depends on the geometry of the model. If you don't like the layout of the texture map after using planar mapping, try changing this option. |
| Map Size | This will specify the maximum dimension of the texture map template. Depending on the model it may be vertical or horizontal, but the texture map is guaranteed not to exceed this value in either width or height. One side will equal this value, and the other will be scaled accordingly. |
| Split | This option allows you to divide the texture map into front and back sections. (To adjust the placement of these sections, see the Orientation option earlier in this table.) You have three options. Don't Split will give you one map with the front and back facets on top of each other. By Orientation will calculate the facet normals, placing all facets that face toward the eye on one side, and placing all facets that face away on the other. By Position with Offset of allows you to divide the model based on geometry rather than facing. Using an offset of 0 will divide the model in half. You can adjust this offset to change how many facets are on each side. |
| Gaps in Map | This allows you to separate the sides of the box on the texture map. If the sides touch, sometimes you will see one pixel of the side on the front, for example. |
| Scale Result | Use this option to specify how much larger or smaller the resulting texture map should be. |
Box
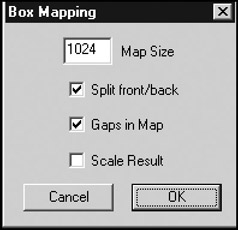
When you use the Box method, you will be presented with the dialog box depicted in Figure 13.25. You can get more information on using the Box method in Table 13.22.

Figure 13.25: The Box Mapping dialog box.
| Option | Description |
|---|---|
| Map Size | This will specify the maximum dimension of the texture map template. Depending on the model it may be vertical or horizontal, but the texture map is guaranteed not to exceed this value in either width or height. One side will equal this value, and the other will be scaled accordingly. |
| Split front/back | Setting this option will divide the model into six sections: front, back, top, bottom, left side, and right side. Uncheck this option if you want to combine top and bottom, left and right, front and back, giving you only three sections. |
| Gaps in Map | This allows you to separate the sides of the box on the texture map. If the sides touch, sometimes you will see one pixel of the side on the front, for example. |
| Scale Result | Use this option to specify how much larger or smaller the resulting texture map should be. |
Cylindrical
When you use the Cylindrical method, you will be presented with the dialog box depicted in Figure 13.26. Table 13.23 provides details about using the Cylindrical method.

Figure 13.26: The Cylindrical Mapping dialog box.
| Option | Description |
|---|---|
| Map Size | This will specify the maximum dimension of the texture map template. Depending on the model it may be vertical or horizontal, but the texture map is guaranteed not to exceed this value in either width or height. One side will equal this value, and the other will be scaled accordingly. |
| Split front/back | Setting this option will divide the model into six sections: front, back, top, bottom, left side, and right side. Uncheck this option if you want to combine top and bottom, left and right, front and back, giving you only three sections. |
| Gaps in Map | This allows you to separate the sides of the box on the texture map. If the sides touch, sometimes you will see one pixel of the side on the front, for example. |
| Scale Result | Use this option to specify how much larger or smaller the resulting texture map should be. |
Cylindrical Cap
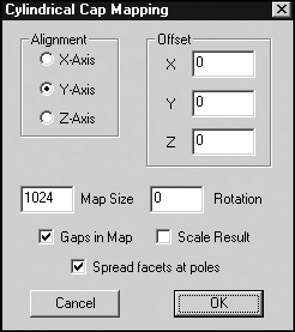
When you use the Cylindrical Cap method, you will be presented with the dialog box depicted in Figure 13.27. Table 13.24 provides details about using the Cylindrical Cap method. This method is similar to the Cylindrical method, except that it assumes you are unwrapping a cylinder with end caps, as if there were closed lids on both ends of a can. The caps are mapped separately from the tubing of the cylinder.

Figure 13.27: The Cylindrical Cap Mapping dialog box.
| Option | Description |
|---|---|
| Alignment | This allows you to specify the axis around which the model will be mapped. |
| Offset | When mapping a model with one of these methods (Cylindrical, Cylindrical Cap, or Spherical) the model is mapped around a center point. This center is calculated using the maximum and minimum geometry values along each axis. This works quite well for mapping a true sphere or cylinder, but if you have a model that is, say, a sphere with a spike on the side of it, the calculated center may not be what you want. To adjust the center of the model from what's been calculated, use this option. |
| Map Size | This will specify the maximum dimension of the texture map template. Depending on the model it may be vertical or horizontal, but the texture map is guaranteed not to exceed this value in either width or height. One side will equal this value, and the other will be scaled accordingly. |
| Rotation | Use this to specify how much, if any, rotation will be applied to the resulting texture map image template. |
| Gaps in Map | This allows you to separate the sides of the box on the texture map. If the sides touch, sometimes you will see one pixel of the side on the front, for example. |
| Scale Result | Use this option to specify how much larger or smaller the resulting texture map should be. |
| Spread facets at poles | Oftentimes facets are squeezed together when the mapping occurs, especially at places like the "poles" (the tops and bottoms of the map, just like on maps of the Earth). With this option set, the resulting map will spread the facets at the poles to alleviate the pinching effect. |
Spherical
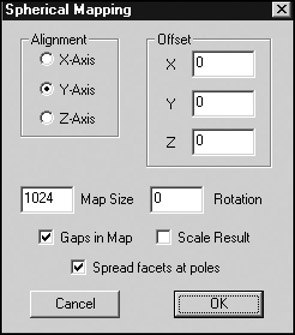
When you use the Spherical method, you will be presented with the dialog box depicted in Figure 13.28. You can get more information on using the Spherical method in Table 13.25.

Figure 13.28: The Spherical Mapping dialog box.
| Option | Description |
|---|---|
| Alignment | This allows you to specify the axis around which the model will be mapped. |
| Offset | When mapping a model with one of these modes (Cylindrical, Cylindrical Cap, or Spherical) the model is mapped around a center point. This center is calculated using the maximum and minimum geometry values along each axis. This works quite well for mapping a true sphere or cylinder, but if you have a model that is, say, a sphere with a spike on the side of it, the calculated center may not be what you want. To adjust the center of the model from what's been calculated, use this option. |
| Map Size | This will specify the maximum dimension of the texture map template. Depending on the model it may be vertical or horizontal, but the texture map is guaranteed not to exceed this value in either width or height. One side will equal this value, and the other will be scaled accordingly. |
| Rotation | Use this to specify how much, if any, rotation will be applied to the resulting texture map image template. |
| Gaps in Map | This allows you to separate the sides of the box on the texture map. If the sides touch, sometimes you will see one pixel of the side on the front, for example. |
| Scale Result | Use this option to specify how much larger or smaller the resulting texture map should be. |
| Spread facets at poles | Oftentimes facets are squeezed together when the mapping occurs, especially at places like the "poles" (the tops and bottoms of the map, just like on maps of the Earth). With this option set, the resulting map will spread the facets at the poles to alleviate the pinching effect. |
EAN: 2147483647
Pages: 197