| Movie clips are arguably the most common type of symbol used by Flash designers and developers. In essence, movie clips are miniature applications themselves. Each movie clip has its own Timeline that operates independently from the Flash document's main Timeline. This means that you can create looping animations while minimizing file size because you can use the Timeline in the same way as the Timeline you find on the main Stage. You don't have to create long repeating animations: Simply create one loop and then place the movie clip on the Stage. It repeats over and over, independently of the main Timeline. Movie clips don't have to loop, either. You can create a clip and have it animate after a particular event happens. Or a movie clip can play and then stop at the end. Movie clips do a heck of a lot more than just hold animations though. For instance, you can use blends with movie clip symbols. Blends determine how the colors of a movie clip interact with the colors of objects on a lower stacking order; we don't cover blends in this book, but there's tons of stuff about it in your documentation. You can also create mini applications with them, drag and drop applications, and all kinds of other useful stuff. The movie clip is your friend, and you should know it and love it. Because you'll be working with the movie clip throughout the book, don't fret all the details now. At this point, simply get to know your new friend. In the next exercise, you will create several movie clips for the Tech Bookstore. The movie clips in this lesson will be used to contain animations for user interface elements. Later on in the book, you will use movie clips as containers for miniature applications and even to hold content loaded from a server. You create movie clips in the same way you create graphic and button symbols. However, movie clips enable you to add more functionality to a symbol than button or graphic symbols do. You can also create and manipulate movie clips using ActionScript, which can be a powerful tool in your applications. You assign an instance name to a movie clip instance, which is used in your ActionScript to target and manipulate that instance. You will learn more about ActionScript in Lesson 6 and Lesson 9. Note Movie clips add a bit more file size to your SWF file than equivalent button or graphic symbols. If you can create the same effect using either a graphic or button, it is wise to do so. Often you will need the additional capabilities that movie clips offer, however.
1. | Select the logo symbol and press F8 to insert the symbol inside a new movie clip.
Type mcLogo into the Name field, select the Movie clip radio button, and click OK to create the new movie clip. The mcLogo will contain a couple of independent animations within it, so you need to insert the logo.png bitmap inside of a movie clip so you can nest other movie clips on layers inside one main clip.
Tip If you cannot select the logo on the Stage, make sure that the logo layer is not locked. | 2. | Double-click mcLogo, rename Layer 1, and then add a new layer to the movie clip.
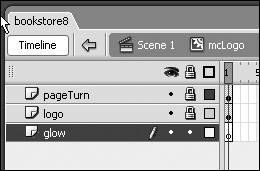
You will see the logo.png bitmap on Layer 1 inside the movie clip. Rename Layer 1 to logo. Click Insert New Layer so a new layer is added above the logo.png image. Rename the new layer pageTurn.
| 3. | Use the Line tool to create a line on the pageTurn layer.
Make sure that the pageTurn layer is selected before you create a line. Select the Line tool and return to Object Drawing. Click the stroke color control in the Tools panel and change the stroke color to #999999 in the color pop-up window. Select the Line tool from the Tools panel.
As shown in the following figure, click and drag from one end of the left side of the book cover from the outer to the inner edge of the cover. Position the line so it is the same angle and length as the left book cover edge.
 Tip With the line unselected, mouse over the ends of the lines until you see a cursor containing an "L" shape. If you click and drag the line with this cursor, you can change the position and length of the line. This can help you properly position the line in relation to the logo and fine-tune a little bit. If you select the entire line, the cursor changes to a four-way arrow when you mouse over it. Clicking and dragging the line moves the entire line instead. | 4. | Place the drawing you made into a new movie clip by pressing F8.
Select the entire line you just created, without moving it. Press F8 to convert the line into a movie clip symbol. Type mcPageTurn into the Name field, select the Movie clip radio button, and click OK. A new movie clip is created inside mcLogo, so mcPageTurn is nested within mcLogo. Look at the edit bar, which shows you a visual representation of where you currently are nested within movie clips.
Tip If you double-click mcLogo and then mcPageTurn, you are taken inside of the mcPageTurn movie clip, in which you can edit the line you created. The line is left as a raw graphic, so you can shape tween the line. You will learn how to create shape tweens in Lesson 5. You need to create a movie clip that will eventually be animated within the mcLogo movie clip. The animation will loop independently from the main Timeline, which means that it should be placed within a movie clip.
| 5. | Insert a new layer in mcLogo and move it to the bottom of the layer stack.
The glow needs to animate beneath the logo itself, so it appears behind that area. Therefore, it needs to be placed beneath the logo itself. Click Insert New Layer to create a new layer and rename it glow. Make sure this new layer is on the bottom of the stack in the Timeline.
 Return to the main Timeline by clicking on Scene 1 in the edit bar.
| 6. | Lock the logo layer. Select the glow animation layer on the Timeline, cut its contents, and place the glow symbol inside the mcLogo movie clip.
Expand the graphics layer folder. The grGlow symbol should still be on the Stage from when you created it in Lesson 2. Return to the Stage by clicking Scene 1 in the edit bar. Select the grGlow symbol and select Edit > Cut.
Double-click mcLogo in the library to open it in symbol-editing mode and select the glow layer. Then select Edit > Paste in Place so the grGlow symbol and the logo graphic line up correctly.
| 7. | Return to the main Stage and delete the glow animation layer. Save the changes you made to the file before moving on.
Click Scene 1 on the edit bar to return to the main Stage. Notice that the glow animation layer is now empty because you cut and pasted the content from the layer into the movie clip that is on the logo layer. Right-click or Control-click the glow animation layer and select Delete Layer from the contextual menu. The layer is permanently removed from the Timeline. Don't forget to save the FLA file before you proceed to the next step.
Now that you have put together the pieces for the logo's animation, you need to create the main menu that controls the Tech Bookstore. In the next exercise, you will create a movie clip to hold both graphic and button symbols.
|
|

