Programming DataAdapter and DataSet Objects
Programming DataAdapter and DataSet Objects
The previous sample illustrated a special way to perform data manipulation that uses Command objects and adds the power of transactions to your data manipulation tasks . Although the approach illustrated in the previous sample ensures that no action queries work unless all action queries work, you will not achieve optimum scalability with it. Therefore, you should restrict your use of transactions to cases that absolutely require them. Instead, use a combination of data adapters and datasets for optimum scalability in your data manipulation tasks.
As you have learned, a data adapter acts as a bridge between a data source, such as the Customers table in the Northwind database, and a dataset in a Visual Basic .NET project. A dataset is a disconnected, in-memory copy of all or some of the data from a data source. Users can view and make changes to data in the dataset. When performing a task that requires a connection to a data source, the dataset briefly and automatically connects and disconnects to the data source through the data adapter just long enough to take care of business. Typical tasks that require an open connection include filling or refreshing a local dataset and exchanging updates between a dataset and its corresponding data source. You do not have to program when to open or close the data adapter; the .NET Framework handles that for you. The normally disconnected nature of datasets boosts the scalability of a database. Databases can handle more users because each dataset connects briefly ”and only when necessary ” to perform a specific task.
Form5 in the ADONETSamples project includes sample code for managing data access and data manipulation through data adapters and datasets. Figure 8-10 shows the form in Design view as well as operational view immediately after the opening of Form5 . As you can see by the number of buttons , this sample application includes lots of sample code. The module behind Form5 has a separate procedure for the click event of each button plus a dataset application set up in the form load event.
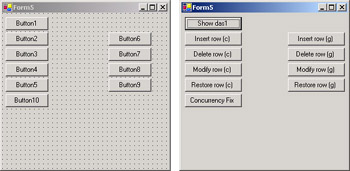
Figure 8-10: The click event procedures for the buttons and the form load event procedure demonstrate coding techniques for data manipulation via data adapters and datasets.
The amount of sample code is large partly because the application shows how to perform data manipulation based on datasets created with two techniques ”one that is code based and another that is graphically based. Button2 through Button5 rely on a dataset created via code-based techniques for performing data manipulation. However, Button6 through Button9 demonstrate comparable data manipulation tasks with a dataset created graphically. Button1 shows both metadata and data values from the dataset set up with code in the form load event procedure. The two datasets in the sample application point at the same data source in the Northwind database through a single data adapter. This design permits the sample application presentation to close with a demonstration of a concurrency violation and its workaround. The possibility of concurrency violations is the price that you pay for the scalability advantages that datasets deliver.
| Note | As with several of the preceding forms shown in this chapter, the form load event transforms the form s layout from the Design view to its initial operational view. To keep the focus of this chapter on ADO.NET, the printed sample code does not include the code for the layout tasks. However, the code is available in the ADONETSamples project. The sample for Form5 is different from all the preceding samples in this project because Form5 includes ADO.NET programming in its form load event procedure. This important code does appear in the code listing. |
Data Manipulation Setup Code
You can set up an OleDbDataAdapter for data manipulation by properly configuring four properties: SelectCommand , InsertCommand , UpdateCommand , and DeleteCommand . Of course, you need to specify an OleDbConnection object for the Command objects that you assign to the properties. You can assign stand- alone OleDbCommand objects for the four properties, or you can use Command constructors in assignment statements that immediately convey an appropriately specified command to a property.
Through the CommandText property for a stand-alone OleDbCommand object or the SQL string in an OleDbCommand constructor, you can specify the operation of an OleDbDataAdapter object. The SelectCommand property determines the data that the Fill method conveys from a data source to a local dataset. For data manipulation tasks such as inserts , updates, and deletes, you need to understand that changes to a dataset are pending until they are accepted or rejected for the dataset. The Update method for the OleDbDataAdapter class performs several functions:
-
Tries to convey pending updates for a local dataset to the underlying data source for the dataset. The CommandText property for the objects returned by the InsertCommand , UpdateCommand , and DeleteCommand properties determine which pending changes the Update method attempts to transfer to a data source. As Access developers, your underlying data source is likely to be an Access database.
-
Accepts the pending changes in the local dataset if no concurrency violations exist. This action can reconcile a local dataset with its underlying data source. However, it is also possible for other users to have changed the data source for a dataset since the last time a data adapter filled it.
-
Can transfer changes from the data source to the dataset to reconcile a dataset with the most recent column values in its data source. The Update method will do this provided that the DataTable objects in a dataset have primary keys. If no primary keys exist, you can reconcile a dataset with its data source by clearing the dataset and refilling it with the most recent data from a data source.
Because the form load event procedure for Form5 illustrates issues pertaining to the preceding design principles for OleDbDataAdapter objects, this sample s commentary begins with a summary of the ADO.NET code in the Form5_Load procedure. This discussion links the data adapter and dataset design issues to a concrete sample and ties the commentary for setting up a data adapter and a dataset to the sample results that you will see later in this section.
The following listing commences with a couple of module-level declarations ”one for an OleDbDataAdapter object ( dap1 ) and a second for a DataSet object ( das1 ). You need to declare these variables at the module level because multiple procedures within the module reference them. The Form5_Load procedure begins by instantiating an OleDbConnection object ( cnn1 ) that points at the Northwind database. Next , the procedure assigns OleDbCommand objects to the SelectCommand , InsertCommand , UpdateCommand , and DeleteCommand properties for the dap1 object. For each property, an OleDbCommand constructor designates a SQL statement as a string, and a Connection object ( cnn1 ).
Notice that the SQL statements for the latter three properties include placeholders (?) for parameters. Therefore, the form load event procedure must add parameters to the Command objects defining the corresponding properties. The syntax for the SQL statements defining Command objects is standard SQL to whatever database the data adapter connects. The SQL statement for the SelectCommand property designates just two columns (CustomerID and CompanyName) from the Customers table in the Northwind database for the das1 object filled by the data adapter at which the dap1 variable points. If you are familiar with Jet SQL, you ll recognize that this is basic Jet SQL.
The three blocks of code following the assignment of the data adapter properties illustrate the syntax for adding parameters. These code blocks build on the earlier presentation of parameters, but the blocks also illustrate specialized issues pertaining to data manipulation through data adapters. Because the dataset has just two columns, the data adapter can add rows with just two columns of data from the dataset to the Customers table in the Northwind database. Each column requires a separate parameter, and therefore, the code adds two parameters to the Parameters collection for the InsertCommand object. The syntax for the invocation of the Add method uses positional arguments to designate the properties for each parameter. The first two arguments designate the parameter name and the OleDbType . When referencing a string variable of type LongVarWChar , you must specify a length for the maximum number of characters in the string. This value is 5 for the incoming CustomerID column value and 40 for the incoming CompanyName column value. You can check your Access database to determine the appropriate maximum length for a string variable. The final argument designates the column name in the data source to which the dap1 object should add the parameter value.
The syntax used with the Add method for adding parameters to the Parameters collections for the UpdateCommand and DeleteCommand objects in the dap1 object follows the same general format as that of the InsertCommand object, with a couple of important exceptions. The UpdateCommand object takes three parameters, instead of the two used with the InsertCommand object. The first, second, and third parameters for the UpdateCommand object designate the revised CustomerID and CompanyName column values in the row for the Customers table specified by a CustomerID value. These parameters must be declared in the same order as that of their placeholders in the SQL statement for the UpdateCommand object.
Notice that CustomerID appears twice, each time with a separate name: @CustomerID and @oldCustomerID . The first instance is the updated CustomerID column value for the row specified by the @oldCustomerID parameter value. For the Update statement in the UpdateCommand object to succeed, the @oldCustomerID parameter value ”which is the original value supplied to the dataset by the data adapter ”must match the current value of the CustomerID of a row in the Customers table. The SourceVersion property setting for the @oldCustomerID parameter specifies that the UpdateCommand should use the original value supplied to the dataset instead of the current value (if the application or a user changed the CustomerID column value in the dataset).
The DeleteCommand object requires just one parameter in its Parameters collection. Again, this value must be the original value supplied to the dataset by the data adapter. Unless the parameter matches a CustomerID value in the Customers table within the Northwind database, your application should definitely not try to delete a row in the table.
After configuring the parameters for the data manipulation tasks, the form load event procedure moves on to creating the dataset and populating it. The Fill method performs these tasks. The method references the das1 object and designates a DataTable object named CustomerIDsNames within the das1 object. The DataTable object holds a subset of the column values from the Customers table in the Northwind database. In general, you should give your datasets enough data so that you can avoid repopulating them often. But you should not give them so much data that you cause lengthy delays in filling them and especially in refilling them.
One way to diminish the need to refill a DataTable object in a dataset is to specify a primary key for the DataTable object. A primary key in a DataTable object allows the Update method to automatically update a local dataset with only the column values that have been updated since the last population of a DataTable object from a data source. The last code block in the form load event procedure s listing shows the syntax for specifying a primary key. The statement assigns an array of columns to the PrimaryKey property for the DataTable object. Notice that the array has a DataColumn type. In this case, the array consists of a single column, namely the CustomerID item from the Columns collection for the first DataTable object in the das1 dataset. The sample shows a positional index value (0) for representing the sole DataTable object within the das1 dataset. However, you can also use a name index as a string value, such as CustomerIDsNames . Using a positional index will usually require less typing.
˜Instantiate dap1 as an OleDbDataAdapter instance Dim dap1 As New OleDb.OleDbDataAdapter() ˜Instantiate das1 as a DataSet instance Dim das1 As New System.Data.DataSet() Private Sub Form5_Load(ByVal sender As System.Object, _ ByVal e As System.EventArgs) Handles MyBase.Load Declare and instantiate Connection and Command objects Dim cnn1 As New OleDb.OleDbConnection( _ "Provider=Microsoft.Jet.OLEDB.4.0;" & _ "Data Source=c:\Program Files\" & _ "Microsoft Office\Office10\Samples\Northwind.mdb") Specify SelectCommand, InsertCommand, UpdateCommand, and DeleteCommand properties dap1.SelectCommand = New OleDb.OleDbCommand( _ "SELECT CustomerID, CompanyName " & _ "FROM Customers", cnn1) dap1.InsertCommand = New OleDb.OleDbCommand( _ "INSERT INTO Customers " & _ "(CustomerID, CompanyName) " & _ "VALUES (?, ?)", cnn1) dap1.UpdateCommand = New OleDb.OleDbCommand( _ "Update Customers SET CustomerID = ?, " & _ "CompanyName = ? WHERE CustomerID = ?", cnn1) dap1.DeleteCommand = New OleDb.OleDbCommand( _ "DELETE FROM Customers WHERE CustomerID = ?", _ cnn1) Specify parameters for InsertCommand dap1.InsertCommand.Parameters.Add("@CustomerID", _ OleDb.OleDbType.Char, 5, "CustomerID") dap1.InsertCommand.Parameters.Add("@CompanyName", _ OleDb.OleDbType.VarChar, 40, "CompanyName") Specify parameters for UpdateCommand dap1.UpdateCommand.Parameters.Add("@CustomerID", _ OleDb.OleDbType.Char, 5, "CustomerID") dap1.UpdateCommand.Parameters.Add("@CompanyName", _ OleDb.OleDbType.VarChar, 40, "CompanyName") dap1.UpdateCommand.Parameters.Add("@oldCustomerID", _ OleDb.OleDbType.Char, 5, "CustomerID"). _ SourceVersion = DataRowVersion.Original Specify parameters for DeleteCommand dap1.DeleteCommand.Parameters.Add("@oldCustomerID", _ OleDb.OleDbType.Char, 5, "CustomerID"). _ SourceVersion = DataRowVersion.Original Populate das1 dap1.Fill(das1, "CustomerIDsNames") Define a primary key for the DataTable das1.Tables(0).PrimaryKey = _ New DataColumn() _ {das1.Tables(0).Columns("CustomerID")} ... End Sub Displaying Metadata and Data from a Dataset
After defining the schema for a dataset and populating a dataset with values from a data source, your application can display metadata describing a dataset and the data inside a dataset. A few basic principles can help you understand how to accomplish these tasks. First, use the DataSet object model to tap the levels of structure within a dataset. Chapter 7 provides an overview of the dataset object model. (See Figure 7-6 on page 345 in particular.) Second, within any given DataTable object in a dataset, the .NET Framework stores schema information in DataColumn objects and stores data values in DataRow objects. The click event procedure for Button1 in Form5 and a related procedure ( DisplayIDsandNames ) demonstrate approaches to displaying metadata and data based on the das1 dataset instantiated and populated in the Form5_Load procedure.
The Button1_Click procedure presents three sets of message boxes. Two of these message box sets present metadata about the das1 dataset; each of the first two sets contains just one message box. The third message box set allows users to page through the actual values in the dataset. You ll find this paging capability convenient for confirming the effect of data manipulation tasks. The number of message boxes in the third set is a variable depending on the number of rows shown per page and the number of rows of data in the DataTable object. For the CustomerIDsNames DataTable object, the number of message boxes in the third set is three.
A dataset consists of a collection of DataTable objects. Because the das1 dataset has just one DataTable object, its first table is its only table. The Form5_Load procedure illustrates the syntax for referring to a table in a dataset by a positional index, but you can also use a name index. The code for presenting the first message box in the Button1_Click procedure demonstrates the syntax for using a name index ”simply delimit the table name in double quotes. The name that you delimit is the TableName property of a DataTable object, which the message box displays.
Within any DataTable object in a dataset, additional metadata describes the structure of the contents. For example, the columns in a table have names and data types. The overall DataTable object can have a primary key. The primary key relies on one or more columns, each of which has a data type. The code leading up to and through the presentation of the second message box in the Button1_Click procedure demonstrates how to construct and display this kind of metadata. Each DataTable object within a dataset has a Columns collection. Metadata about individual columns within a DataTable object resides in DataColumn objects comprising the Columns collection for a DataTable object. The sample code illustrates how to use a For Each Next loop to iterate through the DataColumn objects within the Columns collection of a DataTable object. Any DataTable object within a dataset can have a primary key. The primary key can be defined by one or more columns from the DataTable object. The PrimaryKey property for a DataTable object returns an array of DataColumn objects that define the primary key for a DataTable object. Even if a single DataColumn object defines a primary key, you must iterate through the array elements to view the column defining an array. The sample code declares a column array with the cls1 variable. Using a For Each Next loop, the sample application loops through the cls1 array to display the name and data type for the columns defining the primary key.
One of the most common tasks that you will want to perform with a dataset is to view the data values in its DataTableCollection collection. The .NET Framework stores the data values for a DataTable object in the Rows collection property. Use a DataRow object in a For Each Next loop to iterate through the individual rows within the Rows collection for a DataTable object. You can refer to the column values within a DataRow object by positional or name indexes. The listing for Button1_Click shows the syntax for using name indexes.
Because a DataTable object can contain many rows, it is possible for the characters in the Rows collection to exceed the amount of characters that a message box can display. That s the case for the CustomerIDsNames DataTable object. The listing demonstrates a solution to this issue by grouping rows into units of 35. The Button1_Click procedure therefore displays DataRow column values as a succession of 35-row sets. If an odd number of rows are left over after the last full page of 35 rows, the procedure displays the remaining rows after the last full page. The code presenting the message box is actually in a Sub procedure ( DisplayIDsandNames ) that the Button1_Click procedure calls. Isolating the code in a Sub procedure makes it easy to call the procedure for displaying the message box from inside the loop through the rows as well as after the loop.
Private Sub Button1_Click(ByVal sender As System.Object, _ ByVal e As System.EventArgs) Handles Button1.Click Display table metadata for tables in das1 MsgBox("First table in the dataset " & _ "has the name " & _ das1.Tables("CustomerIDsNames").TableName & _ ".", , "Dataset metadata") Display column metadata for the first table in das1 Dim str1 As String = "DataTable columns " & _ "and data types" & vbCr Dim dco1 As DataColumn For Each dco1 In das1.Tables(0).Columns str1 &= dco1.ColumnName & ", " & _ dco1.DataType.ToString & vbCr Next Display primary keys for the first table in das1 Dim cls1() As DataColumn cls1 = das1.Tables(0).PrimaryKey str1 &= vbCr & "Primary key columns " & _ "and data types" & vbCr For Each dco1 In cls1 str1 &= dco1.ColumnName & ", " & _ dco1.DataType.ToString & vbCr Next Display DataTable metadata MsgBox(str1, , "DataTable metadata") Page through row values with up to intPageSize rows per page Dim drw1 As DataRow Dim int1 As Integer Dim intPageSize As Integer = 35 str1 = "" For Each drw1 In _ das1.Tables("CustomerIDsNames").Rows str1 &= drw1("CustomerID") & ", " & _ drw1("CompanyName") & vbCr int1 += 1 If (int1 - intPageSize) = 0 Then DisplayIDsandNames(str1, intPageSize) str1 = "" int1 = 0 End If Next Display last page if there are less than intPageSize rows to the page If int1 <> 0 Then DisplayIDsandNames(str1, intPageSize) End If End Sub Sub DisplayIDsandNames(ByVal str1 As String, _ ByVal intPageSize As Integer) Dipslay row values MsgBox(str1, , "Column values in groups of " & _ intPageSize.ToString & " rows or less") End Sub Figure 8-11 shows the two message boxes displaying metadata for the CustomerIDsNames DataTable in the das1 dataset. The top message box shows the TableName property of the DataTable object inside the das1 dataset. The property value appears as part of a string expression to compose a sentence . The second text box in Figure 8-11 displays two sets of metadata about the CustomerIDsNames DataTable object in the das1 dataset. The top part of the second text box shows the column name delimited by a comma from the column data type for each column in the CustomerIDsNames DataTable object. As you can see, the column name values correspond to the SQL statement for the dap1 data adapter that populates the DataTable object. The second set of data in the bottom text box shows the column name and data type for the column defining the primary key in the CustomerIDsNames DataTable object.
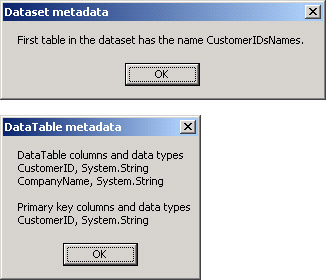
Figure 8-11: You can display metadata about the DataTable objects in a dataset.
Figure 8-12 shows the three message boxes with data values for the CustomerIDsNames DataTable object. This DataTable object, which is based on the Customers table in the Northwind database, contains a total of 91 rows. The first two message boxes each contain 35 rows. This leaves a balance of 21 rows for the third message box to display.
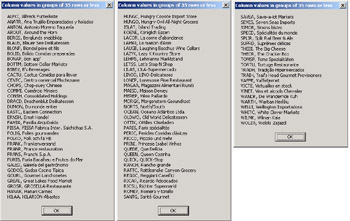
Figure 8-12: You can let users page through the rows of a DataTable object in a dataset with a message box.
Manipulating Rows in a Code-Based Dataset
Manipulating data with a data source through a dataset is a two-step process. First, you make a change to the local dataset. Second, you convey the change from the local dataset to the data source. You are likely to make three types of changes: inserting a new row, deleting a row, and changing the value in an existing row. The click event procedures for Button2 through Button5 in Form5 demonstrate how to handle these tasks for the CustomerIDsNames DataTable object in the das1 dataset that the Form5_Load procedure populates.
Inserting a Row
Adding a row to a local dataset requires three steps. First, you define a new empty row with the same columns as the original DataTable object. Second, you assign values to the columns of the new row. Third, you add the new row of column values to the DataTable object. The .NET Framework appends the new row to the end of the DataTable object. After appending one or more rows, you can update the data source in a corresponding way by invoking the Update method for the data adapter that manages the DataTable object in a dataset.
The listing for the Button2_Click procedure shows the syntax for adding a new row to the CustomerIDsNames DataTable object and then synchronizing the das1 dataset with the Customers table in the Northwind database. Invoke the NewRow method for the CustomerIDsNames DataTable object to instantiate a new empty row ( drw1 ). The newly created row will have the same format as the existing rows in the CustomerIDsNames DataTable object. The new row will be empty, and it will not belong to the CustomerIDsNames DataTable object. After instantiating a DataRow object with the NewRow method, the procedure populates the CustomerID column with a value of MYCOM and the CompanyName column with a value of ProgrammingMSAccess.com . With the Add method for the Rows collection, the procedure appends the drw1 DataRow object to the end of the CustomerIDsNames DataTable object. The Button2_Click procedure concludes by invoking the Update method for the dap1 object. This propagates the new row from the das1 dataset to the Customers table in the Northwind database.
The design of the Button2_Click procedure highlights the core steps for inserting a new row into a table ”both locally and in the data source for a local DataTable object. The procedure does not feature other desirable elements that can distract your attention from the core focus for the sample. For example, clicking Button2 twice in a row will generate an error because the second click tries to add a row to the local data table that already exists. In a production system, you will probably want to add traps that respond to this and other actions that a user might make.
Private Sub Button2_Click(ByVal sender As System.Object, _ ByVal e As System.EventArgs) Handles Button2.Click Add the row locally Dim drw1 As DataRow = _ das1.Tables("CustomerIDsNames").NewRow() drw1("CustomerID") = "MYCOM" drw1("CompanyName") = "ProgrammingMSAccess.com" das1.Tables("CustomerIDsNames").Rows.Add(drw1) Update the Access database file dap1.Update(das1, "CustomerIDsNames") End Sub Figure 8-13 shows the outcome of clicking Button2_Click in the local dataset and in the Northwind database. The window on the left is the last page that the Button1_Click procedure generates. The last row in this window shows the new column values of MYCOM and ProgrammingMSAccess.com . The window on the right side of Figure 8-13 shows the same row of column values in the Customers table for the Northwind database.
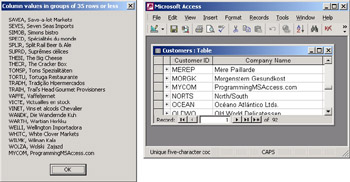
Figure 8-13: With the Update method, you can propagate a new row in a local DataTable object to its corresponding data source in an Access database.
Deleting a Row
Deleting a row from a local DataTable object is an activity that benefits from a primary key for the DataTable object. This is because the Find method can immediately move to any row corresponding to a primary key value. Without a primary key, you need an alternate means of navigating to a row that you want to delete. For example, you can use a For...Next loop or a For...Each...Next loop and pass through the rows in a DataTable object until you find one or more column values identifying a row to delete.
The listing for the Button3_Click procedure shows the code to delete the row added by the click event procedure for Button2 . The procedure to delete a row starts by applying the Find method to the Rows collection of the first (and only) DataTable object in the das1 dataset. This is the familiar CustomerIDsNames DataTable object. Because the argument for the Find method is MYCOM , the method returns a DataRow object ( drw1 ) whose CustomerID column value equals MYCOM . If the row with that CustomerID column value was deleted previously (or never inserted), the method does not populate the row and the drw1 object remains equal to Nothing . Because attempting to delete a row that does not exist throws an Exception object at run time, the procedure tests with an If...Then statement if the row equals Nothing before applying the Delete method. After modifying the local dataset with the Delete method, the Button3_Click procedure invokes the Update method for the dap1 object. This synchronizes the change in the local dataset with the Northwind database.
| Note | Invoking the Delete method does not physically remove a row from a DataTable object in a dataset. The method merely marks the row for deletion. Although your application cannot access a deleted row with the normal methods used to access other rows, special methods that allow you to manipulate deleted rows exist. The concluding sample in this chapter demonstrates the use of one of these methods. |
You can confirm the removal of the local row by clicking Button1 and examining the last page of data. Because the procedure for populating the message box does not depend on the primary key, the new row will fail to appear at the end unless the Delete method fails. To confirm the change in the Northwind database, open a fresh Datasheet view of the Customers table and see whether you can find a row with a CustomerID value of MYCOM . Because the Datasheet view displays rows by primary key value, look for the row among the CustomerID column values starting with M .
Private Sub Button3_Click(ByVal sender As System.Object, _ ByVal e As System.EventArgs) Handles Button3.Click Find row to delete; if present delete it Dim drw1 As DataRow = das1.Tables(0).Rows.Find("MYCOM") If Not (drw1 Is Nothing) Then das1.Tables(0).Rows.Find("MYCOM").Delete() End If Update Access database file and local dataset rowstate for found DataRow dap1.Update(das1, "CustomerIDsNames") End Sub Updating a Row
This section contains two samples demonstrating how to update a column value in a row. The first sample makes the update both locally and in the Northwind database, and the second sample restores the row to its original value in both locations. The change is merely to append an x to the CompanyName column value in the row with a CustomerID column value of ALFKI .
The following listing includes the click event procedures for Button4 and Button5 . A click to Button4 makes the change, and a click to Button5 restores the column value to its former state. The click event procedure for Button4 uses the Find method to point the drw1 variable at the row with a value of ALFKI for its CustomerID column. Then, the procedure appends an x with the &= operator to the end of the string in the CompanyName column for the row at which the drw1 variable points. By invoking the Update method for the dap1 object, the procedure makes a corresponding revision to the same row in the Customers table within the Northwind database.
The code for the Button5_Click procedure starts by pointing the drw1 variable at the row in the CustomerIDsNames DataTable object with a CustomerID column value of ALFKI . Two Visual Basic .NET string functions ( Len and Mid ) work together to strip the x from the end of the CompanyName field in the drw1 DataRow object. Then, the Update method causes the corresponding change to occur within the Customers table of the Northwind database.
You can verify the operation of the updates with the same techniques used earlier in the sample in the Inserting a Row section. Instead of looking on the last data page, you should look on the first page of data because that is where the row with a CustomerID of ALFKI appears.
Private Sub Button4_Click(ByVal sender As System.Object, _ ByVal e As System.EventArgs) Handles Button4.Click Select row to modify Dim drw1 As DataRow = _ das1.Tables(0).Rows.Find("ALFKI") Perform row modification by appending an x drw1(1) &= "x" Update Access database file and local dataset row state for found DataRow dap1.Update(das1, "CustomerIDsNames") End Sub Private Sub Button5_Click(ByVal sender As System.Object, _ ByVal e As System.EventArgs) Handles Button5.Click Select row to restore Dim drw1 As DataRow = _ das1.Tables(0).Rows.Find("ALFKI") Restore by removing last character Dim int1 As Integer = Len(drw1(1)) - 1 drw1(1) = Mid(drw1(1), 1, int1) Update Access database file and local dataset row state for found DataRow dap1.Update(das1, "CustomerIDsNames") End Sub Working with Graphically Based Datasets
The module behind Form5 creates the das1 dataset at run time. No trace of the das1 dataset or its CustomerIDsNames DataTable object exists at design time. Using code to specify objects has some distinct advantages, including precise repeatability . No matter how many times you run the code under the same conditions, you will get the same result. When you leave objects for manual creation at design time, your solution is only as repeatable as its documentation and the ability of an analyst to precisely follow any steps in the documentation for creating objects. After building a basic model, you can try variations with a code- based model for creating objects more easily than with a graphically based model. On the other hand, many developers find graphically based approaches faster and easier. Graphical techniques speed development for most developers, and they are therefore great for building prototypes .
Because graphically based approaches offer distinct benefits to both experienced and inexperienced developers, this section shows the graphical steps for creating a dataset based on the Customers table in the Northwind database. To help relate graphical approaches to code-based approaches, the remaining insert, delete, and update samples use the dap1 data adapter created earlier in the section for the das1 dataset pointing at the Customers table in the Northwind database. Recall that the sample demonstrates the use of code to create the das1 dataset. By having graphical and code-based datasets pointing at the same data source, this sample will generate the items needed to demonstrate concurrency conflicts.
Creating a Dataset Graphically
You learned in Chapter 2 (in the section Building the Jump Start Example ) how to create a dataset graphically by dragging tables and views from Server Explorer to a form. This approach facilitates the creation of the Connection , DataAdapter , and DataSet objects without manually coding them. Each dataset created with this approach can accommodate just one DataTable object. However, one of the key advantages of a dataset is that it allows the specification of a hierarchical relation between two or more tables. Chapter 7 demonstrated a graphical approach to specifying a hierarchical relation between two DataTable objects in a dataset schema. This approach relied on the Dataset Designer. This section builds on that introduction to the Dataset Designer by specifically showing how to use a dataset schema created with the Dataset Designer for insert, delete, and update tasks.
You can start to graphically create a dataset that points at the Customers table in the Northwind database by choosing Project, Add New Item. In the Add New Item dialog box, select the DataSet template and click Open. If Solution Explorer is open, you will see a new Dataset entry such as Dataset1.xsd, and you will see the Dataset Designer window with a link for opening Server Explorer. Click that link, and open the connection to the database that you want to use. As stated earlier, this sample uses the Northwind database. Within the Tables folder for the Northwind database in Server Explorer, drag the Customers table to the Dataset Designer window.
The steps in the preceding paragraph can generate a set of windows similar to those shown in Figure 8-14. This figure depicts the Visual Studio .NET IDE immediately after dragging the Customers table to the Dataset Designer window, which creates a file named Dataset1.xsd. Within the Dataset Designer window, you will see in the Dataset1 dataset a graphical depiction of the local DataTable object, which is named Customers . Notice that the graphical solution automatically creates a local table with a primary key. (See the key next to CustomerID.) Additional column names appear down the side.
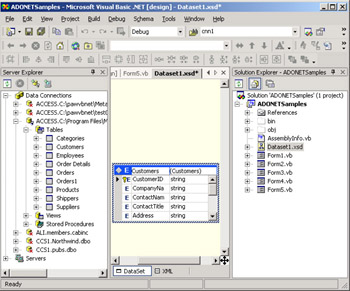
Figure 8-14: Dragging a table to the Dataset Designer window creates a dataset schema that you can use as the basis for a typed dataset that appears in the tray below a form.
The Solution Explorer window to the right of the Dataset Designer window shows a Dataset1.xsd object. This dataset is a schema for data. To complete the graphical design of a dataset, you need to open Form5 in Design view and drag a DataSet icon from the Data tab of the Toolbox to the form. This act opens the Add Dataset dialog box. The default selection is for a typed dataset. If only one dataset exists in Solution Explorer, the Name box shows that dataset. If Solution Explorer contains more than one dataset, the Name box shows the first dataset. You can click the drop-down box next to the name and select any dataset schema on which you want to base a typed dataset. Clicking OK adds an icon for your typed dataset to a tray below your form. (See Figure 8-15.) You can use this dataset with the dap1 data adapter created earlier in the Form5 discussion for the ADONETSamples project. You do not need to add Connection and DataAdapter objects to the tray below Form5 . The Dataset11 dataset works with the Connection object for the dap1 data adapter.
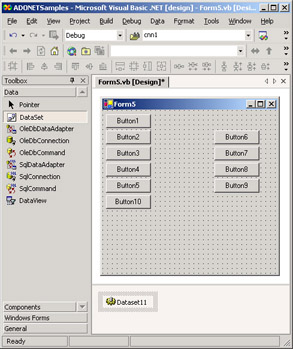
Figure 8-15: The graphically created Dataset11 object in the tray below Form5 points at the Dataset1.xsd schema created graphically in the Dataset Designer window appearing in Figure 8-14.
Inserting, Deleting, and Updating with a Graphically Created Dataset
The Dataset11 and das1 datasets correspond to the Customers table in the Northwind database, but they have different designs and were created differently. Despite the different techniques for originating the two datasets, you can use the dap1 object as a data adapter for populating them and for performing data manipulation tasks with them. The code samples for Button2 through Button5 demonstrate techniques for programming insert, delete, and update tasks with the das1 dataset. This section briefly reviews the sample code for Button6 through Button9 to demonstrate how to perform the same tasks with the Dataset11 dataset.
The Button6_Click procedure inserts a new row into the Customers DataTable object within the Dataset11 dataset and into the Customers table within the Northwind database. This procedure is analogous to the Button2_Click procedure. The main difference between the two procedures is that the Button2_Click procedure works with the das1 dataset while the Button6_Click procedure processes the data in the Dataset11 dataset. The das1 dataset fills automatically when Form5 loads because of code in the Form5_Load event procedure, but this is not the case for the Dataset11 dataset. Therefore, the Button6_Click procedure starts by invoking the Fill method for the dap1 object. The arguments for the Fill method are the Customers DataTable object in the Dataset11 dataset. After this step, the Button6_Click procedure is the same as the Button2_Click procedure except for the names of the dataset and the DataTable object.
Both the Button2_Click and Button6_Click procedures achieve the same goal, which is to add a new row to the Customers table in the Northwind database if a row with a CustomerID column value of MYCOM does not exist already. However, some subtle differences exist in the operation of the two procedures. The Form5_Load procedure populates the das1 dataset, which is declared at the module level. Therefore, the das1 dataset persists its initial values ”except for edits during a session ”from the time that Form5 opens. On the other hand, the Button6_Click procedure repopulates the Dataset11 dataset each time a user clicks the button. Therefore, the Dataset11 dataset can reflect more recent data from the Northwind database than the das1 dataset can.
Private Sub Button6_Click(ByVal sender As System.Object, _ ByVal e As System.EventArgs) Handles Button6.Click Fill Dataset1 via Dataset11 dap1.Fill(Dataset11, "Customers") Add the row locally Dim drw1 As DataRow = _ Dataset11.Tables("Customers").NewRow() drw1("CustomerID") = "MYCOM" drw1("CompanyName") = "ProgrammingMSAccess.com" Dataset11.Tables("Customers").Rows.Add(drw1) Update Access database file and local dataset row state dap1.Update(Dataset11, "Customers") End Sub The click event procedures for Button7 , Button8 , and Button9 appear without detailed comment. The Button7_Click procedure deletes the row with a CustomerID column value of MYCOM in the Customers DataTable object and in the Customers table in the Northwind database. The Button8_Click and Button9_Click procedures respectively append and remove a string value of y from the CompanyName column value for the row with a CustomerID value of ALFKI .
Private Sub Button7_Click(ByVal sender As System.Object, _ ByVal e As System.EventArgs) Handles Button7.Click Fill Dataset1 via Dataset11 dap1.Fill(Dataset11, "Customers") Find row to delete; if present delete it Dim drw1 As DataRow = _ Dataset11.Tables(0).Rows.Find("MYCOM") If Not (drw1 Is Nothing) Then Dataset11.Tables(0).Rows.Find("MYCOM").Delete() End If Update Access database file and local dataset row state for found DataRow dap1.Update(Dataset11, "Customers") End Sub Private Sub Button8_Click(ByVal sender As System.Object, _ ByVal e As System.EventArgs) Handles Button8.Click Fill Dataset1 via Dataset11 dap1.Fill(Dataset11, "Customers") Select row to modify Dim drw1 As DataRow = _ Dataset11.Tables(0).Rows.Find("ALFKI") Perform row modification by appending a y drw1(1) &= "y" Update Access database file and local dataset row state for found DataRow dap1.Update(Dataset11, "Customers") End Sub Private Sub Button9_Click(ByVal sender As System.Object, _ ByVal e As System.EventArgs) Handles Button9.Click Fill Dataset1 via Dataset11 dap1.Fill(Dataset11, "Customers") Select row to modify Dim drw1 As DataRow = _ Dataset11.Tables(0).Rows.Find("ALFKI") Restore by removing last character Dim int1 As Integer = Len(drw1(1)) - 1 drw1(1) = Mid(drw1(1), 1, int1) Update Access database file and local dataset row state for found DataRow dap1.Update(Dataset11, "Customers") End Sub Concurrency Violations
If you have been developing Form5 along with its discussion in this chapter, your copy of Form5 will have two different datasets ( das1 and Dataset11 ) connected to the same data source (the Northwind database). Furthermore, the CustomerIDsNames DataTable object in das1 and the Customers DataTable object in Dataset11 both point at the same table (Customers) in the Northwind database. These two datasets allow the simulation of a multiuser application because each dataset can represent a different user. The ability to simulate a multiuser application is helpful for demonstrating a concurrency violation when two users update the same row in an incompatible way.
A concurrency violation is serious because the .NET Framework throws a DBConcurrencyException object. If your code does not handle the exception, your code will terminate abruptly. When you catch a DBConcurrencyException object, you will often need to perform some action to synchronize your local dataset with the data source to which it corresponds. The exact action to take can depend on the circumstances causing the concurrency violation. A good general approach is to clear an object, such as a dataset or table, and then repopulate it from the data source. This gets the synchronization job done, but it can be expensive in network traffic because you must transfer all the data for a DataTable object or dataset even when only one row caused the problem. Another approach is to perform remedial action on a local dataset. The closing concurrency violation sample demonstrates this approach.
Before considering the code, let s examine a set of circumstances that can reliably generate a concurrency violation. Follow these four steps to generate a concurrency violation:
-
Open a fresh copy of Form5 . (You will need Button10 and its click event procedure to work around the concurrency violation.) Opening the form populates the CustomerIDsNames DataTable object in the das1 dataset.
-
Click Button2 . This inserts a new row in the CustomerIDsNames DataTable object and propagates the new row to the Customers table in the Northwind database.
-
Click Button7 . This populates the Customers DataTable object in Dataset11 with the contents of the Customers table in the Northwind database. Then, the click event procedure for Button7 removes the row added by clicking Button2 from both the Customers DataTable object in Dataset11 and the Customers table in the Northwind database.
-
Click Button3 or Button10 . A click to Button3 throws an unhandled DBConcurrencyException object that aborts the application. The exception occurs because the click event for Button3 attempts to delete a row from the Customers table in the Northwind database based on the row in the das1 dataset that the previous step deleted via the Dataset11 dataset. The click event procedure for Button10 has a Try Catch Finally statement for catching the DBConcurrencyException object. The Catch clause performs a remedial action that reconciles the CustomerIDsNames DataTable object with the Customers table in the Northwind database.
The listing for the Button10_Click procedure starts by deleting the row with a CustomerID value of MYCOM in the das1 dataset. This row exists in the CustomerIDsNames DataTable object because the row was added to the das1 dataset in the second step and no subsequent action removed the row. Therefore, the attempt to invoke the Delete method for the DataRow object pointing at the row with a CustomerID of MYCOM succeeds. Next, the procedure tries to update the Customers table in the Northwind database to remove the row with a CustomerID value of MYCOM . However, this attempt throws a concurrency violation because the third step previously removed the row from the Customers table within the Northwind database. The Catch clause traps the DBConcurrencyException object and performs a remedial action.
As you have learned, updates to a DataTable object are pending until they are finalized. A successful invocation of the Update method can finalize pending updates, but the DBConcurrencyException object from an unsuccessful Update method leaves the pending deletion at the beginning of the Button10_Click procedure unfinalized. The application needs to finalize the deleted row for the local DataTable object. Invoking the AcceptChanges method for the local DataTable object achieves the desired result.
| Note | You can invoke the RejectChanges method for a DataTable object in a dataset to restore an original result if an update to a database is rejected for some reason. |
Private Sub Button10_Click(ByVal sender As System.Object, _ ByVal e As System.EventArgs) Handles Button10.Click Find row to delete; if present delete it Dim drw1 As DataRow = das1.Tables(0).Rows.Find("MYCOM") If Not (drw1 Is Nothing) Then das1.Tables(0).Rows.Find("MYCOM").Delete() End If Attempt to update Access database file and local dataset row state for found DataRow; if .NET Framework throws DBConcurrencyException object accept changes to local table (clearing and re- populating is another valid strategy) Try dap1.Update(das1, "CustomerIDsNames") Catch exc1 As System.Data.DBConcurrencyException das1.Tables(0).AcceptChanges() End Try End Sub EAN: 2147483647
Pages: 111