Applying Colors
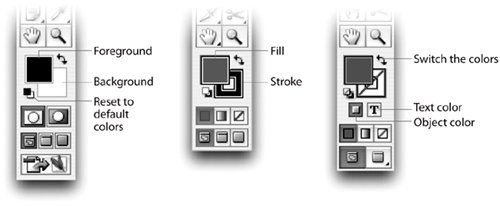
| It's a lot easier to apply colors than to define them. However, even in this fairly intuitive process there are few tricks and stumbling blocks that you should be aware of. These include being aware of the differences in the Tools palette color controls and changing the color of text in Acrobat. Coloring ObjectsPhotoshop has two color squares that appear in the Tools palette (Figure 10-22). The top-left square controls the foreground color for the document; the bottom-right square controls the background color. The foreground color is the one used by all the tools that apply color with the exception of the Eraser tool. The Eraser uses the background color to erase pixels on flattened layers. Figure 10-22. Tools palette color controls in Photoshop (left), Illustrator (middle), and InDesign (right). Illustrator and InDesign also have two color squares in their Tools palettes (Figure 10-22). However, in these applications the top-left square controls the fill color that is applied to objects, and the bottom-right square controls the stroke color. These color controls in all three applications work somewhat similarly:
Coloring TextPhotoshop uses the Foreground color for the text color, but Illustrator and InDesign use Fill and Stroke icons for the fills and strokes for text. InDesign has two additional icons that let you control whether the color is applied to the object or all the text within the object. |
EAN: 2147483647
Pages: 192