Assembling the Scene
|
| < Day Day Up > |
|
The great moment has come! Everything we have done will be assembled in one scene.
-
Load your file with the room or use our file (Lessons\Lesson09\Lesson09(room)-01.max on the CD-ROM).
Note It is possible that you will be warned about Units Mismatch when opening the file (Fig. 9.14), in which case you will have to make a choice. The first option is to Rescale the File Objects to the System Unit Scale. The second option is to Adopt the File's Unit Scale. In our case, the second choice is preferable.
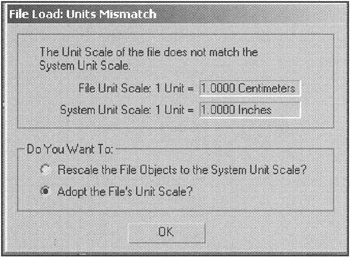
Figure 9.14: Dialog window indicating Units Mismatch
Before we begin adding new objects, we might want to systematize what we already have. It is not obligatory, and the objects we have are not complicated — it is up to you whether it is worth the effort. We use the empirical principle that if something is done quickly (1-2 days) and the project is doomed to be "done and forgotten," then there is no reason to waste time systematizing it. However, if it is a long-term project and we have to return to it later, then it is worthwhile to spend some time putting everything in order. This will help us recall "what is what" even if we open the project in a year. Here, we will discuss 3ds max capabilities for project systematization. It is up to you to decide whether to employ them or not.
The list of objects in our scene is shown in Fig. 9.15. Only Rectangle01 is confusing. On closer examination, it turns out to be the profile for the Bevel Profile modifier we used to construct the window frames. If deleted, the window frames will be destroyed. Its presence by no means affects the final result, but it is irritating. There are two ways out of this situation. You can Hide the object and rename it (e.g., Frame Profile); this is recommended if you will need to edit it further on this level. Your other option is to convert the window frames to a base-level Editable Poly or Editable Mesh. In that case, you can delete the profile without affecting the final result.
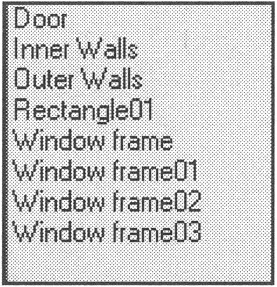
Figure 9.15: List of objects in the scene
We chose the second way and deleted the profile after converting the window frames to Editable Poly.
Select the Outer Walls object and hide it, for we will not need it soon:
-
Context menu à Hide Selection
We propose that you merge the rest of the objects — the "inner" walls, window frames, and door — so that you can work with them more efficiently. There are several methods for systematizing objects in 3ds max. The most efficient (but least convenient) method is to Attach objects. Doing so, constituent objects lose their independence and can only be accessed as an object Element.
The second method is to Group the objects:
-
Main menu à Group à Group
This method is good if you have to work with objects as a whole, while leaving them independent. You can also group objects of different types (e.g., geometrical objects and sources of light). Individual elements are accessed by opening the group:
-
Main menu à Group à Open
That step, as well as the necessity to subsequently close it, is its main disadvantage.
The third method uses a Named Selection of objects. It has existed since the first versions of 3ds max, but only the fifth version made it useful. We mentioned it in the book "3ds max 4: From Objects to Animation," but only in passing, its practical use being rather limited. At that time, when you created a selection, you could neither exclude nor add objects. The new version is much more powerful and is the one we will use.
| Note | There is one more way to systematize objects that we are sure users of 3D Studio VIZ, Autodesk VIZ, and AutoCAD will like — namely, layers. Fortunately for them and unfortunately for us, this tool is absolutely the same as the one integrated in AutoCAD and, in our opinion, is rather limited in 3ds max 5. For example, it does not allow you to exclude a layer from illumination by certain sources of light. Moreover, it has an unfriendly interface. You can find several scripts that make layers more user-friendly at http://www.scriptspot.com. |
-
Select all objects in the scene using the <Ctrl>+<A> key combination.
-
Press the Named Selection Sets button on the main toolbar.
-
In the window that opens, press Create New Set and give the set a name (for example, Walls) (Fig. 9.16).
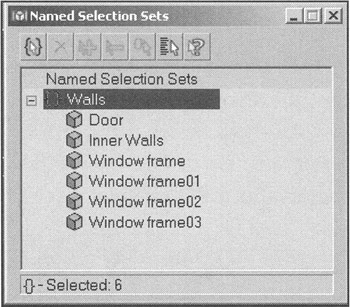
Figure 9.16: Creating a Named Selection Set
Sooner or later, we will use all the buttons enabling you to delete objects from the selection, add new objects, etc. These are rather powerful tools, but they are not without drawbacks — the main one being the necessity of double clicking the desired object. Selecting several objects with the <Shift> and <Ctrl> keys is not supported; we hope that will be corrected in the near future.
Now, load the models into the scene. You can use the Asset Browser, which allows you to browse local disks, network drives, websites, as well as move models and textures by drag-and-drop. There are two ways to launch the Asset Browser: from the control panel (Control panel à Utilities), or from the viewport (Context menu à Views à Extended à Asset Browser) (Fig. 9.17).
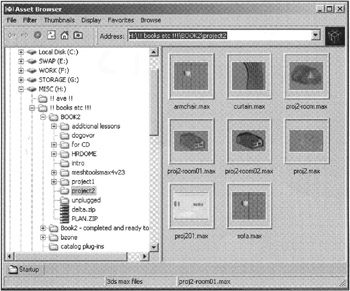
Figure 9.17: Asset Browser window
Go to the folder with your models, or to the Lessons\Lesson09\ folder on the CD-ROM if you want to use our files. Select the ![]() Lesson09(armchair).max file and drag it to the Top viewport. (It is necessary to have the right model orientation.) You will have three options: Open File, Merge File, and XRef File. The first two items are self-explanatory, but XRef File requires additional attention.
Lesson09(armchair).max file and drag it to the Top viewport. (It is necessary to have the right model orientation.) You will have three options: Open File, Merge File, and XRef File. The first two items are self-explanatory, but XRef File requires additional attention.
You can load objects or whole scenes as references (XRef Objects or XRef Scenes, respectively) in 3ds max, which means a connection will remain with the source file. The difference between XRef Object and XRef Scene is the latter does not allow you to edit objects in the scene. To do so, you will have to Merge the scenes in the XRef Scenes window (Fig. 9.18), which will break the connection with the source file:
-
Main menu à File à XRef Scenes
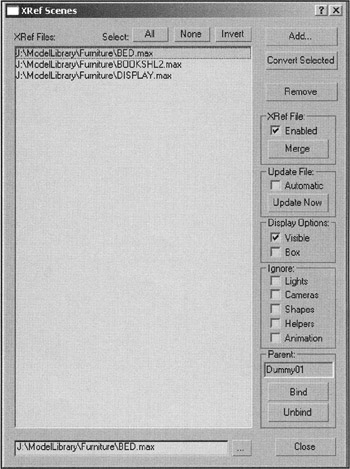
Figure 9.18: Management window for XRef Scenes
Is working with references worthwhile? There is no doubt such an approach is beneficial for several people working on one project — it enables them to work in parallel. It is also useful if you have created a library of models and want to use them in several projects. It is much easier to edit the library models than those in every project. In other cases, the Merge command is preferable, which we will use here.
-
Put the armchair in its place in the living room (Fig. 9.19, a).
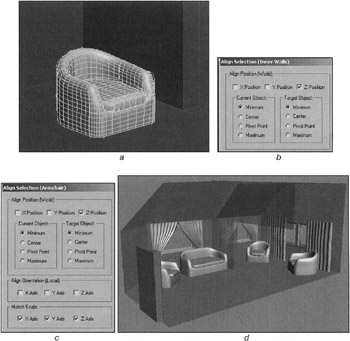
Figure 9.19: Furniture arrangement -
We do not know why, but the dimensions seem off, and the armchair is too small. Scale it by all coordinates (Uniform Scale).
-
Make the armchair stand directly on the floor by selecting it, applying the Align command, and clicking on the Inner Walls object:
-
Control panel à Align
-
Select the alignment axis (in our case, the Z axis) and parameters so that the armchair stands on the floor (Fig. 9.19, b).
Load the sofa from Lesson 9-Sofa.max. It also seems small. Since we made the sofa out of the armchair, and it needs to be scaled to the same extent, we suggest that you use an interesting option of the Align command:
-
Select the sofa, apply the Align command, and click on the armchair.
-
Specify the alignment parameters that were used in the previous case. In addition, check all three Match Scale axes (Fig. 9.19, c). The sofa will be aligned and scaled according to the armchair.
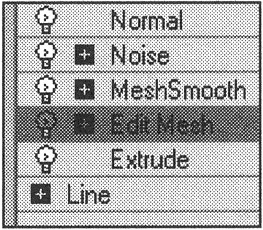
Load your curtains and hang them on the windows by copying and rotating them (Fig. 9.19, d). Note that we hung the curtains on the big window slightly differently — straight, without being tied open on the sides. It was very easy to do: We selected the Edit Mesh modifier, made the folds, and deactivated it again by pressing the "lamp" icon. You can also change the rumpled nature of the curtains by changing the Noise modifier parameters.
| Note | You can use the Merge command of the Main menu to insert the objects. By doing so, the selected objects will be placed where they were created. |
| Do it yourself | We do not have many pieces of furniture in our room, and you may want to make more or supplement them with objects from the 3ds max library. The ModelLibrary folder on the second CD-ROM has many such models. You can use them to fill your room with furniture. Due to licensing reasons, we will not use these models, but you are free to do so. |
We now propose that you join these objects and name the selection Furniture. You can do so quickly by the following method:
-
Click on Walls in the Named Selection Set.
-
Invert the selection by pressing <Ctrl>+<I>.
-
In the selection window, type in "furniture" and press <Enter>. You have thus created a new selection named Furniture. You can easily select all of the constituent objects in any dialog window where the named selection is used.
-
Save your file as
 Lesson09(room)-02.max.
|
| < Day Day Up > |
|
EAN: N/A
Pages: 136