MANAGING NETWORK PRINTING
CHANGE THE ORDER OF PRINT JOBSThe Annoyance:We often have printing traffic jams. At any given moment, the kids send documents filled with graphics and color to our shared printer. A few seconds later, my wife prints a humongous report that contains charts and has to be on her boss's desk the next morning. A few seconds after that, I print an important document that I need immediately. I have to wait forever for my document to come out of the printer, which often holds up my dinner, prevents me from watching my favorite TV shows, or keeps me up late. The printer is attached to my computer. Can I force the printer to print my stuff first? The Fix:You can try, but it doesn't always work. Windows has tools to help you manipulate the order in which print jobs are completed, but stuff moves through the printing process so quickly that sometimes your actions are just too late. If you want to try anyway, open the Printers folder (Printers and Faxes folder in Windows XP) and double-click the printer's icon to open its window, which looks something like the window in Figure 5-6. Figure 5-6. The printer's window displays the jobs in the print queue in the order in which they were received, which is, by default, the order in which they print. You have several choices for getting your document to print right away:
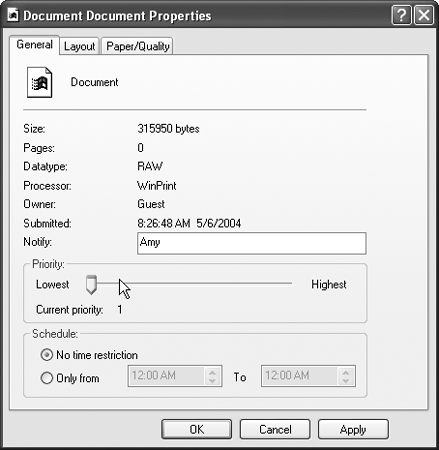
Figure 5-7. Move the slider bar to the right to raise the priority of the selected print job.
PAUSING A PRINT JOB DOESN'T STOP THE PRINTERThe Annoyance:When I pause (or cancel) the current print job, the printer keeps printing, and printing, and printing. Often, the whole document prints, so pausing it didn't accomplish my goalstopping the print job to let the next one in the queue print right away. The Fix:Commands are sent to the virtual printer, not the physical printer (see the sidebar "To Windows, Printers Aren't Real" earlier in this chapter). The Pause command (or the Cancel command) stopped the printing system from sending data to the printer. However, data already sent to the printer is in the printer's memory, which is physical hardware (memory chips). No application can go there, and therefore the document continues to print. Some printers have lots of memory; in fact, they have enough memory to store an entire large document. The only way to remove data from a printer's memory is to turn off the printer. Push the power button if the printer has one, or unplug the printer if it has no power button. TURNING OFF A PRINTER CAUSES A PAPER JAMThe Annoyance:Sometimes a user sends a large document to the wrong printer. For example, one of the children sends a long book report to the printer that has checks in its tray. If I don't want to wait for the large document to print, I pause or cancel the print job, and then I turn off the printer to stop the printing. When I turn on the printer again, there's invariably a paper jam. Sometimes I have to disassemble the printer to get to the jammed paper. What's the secret to avoiding a printer jam when you turn off a printer churning out paper? The Fix:The secret is to pick the exact nanosecond between the time the printer feeds the current page to the out tray and the time that it grabs the next page. If you figure out how to tell when that nanosecond occurs, please let me know because I've certainly never figured it out. My solution is to try to avoid the jam by yanking the paper out of the printer. For a laser printer, pull the tray out of its slot. For an inkjet printer, remove all the paper. When paper isn't available, the printer stops to wait for more paper, and that's when I power down the printer to erase its memory. This almost always works, but sometimes I remove the paper after the printer has started feeding the next sheet of paper. If I can see that paper, I just pull it out. If it's already entered the interior of the printer, sometimes this causes a printer jam, as I tug and the printer refuses to release the paper. I guess this means the fix for this annoyance is "good luck." Tip: I think we should all start a campaign to ask every printer manufacturer to include a button on the printer marked "Erase data in memory immediately and eject any paper currently in the paper path." MANUALLY FED FORMS HOLD UP PRINTINGThe Annoyance:Sometimes another user sends an envelope or some other manually fed form to the printer attached to my computer. If I send a document to the printer, it won't print until the first user brings the envelope to the printer, inserts it, and lets it print. Meanwhile, I have to watch the printer blink its lights at me, as if it's saying, "ha-ha, you have to wait for your document until Clyde shows up to print his envelope." Clyde's working on a different floor, and it takes him a while to get to the printer. Sometimes he even forgets he sent the job to the printer. Isn't there a way to overcome this problem? The Fix:You have two methods available to you for resolving this annoyance:
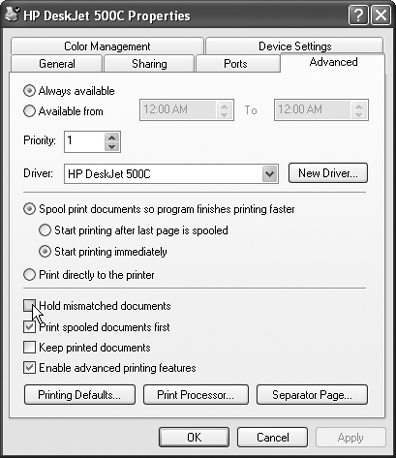
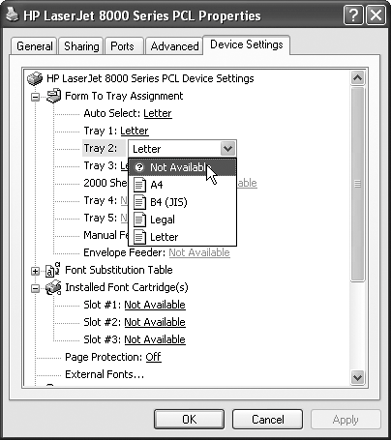
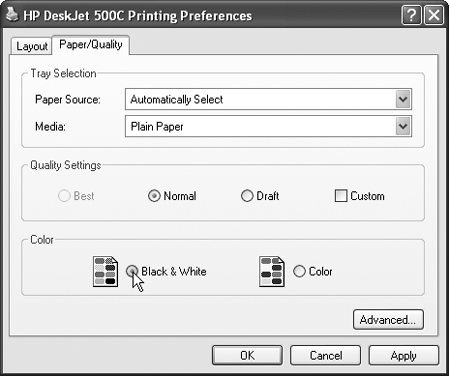
The first method works only if the dynamics of your household or office operate in a way that causes threats to work. 'Nuff said. The second method requires changing the configuration of the printer to enable an option designed specifically to prevent this annoyance. To make the change, open the Printers folder, right-click the printer, and choose Properties. Click the Advanced tab and check the "Hold mismatched documents" box (see Figure 5-8). Figure 5-8. Select the option to hold mismatched documents, i.e., documents that require manual feeding of paper. A mismatched document is one in which the codes for the print job going to the printer don't match the printer's configuration. For example, if the target printer doesn't have an envelope tray, an envelope will be flagged as a mismatched document because it requires the user to manually feed an envelope to the printer to complete the print job. By enabling the option to hold mismatched documents, you configure the spooler to move other documents that are not mismatched ahead of the document that requires special handling. Eventually, when the spooler is empty except for the mismatched document file, that document is sent to the printer. Most printers blink some lights at that point to indicate that a manual feed is required to print the job. By default, the option to hold mismatched documents is not enabled because in the business world (and in some households) printers rarely have empty spoolers. Users are constantly sending print jobs to the printer. Enabling this option means a user waiting for the mismatched document might have to wait until late in the evening, after everyone has left, for her document to be sent to the printer. Of course, some of us think this is proper punishment for a user who doesn't immediately go to the printer to insert the needed media. LIMIT PRINTING CHOICES TO AVOID PRINTING ERRORSThe Annoyance:We have a printer with two trays, one containing blank paper and the other containing the letterhead for my business. Users are supposed to select the correct tray in the Printer dialog box, but they forget more often than they remember. Is there a way to force users to select a tray before they print a document? The Fix:Yes and no. You can't force users to remember to take an additional action before sending their document to the printer. In fact, it's probably true that you can't force anybody to remember to do anything. However, you can create a scenario in which they (or you) don't have to rely on their memory by creating a printing environment customized for your needs. The solution is to have network printers that permit printing from only a single tray. This doesn't mean you have to buy more printers. Instead, it means you take advantage of the fact that printers are virtual devices (see the sidebar "To Windows, Printers Aren't Real" earlier in this chapter). Simply create as many printers as you need, with each printer limited to using a specific tray. Because you print to a virtual printer rather than a physical printer, you can create multiple virtual printers for the same physical printer. This makes it easier to use specific features in the printer. To create a separate virtual printer for each feature, you must install the same printer multiple times. You can use the same Add Printer Wizard you used to install the original printer. Go through all the steps, selecting the same printer and the same port (usually LPT:1). Windows is perfectly happy to let you connect multiple printers to the same port. Warning: During the installation process, Windows 2000 and XP ask if you want to share the printer. Don't share the printer at this pointyou're going to rename the printer later, which removes the share. Share all the printers after you've completed the configuration process. The wizard asks if you want to use the same driver you used when you installed the printer the first time. Say yeswhy take the time and trouble to install the same files from the Windows CD? The wizard adds the printer to your system with a parenthetical number after the printer model name, such as HPLaserJet (Copy 2). The next duplicate has (Copy3) in its name, and so forth. Install as many copies of the printer as there are features you want to isolate. For example, if you want to set up a printer for Tray 1 and another printer for Tray 2, install two copies of the printer. If the printer also has a manual feed tray you use frequently (perhaps to print envelopes or labels), create a third instance of the printer. After you install all the printers, configure each printer for a single setting. Right-click the printer's icon and choose Properties from the shortcut menu. Move to the tab that holds the configuration settings for the printer, which differs depending on the printerthere might be a Settings tab or a Devices tab. Configure the printer to reflect a single set of default options. For example, to create a printer that accepts only print jobs destined for Tray 1, configure the first virtual printer to use Tray 1 for the right paper size, and then select Not Available for the remaining trays (see Figure 5-9). For the next virtual printer, make Tray 1 unavailable and select the appropriate paper size for Tray 2. Figure 5-9. Making a tray unavailable means users can't inadvertently pick the wrong tray (and therefore the wrong paper) when they print documents. The selections for each tray in the dialog box represent the paper size, not the type of media you insert in the tray. So, although each tray you configure is probably marked "letter" to represent letter-size paper, you can fill it with any media of that size (plain paper, letterhead, or checks). Rename the printer to reflect its settings. For example, if you put plain paper in Tray 1, name the printer that has only Tray 1 available "Paper." If Tray 2 holds checks, name the printer that offers only Tray 2 "Checks." To rename a printer, right-click its icon and choose Rename from the shortcut menu. Share each printer using a sharename that reflects the settings (in fact, it's easiest to use the new printer name as the sharename). If you have a color printer, you can create a virtual monochrome printer and urge users to select the color printer only when absolutely necessary. This means you won't have to replace the color cartridge as frequently, which results in substantial savings. FIND THE MONOCHROME OPTION ON INKJET PRINTERSThe Annoyance:I want to configure a color printer for black-and-white printing, but I can't for the life of me figure out how to do this. I've looked at every tab on the printer's Properties dialog box, but the option for black-and-white printing doesn't exist anywhere. The Fix:To perform this task you must go on a treasure hunt. To make matters worse, each printer model has its own maze, with entrance holes in different places. It's no wonder you're confused. I can give you some general directions to get you started. Most of the time, the tabs available when you open the printer's Properties dialog box don't offer the option you're looking for. You probably have to click a button on one of the tabs to open another set of dialog box tabs. For example, on my Lexmark inkjet, I click the Printing Preferences button and choose the Print in Black and White option. That was easy! On my HP DeskJet, I click the Paper/Quality tab and choose the Black & White option (see Figure 5-10). Figure 5-10. Turn one copy of your color printer into a black-and-white printer to save money on color cartridges. Tip: Your inkjet printer might use the term monochrome instead of black and white. PRESERVE COLOR CARTRIDGESThe Annoyance:Before we created a network for our two computers, anyone who worked on the computer that had a black-and-white printer had to go to the computer with a color printer if they wanted to print color documents. After we shared the two printers on the network, my costs for color cartridges zoomed. I've tried to convince people to print to the black-and-white printer unless color is absolutely necessary, but my arguments fall on deaf ears. Home networks have hidden costs that are really annoying. The Fix:Isn't it amazing how necessary color becomes when users don't have to copy a document to a floppy disk and walk it over to a computer that has a color printer? Maybe it's a coincidence. You can save money by cutting down on the amount of color ink print jobs use. Most color printers offer color quality options, such as Best, Normal, Draft, and so on. The differences are the depth of colorthe more depth, the more ink you use. You can create multiple virtual printers for different qualities of color depth so that users can select the quality they need (see "Limit Printing Choices to Avoid Printing Errors"). You'll probably have to remind everyone that very few personal documents or homework assignments really need deep color saturation. Even better, share only the color printer you configure for Draft quality. You'll be amazed at how few complaints you'll get. Most users glance at the document, see color, and are happy. If your son complains that the color quality isn't good enough for an important document, you can offer to print it for him. Tell him you're an expert in "tweaking" color printers. Of course, when you print the document, you'll just use the printer set for Normal or Best color quality. Isn't this sneaky? Don't you love it? You'll save money on cartridges, and you'll develop a reputation for being a color printer geek. |
EAN: 2147483647
Pages: 90
 Pause Printing from the Menu bar. Then, right-click your own print job and choose Resume.