15.2. The Drawing API One of the most important ideas to come away with after reading this book is that a world of creativity exists beyond the basic uses of Flash. As you become more and more comfortable with ActionScript, for example, you will find yourself replacing timeline techniques with scripting, and building things you never thought you could. For example, what if you wanted to draw something based on user input, and therefore couldn't draw the shape using traditional tools? In this case, ActionScript offers a way to create lines, curves, and fills programmatically. The Drawing API (application programming interface) needn't be as intimidating as it sounds. It's really just a collection of commands that define line and fill styles, how to position points, and how to connect them. A simple example to draw a three-pixel-wide, black line dynamically might look like this: // Create a new empty clip to act as the drawing canvas this.createEmptyMovieClip("canvas_mc", 1); // Create a stroke that is 3 pixels wide, black, with 100% alpha canvas_mc.lineStyle (3, 0x000000, 100); // Start line at x:20, y:20 canvas_mc.moveTo(20, 20); // Draw a horizontal line 100 pixels long to x:120, y:20 canvas_mc.lineTo(120, 20);
Of course, you can create much more complex works of art than this example implies. For example, you are not restricted to creating straight lines; you can also create Bezier curves and manipulate their control points. For now, however, try to create some simple eye candy that keeps four moving circles connected with lines. Start by creating four circles and positioning them on the Stage in random locations: Create a new Flash document, and save it as connect_the_dots.fla in the 15 folder of your working directory. Using the Oval tool, draw a small circle, 10 x 10 pixels, with a dark fill and no stroke. Convert it to a movie clip and call it circle. You will soon add this circle to the Stage dynamically, so you must give it a name with which it can be identified. Right/Ctrl-click the symbol in the Library and select the Linkage option. In the Linkage dialog, name the identifier circle, as seen in Figure 15-7. Figure 15-7. The Linkage Properties dialog 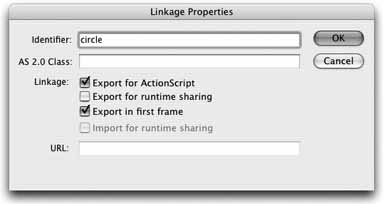 Now you can add four circles to the Stage. Create a for loop that repeats its contents until its counter variable is exceeded. (To look at the script in its entirety while reading, open the connect_the_dots_01.fla file in the 15 folder.) In this case, you will create four circles as the value of i increases from its initial value of 0, adding 1 each time until the loop fails at 4 and the script continues. Remember, the semicolon allows multiple instructions on a single line, and the ++ increments the variable as if you said i = i + 1. For clarity, the closing brace is included here, but everything in the next few steps (until indicated) will appear inside the loop: for (i = 0; i < 4; i++) { }
Inside the loop, you will do everything you must to make each circle behave similarly, but independently of each other. First, attach the Library movie clip called circle to the main movie, and store a pointer to it in the ref variable for easy reference. Each time you dynamically create or attach a movie clip, it should have a unique instance name and must reside in its own level. Use the value of i in the loop to create these unique names and levels: ref = this.attachMovie("circle", "circle" + i, 100 + i);
Next, position each circle on the screen randomly. The first line of the code snippet below shows the simple way to assign the _x value. The Stage width is 550 pixels, so you can simply create a random number between 0 and 550. However, this method has been deprecated in favor of the more standards-compliant way of generating a random number using the Math object. Similarly, the technique used for the _y value shows how to use any size Stage and make sure the movie clip is never partially off the Stage (as would be the case for 0 or 550, for example). To begin, the routine for creating a random number between 0 and 1 is stored in the predefined Math object. Therefore, you need only call it to get a random number. Since this number is a fraction, you can then get a number in your desired range by multiplying that range by the new number. Since you're working with _y values here, your range needs to be the Stage height minus the height of the circle (400 10). However, this might result in values from 0 to 390, so to prevent the clip from being off the top of the Stage, you must offset this range by half the height of the clip: ref._x = random(550); ref._y = (Math.random() * (Stage.height - ref._height)) + (ref._ height / 2);
Now you need to send each circle moving in a different direction. Randomly pick a number of pixels to add to the _x and _y of each circle. Pick a number from 0 through 10, but then subtract 5: ref.dirX = (Math.random() * 10) - 5; ref.dirY = (Math.random() * 10) - 5;
This gives you a possible range of 5 through 5. Then, store that value in an independent variable that is inside each circle. (Remember, any time you manipulate ref, you are working with one circle.) Finally, create an event handler for each circle to execute its code every time that circle receives an enterFrame event. Don't forget that using this inside the event handler means you are referring to the circle to which it is attached. The first two lines are simple. Just add the random number of _x and _y pixels chosen in the last step to each circle's current location. The next section may look complicated, but it's just a simple conditional statement. If the circle is moving in a positive x direction and it's past the right edge of the Stage (in this case, 550), or it's moving in a negative x direction and it's past the left edge of the Stage (0), just reverse its direction by multiplying the current direction by 1. Remember from your look at conditionals that && means and and || means or: ref.onEnterFrame = function():Void { this._x += this.dirX; this._y += this.dirY; if ((this.dirX > 0 && this._x > Stage.width) || (this.dirX < 0 && this._x < 0)) { this.dirX *= -1; } if ((this.dirY > 0 && this._y > Stage.height) || (this.dirY < 0 && this._y < 0)) { this.dirY *= -1; } }
Test your movie. You should see four independently moving circles, with no connecting lines. If you want to check your work, or follow along with the finished example, open the connect_the_dots_01.fla file in the 15 folder. The last step is to add the connecting lines. Start by creating an empty movie clip to serve as a canvas for the dynamically drawn lines. Notice that the use of this refers to the current timeline, so the keyword refers to the main movie again, not one of the circles: this.createEmptyMovieClip("canvas_mc", 1);
Next, create an enterFrame event handler that updates the lines as fast as your frame rate allows. First, clear the canvas so you don't draw an entirely new set of lines each time the handler is called. Then, define a line style. In this case, the script calls for a 1-pixel-wide, dark blue line with an alpha of 100 (i.e., opaque). Finally, draw lines from the first circle to the second circle, the second circle to the third circle, the third circle to the fourth circle, and the fourth circle back to the first circle: canvas_mc.onEnterFrame = function():Void { canvas_mc.clear(); canvas_mc.lineStyle(1, 0x000099, 100); canvas_mc.moveTo(circle0._x, circle0._y); canvas_mc.lineTo(circle1._x, circles1._y); canvas_mc.lineTo(circle2._x, circles2._y); canvas_mc.lineTo(circle3._x, circles3._y); canvas_mc.lineTo(circle0._x, circles0._y); }
Test your movie and compare it to connect_the_dots_01.fla in the 15 folder. It should look something like Figure 15-8. Figure 15-8. The Drawing API connects these movie clips at runtime 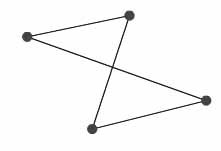
|