Receiving Mail with Multiple Domains
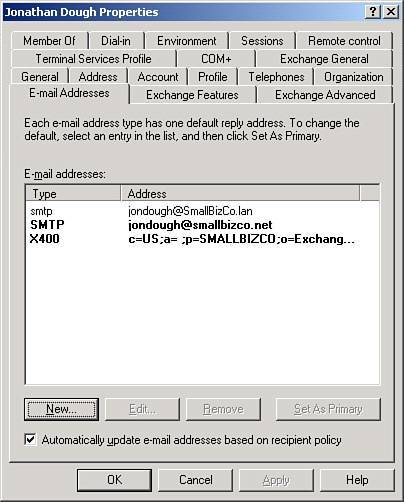
| One question that appears regularly in the SBS community is how to set up Exchange to accept email from more than one domain. In the Connect to the Internet Wizard (CEICW), the Exchange Configuration field only allows for one email domain name, so the assumption has been that SBS can only receive email for one domain name. Because SBS 2003 uses Exchange 2003 Standard Edition for email, the same features available for Exchange 2003 are also available for SBS 2003, including the capability to work with multiple mail domains. To take advantage of these features, you have to work outside the wizards. Adding Additional Email AddressesAssociating additional email addresses with a single-user account is fairly straightforward. Each user object in Active Directory can have more than one email address associated with it. In fact, with a default SBS installation, three email addresses already are associated with each user object. These addresses can be seen in the E-mail Addresses tab of the user properties page in Active Directory Users and Computers, shown in Figure 12.10. Two of the addresses are SMTP addressesone has the external mail address for the user and is marked as the primary address; the other is an address for the internal domain. There is also an X.400 address that is used internally by Exchange and will never be seen by the average user. Figure 12.10. Each user starts with three email addresses defined. To add another address for the user, follow these steps when the E-mail Addresses tab is open:
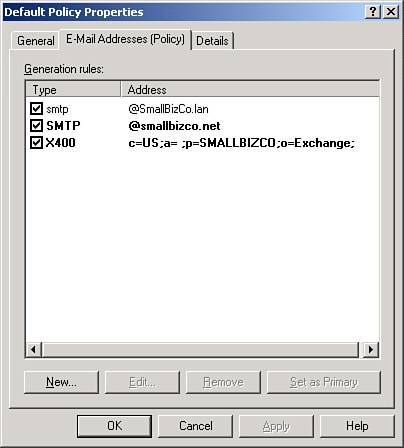
The new address appears in the list, and when you close the user properties dialog, Exchange will now accept incoming mail for that address and deliver it to the user. Note One reason to add an additional address for a user is to give the user an alias address. In the examples, the user Jonathan Dough has a logon ID of jondough. By default, his email address is jondough@smallbizco.net. If he wanted to use a different address, such as jonathan.dough@smallbizco.net, instead, you can add this to the list of addresses for his user object, and he will be able to receive messages at that address. If he wants jonathan.dough@smallbizco.net to appear as the return address on all his outgoing mail, you need to select that address in the E-mail Addresses tab and click the Set As Primary button. Recipient PoliciesIf you need to add an additional mail domain name for all users on the network, adding the address to each user object individually is not the best approach. Instead, use recipient policies to make changes across the entire organization. When Exchange is initially configured through the CEICW, the wizard creates a recipient policy in Exchange. Any new accounts created on the server get their email addresses assigned based on the settings in this policy. When the Default Recipient Policy object is created, it contains the three email domain names described previously, as shown in Figure 12.11. Figure 12.11. The default recipient policy contains the three basic address settings configured by the CEICW. To add another mail domain to the Exchange server, follow these steps:
If you respond Yes to the dialog box, a new email address is created for each user object in Active Directory. That task is performed by the Recipient Update Service. Recipient Update ServiceNot much guesswork is needed to figure out what the Recipient Update Service is and does. When active, it applies any changes to any of the recipient policies to all user objects across the network. In an SBS standard installation, this service is configured to run at all times, so that any time a change is made to the default recipient policy (or ay other recipient policies), those changes are immediately applied. This behavior can be modified in one of two ways. First, the Recipient Update Service can be disabled. This is done by opening the Recipient Update Service objects and setting the Update Interval to Never Run instead of Always Run. To make these changes, follow these steps:
If you disable the Recipient Update Services, new users you create will still get all the addresses defined in the recipient policy when they are created, but no objects on the network will have any changes applied automatically if you make additional changes to the default recipient policy. The second way to prevent a user object from getting updated with changes to the recipient policies is to restrict that behavior in the user object directly. This is done in the E-mail Addresses tab of the user properties page, refer to Figure 12.10, by disabling the Automatically Update E-mail Addresses Based on Recipient Policy check box. This exempts this user object from having global updates applied. Note Why would you want to exclude a user from having recipient policy changes applied? If the user is configured to use a different email domain than the server default as his default address, every time a change is made to the default recipient policy, his return email address will change to match the system default. If you disable the automatic update through the Recipient Update Service for that user account, his customized email settings will not be affected by any changes to the recipient policies. On the other hand, if you need to make changes for his account because of changes to the recipient policy, you have to make those changes by hand. Routing Mail for a Nonauthoritative ZoneDealing with split delivery mail domains is not as uncommon in the small business environment as you might think. Many small businesses rely on split delivery mail solutions, especially when the POP3 Connector is being used. Simply put, a split delivery mail system is a mail setup where not all the accounts for an email domain exist on a single mail server, in this case, the SBS server. And the CECIW cannot handle a split delivery mail domain during Exchange configuration, so if this scenario applies to you, you need to configure the setup manually. The problem arises when Exchange is told that it is the authoritative server for the split delivery mail domain. When a user on the SBS network attempts to send email to an account that does not reside on the SBS server, Exchange immediately returns the message as undeliverable because it cannot find that mail address in Active Directory. The best solution for this situation is to configure Exchange so that it is not the authoritative server for the domain. To change this configuration, follow these steps:
|
EAN: 2147483647
Pages: 253