Managing Users
| Modern versions of Windows, the branch of the family tree that includes Windows NT, Windows 2000, and Windows XP, incorporate the distinct concept of a " user ." Given your username and password, besides applying your preferences for the desktop and applications, Windows can track which of several dozen privileges you should be allowed to exercise, including the right to install new software, change other users' passwords, access the computer remotely via a network, orwhen your disk is formatted appropriatelyaccess any given file. Here are the elements of the Windows environment that are or can be user-specific :
This is a huge improvement over Windows 9x, where anyone could use the computer with or without a password, and do anything he wanted with it. And, although you certainly can configure Windows 2000/XP to be just as indiscriminate, it's in your own best interest to take full advantage of Windows' security features. In this section I'll give you a bit of background on the Windows security system, and then we'll go over how to set up and manage user accounts. If you want to get right to it, skip ahead to "Adding and Deleting User Accounts from the Control Panel" later in this chapter. Note The use of the word account in computers goes back to the days of mainframe and time-shared computers that were so expensive that you were charged by the houror maybe even the secondof computer use. Your username told the company or university whom to charge. In Windows, an account is a collection of files and security settings identified by a username and optionally secured a password. Domain and Workgroup EnvironmentsWindows was designed to work in both the home/small office environment and the corporate environment, and these two worlds have distinctly different security needs and management techniques. For home and small office use, convenience and minimal cost are the key parameters. In the corporate world, centralized management, delegation, and fine-grained control are the key concerns. I'll briefly describe how Windows addresses these two distinctly different sets of needs. Windows uses two different security models, called the Workgroup model and the Domain model, respectively. The difference is illustrated in Figure 5.1. Figure 5.1. In the Workgroup model, user accounts are maintained separately on each computer. In the Domain model, user accounts are centralized.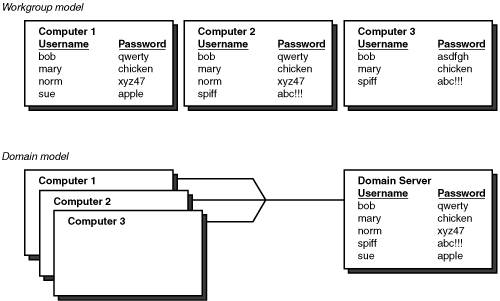 In the Workgroup model , each computer maintains its own list of user accounts. You can see in the figure that user Mary has accounts on all three computers. Spiff has accounts on just two. Norm has accounts on all three, but on one computer, the password is different. This illustrates the important features of Workgroup security:
With the Domain model , each computer is connected to a network, and when a user attempts to sign on, the computer refers to a computer running Windows NT Server, Windows 2000 Server, or Windows Server 2003 to see whether the name and password are recognized. The important points are as follows :
What this boils down to is this: If you use your computer on a corporate domain network, you probably can't make any changes to the computer's security setupnot if your organization's network manager did his job correctly. You can skim this section, though, to get an idea of what is going on behind the scenes. However, if you are setting up your own computer for your personal use, or for a small office, read on. You'll see how to use the workgroup model to create individual local accounts, and how to take best advantage of the limited but important security features available to you. Tip How do you tell whether your computer is set up for domain or workgroup-type security? Click Start, right-click My Computer, select Properties, and select the Computer Name tab. Under Full Computer Name, the dialog will have the word Workgroup or Domain. Note Windows XP Home Edition, by the way, can't be part of a domain network; it uses the Workgroup model only. Account TypesWhen you log on, Windows consults a database that it keeps hidden away on your hard disk (for local accounts), or on a networked domain server (for domain accounts). Along with your password, this database contains settings that determine exactly what you are allowed to do to with the computer, such as change other users' passwords. Some of these permission settings are associated directly with your account, but most are inherited through a system called User Groups , which contain lists of one or more usernames. Permissions to read files and change Windows settings are usually assigned to groups, and you inherit any privileges assigned to the groups of which you're a member. User accounts can be customized to some extent, but basically fall into one of four categories, which are, in increasing order of privilege,
I'll briefly discuss each of these in turn . Guest AccountsGuest accounts have minimal access rights; they can run programs but generally cannot make any changes to the system, nor save any files in shared folders. In addition, the account's User Profile (a folder created under \Documents and Settings that contains the Registry settings, preferences, application-specific files, and the My Documents folder) is automatically deleted after the user logs out, and created afresh when the next person uses the account. Guest accounts are fine for public settings, but probably are not a good idea for a houseguest who'll be staying for a few days, and who might be irked if she creates a document that disappears as soon as she logs off. By default, a single Guest-type account is set up when you install Windows XP. The account name is (big surprise) Guest . It has no password assigned, and it is also disabled by default, so that it can't be used unless you take steps to enable it. We'll talk more about that later in this chapter. Computer AdministratorsWith a Computer Administrator account you can make any change, read or write any file, or, well, do anything that a Windows user can do. In addition, while logged on with a Computer Administrator account, any software you run has full access to the computer. This is, of course, a good thing when you're installing a new device or a new application, but it's a terrible risk for day-to-day use, as any virus or other bad software that you might run inadvertently will also have full access to your computer. Note You might be tempted to configure a file's permissions to prevent even Computer Administrator users from reading it. You can do this. But, Computer Administrators have a privilege that lets them take ownership of any file, and as owner, they can change the file's read/write permissions so that they can read the file. So, don't assume that you can outsmart the Administrator! Power UsersA Power User can change some settings, for instance, screensaver and Power Management, and can install minor application programs as long as they don't replace any Windows components . Serious changes to Windows, such as networking configuration, Windows configuration, and device driver management, are not allowed. This is the type of account to create for yourself for day-to-day use of the computer. However, for reasons that I can't fathom, the Power User category is available only in Windows 2000 Professional and Windows XP Professional, and is not available on Windows XP Home Edition. Limited UsersLimited Users can log on, save files, and run most programs, but cannot install software, configure Windows, change security settings, or do much else that doesn't involve the user's own personal data. Limited User accounts are ideal for home systems, and are meant for kids , houseguests, and relativesin general, anyone whom you want to let use your computer, but whom you're worried might accidentally cause a problem. Limited User accounts can also be annoying for this same reason, as users can't even change the screensaver or the fonts Windows uses. Windows XP Home Edition offers only two choices, Limited or Computer Administrator accounts, which I find problematicLimited accounts are too limited, and for day-to-day use, Computer Administrator accounts are too powerful. Personally , I prefer to use Windows XP Professional so that I can have a Power User-type account. I use the Administrator logon only when I need to make a serious change or install an application (and then, I usually use runas rather than logging off and back on. We'll discuss runas later in this chapter). Default Accounts and GroupsWhen you install Windows 2000 or XP, several standard local user accounts and user groups are created as part of the installation process. Some of these are used for maintenance, and some Windows uses internally. You can, and should, add additional personal accounts for your own use. We'll cover that shortly. Here, though, are the default entries that you'll encounter when you go to add your own. Table 5.1 lists the local user accounts installed with Windows XP. Some additional user accounts are created if you install Internet Information Services on Windows XP Professional. In addition, several local groups are created, as listed in Table 5.2. Table 5.1. Default Local Users
Table 5.2. Default Local Groups
Security PrincipalsUser and group names can be used when you're assigning permissions to files and folders. There is an additional set of names called security principals that are like groups in that you can specify them as having access to files, folders, or other objects. However, their "membership" is contextual. When Windows encounters one of these names in an access control list, it evaluates whether the current user or program has a designated characteristic. For example, if I designate that the "SERVICE" entity is to be granted access to a certain folder, any Windows Service will be able to access the folder, no matter what user account the service is using. These entities can also be used to deny access; for example, a Deny entry for entity NETWORK would mean that a user could access a file while logged on locally, but would not be able to access the file over the network. Table 5.3 lists the built-in security principals. Table 5.3. Built-in Security Principals
Account PermissionsComputer Administrator users gain most of their powers by virtue of membership in the Administrators group, which is created by Windows, cannot be deleted, and is recognized by Windows as a special entity. Windows management software and the operating system itself check to see whether you are a member of the Administrators group before deciding whether to let you make certain changes; and at deeper levels, Windows knows to let Administrators bypass the normal security mechanisms that protect files and folders. There are a number of User Rights , such as the ability to change the system clock, that can be individually assigned to users or groups. They serve as the means by which Windows restricts or grants the ability for users or programs to change the way Windows works and, when necessary, to circumvent security features. Not surprisingly, the Administrators group is listed for nearly all of them. On Windows XP Home Edition, these permission settings cannot be changed. However, on Windows XP Professional, Windows 2000, and earlier versions of Windows NT, other accounts can be given these permissions as well. For example, if you've set up Remote Desktop access to your computer, you know that you have to list the users who are able to log on remotely, using the Remote tab on the System Properties dialog. That dialog actually makes the listed user a member of the Remote Desktop Users group. That group has the "Allow logon through Terminal Services" user right. Thus, the listed users can log on through Remote Desktop. Although you probably don't want to change their assignment, the settings can be seen in the Local Security Policy management tool, from the Administrative Tools menu or control panel icon. (You must be logged on as a Computer Administrator, or you can right-click the entry and select Run As, and then follow the dialog to run the program as an Administrator.) In the left pane, select Local Policies, User Rights Assignment. The Policy column lists the various user rights, and the Security Setting column lists the users and groups that are granted the rights, as shown in Figure 5.2. Figure 5.2. User Rights Assignments lists the accounts and security principals that are to be granted each privilege. Table 5.4 lists the standard User Rights used by Windows XP and Windows Server 2003. In the description column, most entries refer to "users." Here, "users" means any user who is either explicitly listed in the policy entry, is a member of a group that is listed, or has an associated security principal that is granted the associated right. When the description refers to the rights of programs, remember that programs are associated with a specific user, so the program's privileges are the same as the associated user's privileges. Table 5.4. User Rights
In the Local Security Settings tool, each policy is listed along with the groups or principals that are granted the associated privilege. Table 5.5 lists the default assignments for Windows XP Professional in a different way, showing all the privileges granted to each group and security principal. Remember that a given user will likely be a member of several of these groups or principals, so that user gains the combined privileges from each. To maintain tighter security, on a server fewer rights are usually granted to interactive users. Usually only the Administrator logs on directly, and regular users access the computer only over the network. Table 5.5. Default User Rights Assignments
Although you can change these assignments, it's somewhat risky (you might find that you can no longer log on, use, or manage your own computer), so you should have a very good reason for doing so. One need for adding additional privileges occurs when you install and run a Windows Service using a special user account. You will need to add that account to the Log On as a Service policy entry. As another example, I use an email system that requires recipients to have a user account, and the accounts must have the Log On as a Batch Job privilege. I don't want most of these email users to have access to the server computer, so I've rounded up the mail users into a group called "Email Users," and have added that group to Log On as a Batch Job. I also deleted most of them from the Users group, because they only need to pick up mail, and never log on. Adding and Deleting User Accounts from the Control PanelUnless your computer is a member of a domain network, the most straightforward way to create and manage user accounts on Windows XP is with the User Accounts applet in the Control Panel. Here, you can create user accounts, change passwords (your own, or if you are a Computer Administrator, other peoples'), change the Welcome Screen picture associated with the account, and make a "password reset" disk to have on hand in case you forget your password. Note If you are using Windows XP Professional, one thing the Control Panel tool won't let you do is to put user accounts into the Power Users category. What I suggest is that when you create new user accounts, create them as Limited Users, and then use the Management Console tool that I'll describe under "Managing Users from the Management Console" to turn them into Power User accounts. You only have to do that once, after creating the account. If you have to make changes in the future, you can still use the Control Panel tool to change the password, picture, and so on. Select Start, Control Panel, User Accounts to open the User Management applet. You should see something similar to Figure 5.3. Figure 5.3. The Windows XP User Accounts control panel applet lets you create and manage user accounts. The links on the left side under Learn About open help documentation for the listed tasks. On the top of the main panel is a list of basic tasks. I'll explain how to create new user accounts shortly. The bottom section of the main panel lists the local user accounts on this system. You can see details about each of the user accounts, including whether the user has administrative rights and whether the account is password protected. You might also notice that the guest account in Figure 5.3 is enabled. By clicking on it here, you can change the enabled or disabled status of the account. Holding the mouse pointer over one of the accounts opens a pop-up with additional information about what you can change by going into the account. You must be a Computer Administrator to create or modify another user's account. Tip To run the User Accounts control panel as a Computer Administrator when you're not currently logged on as one, open a Command Prompt window and type runas /user:Administrator "control nusrmgr.cpl" On XP Home Edition, substitute the name of a Computer Administrator account instead of "Administrator." If you click on a user account to manage it, the screen like the one shown in Figure 5.4 will appear. Figure 5.4. Modifying a user account with the User Accounts control panel applet.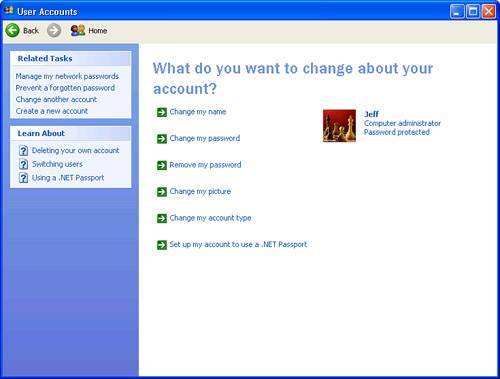 In the User Accounts Control Panel applet, there are quick-click actions to do the following:
In Figure 5.4, I am modifying the account that I am logged in with. This not only modifies the voice of the quick-click actions to the first person (for example, "Change my password" rather than "change the password"), but an additional action also appears:
Note Carefully consider the privacy implications before you configure your account to use the Passport feature. If you do, then anyone using your account will automatically have access to any websites or services that use Passport as the logon mechanism. Essentially, you're giving Windows and Microsoft permission to validate web transactions in your name. Adding Users to Your ComputerHere is my recommendation for the best way to add new user accounts to your computer:
If you are using Windows XP Professional, you can then use the Local Users and Groups tool to turn the new user accounts into Power User accounts, as described under "Managing Users from the Management Console." There, you can also create new security groups to simplify the job of file security. (On XP Home Edition, you cannot create or use security groups.) Before any of these users log on for the first time, you might also want to prepare a customized Default User Profile, as described later in this chapter in the section "Managing User Profiles." Setting Local Security PolicyIn a business setting, you might also want to set your computer's local security policy to require good passwords. To do this, log on as a Computer Administrator and open the Administrative Tools control panel applet, which you'll find in the Control Panel's Performance and Maintenance category. Open the Local Security Policy item, or, if you're not logged on as a Computer Administrator, right-click Local Security Policy and select Run As. In the left-hand pane, select Account Lockout Policy. In the right-hand pane, double-click the following entries and make the following settings, in this order, as illustrated in Figure 5.5:
Figure 5.5. Account Lockout Policy lets you block attempts to guess your password.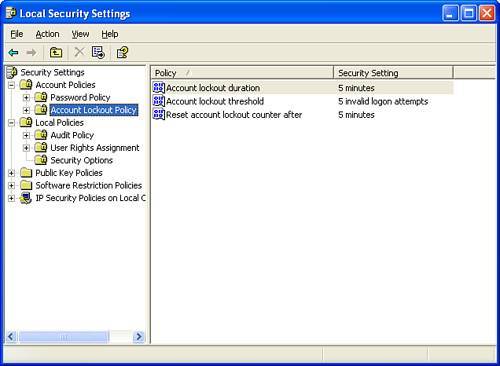 Then, in the left-hand pane, select Password Policies, and make the following settings:
You may also want to enable the settings that require employees to change passwords every so many days. Local Accounts and Password Reset DisksAdministrators can reset the password for any user account, meaning they could potentially change a password, log on as a user, and see all the user's preferences and files. In addition, before Windows XP, resetting a password would give a user carte blanche access to everything in the user's profile, including stored passwords, encrypted files, and more. Windows XP changes things a bit. If a local administrator forces a password change of a local user account, Windows XP erases all other passwords associated with the user account, including the security key required to decrypt files encrypted using the included Encrypting File System (EFS). This means that a local administrator can't see your encrypted files, but if you lose your password and need to have your password reset, you'll lose your encrypted files, too. For local accounts, Windows XP provides a mechanism so that you can protect yourself from this consequence of a forgotten password by creating a password reset disk . This floppy disk lets you log on to your user account without the password and without losing any other associated passwords or EFS keys. Think of it as a physical "key" to your computer account. You can only create a password disk for your own account, by following these steps:
Remember: Someone who gets hold of this disk has access to your account, so keep it somewhere safe and secure. Each user must create her own password reset disk. However, you will not need to re-create this disk if you change your password. If you have forgotten your password, you can sign on from the Windows XP Welcome screen using these steps:
Then, put reset disk away in case you need it again in the future. If you are a domain network user, you still contact a domain user administrator to reset your password or unlock your account. On domain accounts, EFS keys are not destroyed when the account is reset, so the password reset disk mechanism is not needed. Managing Users from the Management ConsoleOn Windows XP Professional and on Windows 2000, there is an additional tool for user maintenance called the Local Users and Groups Management Console. You can get there in any of four ways:
Do you think four ways are enough? There are actually more, but let's let it pass for now. Note If Administrative Tools doesn't show up under your Start menu, you can add the link. Right-click on Start, and then select Properties, Start Menus, Customize, Advanced, Display. However you get there, the display will look something like that shown in Figure 5.6. Figure 5.6. The Local Users and Groups Management Console gives you fine-grained control over security group membership.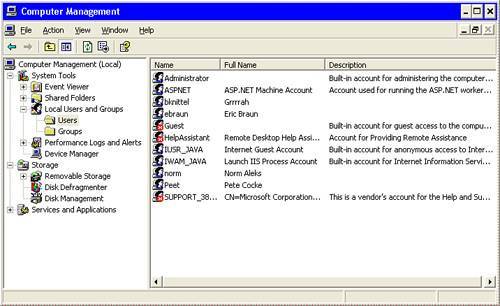 When you're in the MMC, you can right-click on either the Users or Groups folders in the left-hand pane to create new users and groups. You can double-click an individual user or group to manage properties related to that object, and you can right-click a user or group to rename or delete the object. For instance, in a home or small office environment, you might find it easiest to create most of your local user accounts as Limited Users with the Control Panel user management tool, and then assign most of your users to the Power Users group. There are two ways to do this. One method is described shortly under "The Windows 2000 User Manager, for XP, Too." The other method uses the Local Users and Groups tool. You must be logged on as a Computer Administrator user. Follow these steps:
You can also use this tool to create new local security groups. If, for instance, you want only certain employees to have access to your accounting files, you might create a group named Accounting. Add the appropriate users to this new group. Then, edit the file security settings for the folders that hold your accounting files and other sensitive financial files, and be sure that only groups Accounting and Administrators have access. This will be easier to maintain than adding each individual user to several folders' access lists. In the future, you need only add or remove users from the Accounting group, rather than needing to add or remove names from several different folders. Managing Users on Another Computer If you want to connect to a different computer to manage local users and groups, simply right-click Computer Management on the screen depicted in Figure 5.6, select Connect to Another Computer, and enter the computer name. Now all options in the Computer Management MMC reflect the configuration of the remote system, and you can manage the users and groups in the same way as on the local system; however, to do this, your Computer Administrator login name and password must be valid on the other computer. The Windows 2000 User Manager, for XP, TooIf you are using Windows 2000 Professional, your Users control panel dialog looks like the one shown in Figure 5.7. Figure 5.7. The Windows 2000 User Manager control panel applet. It's also available on Windows XP, though you have to perform the trick that brings it up. It has two very important uses: You can use it to make Windows log on automatically, and on XP Professional, you can use it to easily create Power User accounts. To start it up, open a command prompt window with Start, All Programs, Accessories, Command Prompt, and type control userpasswords2 If you are not currently logged on as a Computer Administrator, you will be prompted to enter an Administrator account name and password. This small user manager program can do two very useful things: It can make Windows log on automatically on startup, and it can create Power User accounts. Power User accounts are very useful, but are only available on Windows 2000 and Windows XP Professional. To change an existing account, select the name from the user list and click Properties. Select the Group Membership tab, and select one of the following categories:
Click OK to save your settings. If you modify your own account, the change won't take effect until you log off and back on again. On Windows XP Professional, you can create new accounts from this dialog; just click Add and enter the account name, and then select Group Membership and assign the desired account type. You can also use this tool to assign a password to the Administrator account on Windows XP Home Edition. On Home Edition, there is an account with the name Administrator, which is only available when you boot Windows in Safe mode. By default, it has no password. Microsoft did this so that even if you forget the password of the Computer Administrator account(s) you've set up yourself, you can still get into your computer. The downside is that anyone can boot your computer in Safe mode, select this Administrator account, and gain access to every file on your computer. If this concerns you, you can use the Windows 2000 User Manager to assign a password to the Administrator account: Select Administrator from the list of users, and click Reset Password. Remember that if you forget the password to this account as well, you will not be able to log on to Windows. To be safe, you should create password reset disks for your other accounts, as discussed earlier. Another important use for this dialog is to instruct Windows to log on automatically when it's turned on and started up. This works on Windows XP Home Edition, XP Professional, and 2000 Professional. To set this up, uncheck Users Must Enter a User Name and Password to Use This Computer. Click Apply, and Windows will prompt you for a username and password. This account will sign on automatically when Windows starts up. Managing Users from the Command PromptYou can manage user accounts from the Command Prompt as well as from the GUI. I tend to use this method when doing quick, simple changes to user accounts, or when creating a large number of accounts for, say, a classroom computer. Here are some commands that you might find handy:
Of course, you have to be logged on as a Computer Administrator to create or modify other users' accounts. Putting them together, you might use these commands to create a new Power User account: net user bknittel secretpassword /add net localgroup "Power Users" bknittel /add Or use these commands to delete one: net user bknittel /del rd "c:\Documents and Settings\bknittel*" /s That last command is "iffy"if a folder with your username already exists in the Documents and Settings folder when you create your account, or if you log on to a Windows domain network, Windows sometimes adds .XXX to the user profile folder name, where XXX is the computer or domain name; you can't always be sure what the exact folder name will be. Automating User ManagementWhen you have many user accounts to create or modify, you should look to Windows automation tools to help simplify the job and minimize errors due to typing mistakes. You can use the command-line tools I mentioned previously inside batch files as an excellent means of getting the job done. You can also use Windows Script Host (WSH). WSH is by far the more flexible of the two options. By tying in to the Active Directory Service Interfaces (ADSI), you can create, read, or modify any information or configuration options available for a user account. Here's an example. A common task that help desk personnel often require is the ability to easily unlock user accounts after a user has entered too many incorrect passwords. The following script file named unlock.vbs prompts for an account name and unlocks the account. From the command line, unlock runs the script. The user who is running the script must have the rights to unlock the target account. Set WshNetwork = WScript.CreateObject("Wscript.Network") CurDomName = WshNetwork.UserDomain DomainName = InputBox("Enter the Domain Name", "Domain", CurDomName) UserName = InputBox("Enter the account name to unlock", "User ID") on error resume next Set myUser = GetObject("WinNT://" & DomainName & "/" & UserName & " ") If myUser is Nothing Then msgbox "Unable to find user account " & DomainName & "\" & UserName ElseIf myUser.IsAccountLocked Then myUser.IsAccountLocked = 0 myUser.SetInfo If Err.Number then msgbox "Unable to unlock account, you may not have permission" Else msgbox UserName & " is now unlocked" End If Else msgbox UserName & " is already unlocked" End if For more on this topic, you might consider some of these excellent references:
You'll also find some downloadable examples of administrative scripts at InformIT.com (www.informit.com) and the Microsoft Development Network (msdn.microsoft.com/scripting). I also recommend taking a look at Andrew Clinick's administrative scripts from the Microsoft TechEd 2000 conference. The article and source code are available for download at http://msdn.microsoft.com/library/en-us/dnclinic/html/scripting06122000.asp. Managing User ProfilesA user profile is a folder that contains all of a user's personalized information: the Registry file that contains his customized settings, his Desktop and My Documents folders, and application data such as the Outlook Express address list and email database. By default, profiles are stored under C:\Documents and Settings , in folders with the same name as the user account. When you create a new user account, the user's profile folder is not created at that time. Instead, it's created when the user logs on for the first time, and it's copied from the default user profile stored in \Documents and Settings\Default User . I'll talk more about this in a moment. You'll find an interface for simple local user profile management by right-clicking My Computer, selecting Properties, Advanced, and then clicking the Settings button in the User Profiles box. You should see something similar to Figure 5.8. Figure 5.8. The User Profile Management dialog. Notice the three buttons :
One important reason to know about User Profiles is that you can customize the Default profile used for new accounts on your computer. Configuring a Default User ProfileIf you aren't happy with the initial desktop and other settings created for each user at the time of logon, you can configure a profile and copy it into the Default User profile. Subsequently, new users who log on to the system for the first time will get your desired settings, rather than the default profile provided out of the box. Here's how to do it:
Now, when you log on as a user who has not previously logged on to this computer, the initial settings will come from the prepared default profile. Roaming User ProfilesRoaming profiles are available on domain networks only. A roaming profile is a profile folder created by a domain administrator and stored on a network server. When you log on using a domain account that is configured with a roaming user profile, the profile folders are copied from the network to the computer you are using. When you log out, any changes to your documents or profile settings are copied back to the domain server, so those changes will be available on subsequent logins from different systems. It's a nifty ideayour preferences, desktop, and documents can literally follow you anywhere in the world. Note Some relatively unimportant folders are not copied back and forth between the domain server and a local computer to save time and network traffic. By default, these folders include Local Settings, Temp, Temporary Internet Files, and the History folder. The list of ignored folders is stored in the Registry under HKEY_CURRENT_USER\Software\Microsoft\Windows NT\CurrentVersion\Winlogon\ExcludeProfileDirs , which can be configured per user. Controlling How Users Log On and OffAlthough Windows 9x treated user authentication (logging on) as an option, user tracking is deeply ingrained in the Windows NT product line and that includes Windows XP. In Windows XP a user must always log on before the Windows desktop can appear. There are three ways to log on: The Welcome Screen, the Logon dialog, or an optional automatic logon upon startup. The Welcome Screen Versus the Logon DialogWindows XP provides a stylish graphical logon screen that lists all available user accounts [*] . It's convenient , but in some cases it can be seen as a security risk; it displays usernames, and thus provides half of the information needed for an intruder to log on.
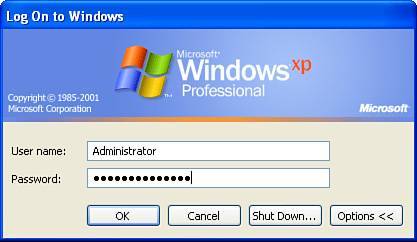
An older logon system called the Logon Dialog is also available (and it's the only one available if your computer is a member of a corporate domain network), shown in Figure 5.9. With this system, you must enter your logon name and password, and then click OK. Figure 5.9. The classic Windows logon dialog. The Options button hides or displays additional buttons, such as Shut Down. These options may be disabled by the network policy on some corporate systems. Note For domain logons , the most obvious method is to enter your username and password in the spaces provided, and then select your domain from the Log on To drop-down box. But you can also specify your username as username @ domain . For example, if my username in the MyCompany.com domain were bknittel, I could enter my username as bknittel@mycompany.com. You can also use this method to log on to a local account by entering accountname @ computername . For example, you can log on to computer JAVA's local Administrator account with administrator@java. To choose which method is used, go into the User Accounts applet under the Control Panel, and click Change the Way Users Log On Or Off. To use the Logon Dialog, clear the options to Use Fast User Switching and the Welcome Screen. To use the Welcome screen, check both options. Logging on as Administrator from the Welcome ScreenThe Windows XP Welcome screen does not normally list the local Administrator account as an available account unless no other Computer Administrator users are defined (and then, only on XP Professional, not Home Edition). If you don't know the passwords to any of the accounts displayed on the Welcome screen, or if none of the displayed accounts have administrative privileges but you need to perform some administrative function, you can bypass the Welcome screen to log on with the "standard" logon dialog, using any valid local account, by pressing Ctrl+Alt+Del twice. Then, simply enter the local administrator username and password, make whatever changes to the system you need to make, and log out. You'll be back at the Welcome screen. Note On Windows XP Home Edition, the Administrator account is only available when you boot Windows in Safe mode, and by default, a password is not set for the Administrator account. Remember that you can often save yourself the trouble of logging on as Administrator; you can also right-click a shortcut and select Run As, or use the runas command at the Command Prompt, to run programs with Administrator privileges.
Showing and Hiding Accounts on the Welcome ScreenBy default, the Administrator account and several system service accounts are not shown on the Welcome screen, although Administrator does appear if no other Computer Administrator accounts are defined. You can instruct Windows to display the Administrator account or to remove specific user accounts by editing the Registry key HKEY_LOCAL_MACHINE\SOFTWARE\Microsoft\Windows NT\CurrentVersion\Winlogon\SpecialAccounts\UserList . (The Registry is discussed in Chapter 6, "Tweaking and Tuning Windows.") This key holds values that determine which accounts are omitted from the Welcome screen. The UserList key contains values that name the accounts to be hidden, such as Administrator, HelpAssistant, and NetShowServices. The associated values determine how the account is displayed:
To add the Administrator account to the Welcome screen, log on as Administrator and run regedit . Open the key indicated earlier and change the Administrator value from to 1 . To hide a user account, add a new DWORD value with the same name as the user's logon name, and enter the numeric value . You can log on to a hidden account by pressing Ctrl+Alt+Del twice at the Welcome screen to display the Logon dialog. Fast User SwitchingWindows XP has a feature called Fast User Switching that lets you log on to alternate accounts without logging off from the first. You might compare this to having a big Lazy Susan on your deskinstead of cleaning it off so someone else can work at it, you just turn it around, leaving your original workspace intact, although out of reach. This is almost exactly what Fast User Switching does. When you switch users, you remain logged in and your programs even keep running; they're just not visible while someone else's desktop is displayed. Several different people can trade off use of the computer using this technique. Fast User Switching is useful in several different scenarios:
To switch users, click Start, Log Off, Switch Users (or use the Window+L keyboard shortcut). This brings you back to the Welcome Screen. From here, you can log back on to your original account to reconnect with your original session, or you can log on as another user. Note By default, you'll also get kicked back to the Welcome screen if your screensaver has time to activate. If you don't like having to sign back on after clearing the screensaver, right-click the desktop, select Properties, view the Screen Saver tab, and uncheck On Resume, Display the Welcome Screen. I recommend saving any open documents before switching users. If another user shuts Windows down or manages to crash the system, your data could be lost if you have not saved it. And keep this in mind: You already know that running multiple applications requires more system resources. Running multiple applications for multiple users takes even more. Things will run more smoothly if you have a fast processor and a lot of RAM. Also, some applications may not work correctly in this new multi-user environment. If the application you are using was written to the Microsoft Windows XP Logo standards (see www.microsoft.com/winlogo for details), it should behave properly. If Fast User Switching doesn't seem to be available on your computer, you may have to make a tradeoff . Several Windows XP features are mutually exclusive with Fast User Switching:
To enable Fast User Switching, log on as a Computer Administrator. Disable any competing features, and then open the User Accounts Control Panel applet. Select the task Change The Way Users Log On Or Off, and then check Use Fast User Switching. If you want to disable it, follow the same steps but uncheck the option. Yours must be the only account currently logged on. Enabling Automatic LogonYou can't make Windows give up on the concept of user accounts, but you can tell Windows to log on to one account automatically when it boots up. You might want to do this in a kiosk environment, in an industrial control installation where the computer's job is simply to run some specialized software, or in a very trusting home or work environment with just one user. To bypass the Welcome Screen or logon dialog, open a Command Prompt window, type the command control userpasswords2 , and press Enter. Uncheck Users Must Enter a User Name and Password to Use This Computer and click OK. You'll be prompted for a username and password. (If the account has no password, leave the password fields blank.) The next time Windows boots up, it will automatically log on using this account information. You can use shortcuts placed in the Startup folder to automatically run applications. And, you can use Local Security Policy to disable any features you don't want this unprotected computer to make available. If you want to log on using another user account you can simply log off or switch users, and then log back on using the alternate account. To change Windows back so that it presents the Welcome Screen or logon dialog, use the control userpasswords2 command again, and check Users Must Enter a User Name. Dealing with a Lost PasswordIt will eventually happen that you or one of your users will forget his password, or worse , the Administrator password. In this case, there are only a few things you can do. You should try them in the following order.
Prevention is the best medicine in this case, so you might want to take a minute now to create a password reset disk for your personal account and your computer's Administrator Account. If you manage many computers, it also can't hurt to get a copy of the Administrator Pak from winternals.com now, before you run into a crisis. Note This section's given you just the basics of user management. As you might guess, it's a large topic. If you want to get into more detail, I recommend you pick up a copy of Special Edition Using Microsoft Windows XP Professional, 3rd Edition (or the Home Edition ), published by Que. |
 ]
] 

EAN: 2147483647
Pages: 128
- Chapter VI Web Site Quality and Usability in E-Commerce
- Chapter IX Extrinsic Plus Intrinsic Human Factors Influencing the Web Usage
- Chapter X Converting Browsers to Buyers: Key Considerations in Designing Business-to-Consumer Web Sites
- Chapter XI User Satisfaction with Web Portals: An Empirical Study
- Chapter XIV Product Catalog and Shopping Cart Effective Design