Using Code Groups
|
An essential part of maintaining a secure environment is defining code groups that actually provide some level of protection while allowing membership of code that does require specific resources. The permissions that you give the code group define how much security the code group provides as contrasted to the access it grants. These two concepts contrast with each other. Granting a code group greater access means reducing the amount of security that it provides.
The following sections describe code groups in detail. First, the benefits and limitations of the default code group are discussed. Once you understand the default code groups better, this section will demonstrate how to create custom groups of your own.
Understanding the Default Groups
The default .NET Framework setup doesn’t assume anything about the individual user or the enterprise—it focuses on the requirements of an individual machine. Consequently, the Code Groups folder for the User and Enterprise levels only contain the All_Code group. The Machine level contains all of the default groups that the .NET Framework supplies, as shown in Figure 5.10.
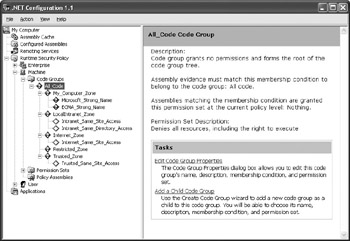
Figure 5.10: Look for the default .NET Framework groups at the machine level.
As shown in Figure 5.10, the default groups start with zone level security. You can see that each group defines a different zone, such as the Internet zone. Below each of these code groups are groups that define levels of access. At the My_Computer_Zone level, the code gains full access using either the Microsoft or European Computer Manufacturer’s Association (ECMA) strong naming conventions.
Notice that some of the entries in this list (Figure 5.10) have white diamonds in place of the more common purple diamonds. You can’t edit these custom code groups directly. In most cases, these custom code groups provide specific features that the originator doesn’t want changed in any way. Viewing the custom code group properties does show the XML used to create it, however, which is an important way to learn more about how to construct custom code groups yourself. Figure 5.11 shows a typical custom code group representation. (Display this dialog box by clicking the View Custom Code Group Properties link and selecting the Custom Code Group tab.)
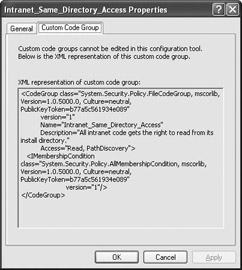
Figure 5.11: Define a custom code group for specific situations where you don’t want any changes.
Custom code groups are one situation where it becomes important to import the information from an XML file, rather than to define the group directly. Figure 5.11 shows that defining a custom code group is similar to defining a custom permission set as we did in Listing 5.1.
| Tip | You can add custom code groups using the –custom option of the CASPol utility. For example, you could type CASPol -addgroup 1.1.1. –custom MyMembershipCond.XML FullTrust -name MyStrongGroup -description “This is a special group.” to add a new group based on the MyMembershipCond.XML file content. Note that no matter how you add an XML-based membership condition, it’s always going to appear as a custom code group. |
Working with Code Groups
Code groups can help you perform real work with applications by ensuring that a particular application actually has the required access. However, it’s not just about ensuring correct security. A code group can reduce your coding burden and add consistency to the verification process.
You’ve already seen pieces of this concept. The “Making Group Modifications” section of this chapter emphasizes the hierarchical structure of the security setup. The “Writing the StrongNameIdentityPermission Class Code” section of Chapter 4 discusses how to use strong names in your code. Finally, the “Defining Membership and Evidence” section of Chapter 4 shows how to verify membership in a particular code group. The example in this section combines all of these features and shows how to access them using a code group that you’ve defined.
| Warning | If you suddenly notice that all code access security requests succeed, even from locations such as the Internet, someone may have turned code access security off. To turn code access security back on, type CASPol –security on. Obviously, if this solution fixes the problem, you need to investigate further. A cracker may have gained valuable access to your system. |
Defining the Special Code Group
A special code group lets you check for a particular membership. However, before you can create a special code group, you need a component that will check for this membership as part of allowing access to the features it provides. Listing 5.2 shows one way to approach the problem. This is the technique that many developers will use because it’s easy and fast. (You can find the full listing for this example in the \Chapter 05\C#\CodeGroupComponent or \Chapter 05\VB\CodeGroupComponent folder of the source code located on the Sybex Web site.)
Listing 5.2 Specialized Code Group Component
// Use attributes to define the security requirements. [ZoneIdentityPermission(SecurityAction.LinkDemand, Zone=SecurityZone.MyComputer), StrongNameIdentityPermissionAttribute(SecurityAction.LinkDemand, PublicKey= "0024000004800000940000000602000000240000525341310004000001" + "000100530C096B92537C141556FB86ECEEA1FDCE8E23F3BA4F261EB20A" + "045CCC9C36F2CAC15D867700D2A6AC52084B5B6F15DCC4ED8829B9C446" + "B36CCEEFFEB0C44E4E7481DD77C057ABA79E4ABC1530CFE26A3FE32CF3" + "7705289BF736CF12F559E8804B0E3B780944FACE97182BA84674DA3BE3" + "1C50553DAFA1467C13FB810AD506DF")] public class SayHello2 { public String DoSayHello2() { return "Hello from DoSayHello2!"; } } Each of these attributes checks a specific security attribute. To use this component, the caller must appear on the local computer and be signed with the correct key. You can place these two attributes in various locations. Placing them at the class level secures all of the methods, events, and properties in the class as well. Securing individual elements means placing the two attributes immediately before those elements.
Considering a Code Group Component Alternative
The .NET Framework normally provides multiple ways to perform any given task, but you have to consider the tradeoffs of each option. This example could also use membership checks to achieve essentially the same effect. The advantages of using membership checks are that you can perform custom processing and you don’t have to provide a specific public key. The disadvantages of this approach are that you can’t place the check at multiple levels (at least not easily) and you have to write a lot more code. Listing 5.3 shows the code for the alternate version of the CodeGroupComponent. (You can find the full listing for this example in the \Chapter 05\C#\CodeGroupComponent or \Chapter 05\VB\CodeGroupComponent folder of the source code located on the Sybex Web site.)
Listing 5.3 Alternative Code Group Component
public SayHello() { // Get the calling assembly. Assembly Asm; Asm = Assembly.GetCallingAssembly(); // Get the evidence from the assembly. Evidence EV; EV = Asm.Evidence; // Create a zone membership condition check. ZoneMembershipCondition ZoneMember; ZoneMember = new ZoneMembershipCondition(SecurityZone.MyComputer); // Check for application directory membership. if (!ZoneMember.Check(EV)) { DialogResult Result; // Return value. // Ask whether the user wants to continue. Result = MessageBox.Show("Using this component from an " + "intranet connection can cause " + "a security " breach.\r\nContinue?", "Potential Security Error", MessageBoxButtons.YesNo, MessageBoxIcon.Warning); if (Result == DialogResult.No) // Throw an exception. throw(new PolicyException("Calling assembly zone incorrect.")); } // Examine the evidence for this component. IEnumerator Enum = Assembly.GetExecutingAssembly().Evidence.GetHostEnumerator(); // Get the strong name for this component. StrongName SN = null; while (Enum.MoveNext()) if (Enum.Current.GetType() == typeof(StrongName)) SN = (StrongName)Enum.Current; // Create the strong name membership condition. StrongNameMembershipCondition StrongMember; StrongMember = new StrongNameMembershipCondition(SN.PublicKey, null, null); // Check the strong name membership. if (!StrongMember.Check(EV)) { // Throw an exception. throw(new PolicyException("Calling assembly isn’t a " + "Demonstration_Strong_Name member.")); } } The code begins by getting the calling assembly—the client that’s calling on the component for service. It uses the Asm object to obtain evidence. The first check determines whether the caller is in the correct zone. It does this by creating the ZoneMember object and using the Check() method against the caller’s evidence.
When the caller is in the wrong zone, the code asks about the potential for a security breach. If the user answers no, the code throws an exception. This is an example of how the second technique is superior to the first because you’ve added flexibility in handling the situation. The example uses a PolicyException with a custom message. You can also use a SecurityException. However, the PolicyException is more precise and specific.
The second check determines whether the caller has the correct strong name. Of course, this means constructing a StrongName object. The code obtains the strong name using an enumeration that checks the executing assembly, rather than the calling assembly. The executing assembly is the component and you want to verify that both the caller and the component have the same strong name. The code uses an enumeration to find the executing assembly strong name. The strong name handling demonstrates another way in which the second method is superior to the first. You don’t have to hard code the public key, so changing keys is a simple change and recompile.
| Warning | It’s easy to confuse the calling and executing assemblies, especially when you need to work with multiple client levels. Always verify the use of the GetExecutingAssembly() method for the host application and the GetCallingAssembly() method for the calling application. Otherwise, you could perform comparisons that end up checking the caller against itself. |
After the code locates the strong name information for the executing assembly, it creates a StrongNameMembershipCondition object using just the SN.PublicKey value. Notice that the code uses a null value for both the name and version arguments. The StrongMember object will match any caller signed with the same public key as the component. If you also added the name and version number, the call would fail unless the caller is the same as the current component. As with the zone check, the code throws a policy exception if the public keys don’t match.
Installing the CodeGroupComponent
You must sign this component. Add the example component to the GAC by typing GACUtil /i CodeGroupComponent.DLL at the command prompt. (You can remove the component later by typing GACUtil /u CodeGroupComponent.DLL.) However, there’s no requirement that you always add your component to the GAC. This step does make working with the component easier. The following steps tell you how to create the specialized strong name code group based on this component using the .NET Framework Configuration Tool:
-
Highlight the My_Computer_Zone entry within the Machine\Code Groups folder.
-
Click the Add a Child Code Group link. The .NET Framework Configuration Tool displays an Identify the New Code Group dialog box.
-
Type Demonstration_Strong_Name in the Name field and A code group used for demonstration purposes. in the Description field. Click Next. The .NET Framework Configuration Tool displays a Choose a Condition Type dialog box.
-
Select Strong Name from the condition list. The Choose a Condition Type dialog box changes to accept strong name information.
-
Check the Name and Version entries to enable these security entries.
-
Click Import. You’ll see an Import Strong Name from Assembly dialog box.
-
Locate the CodeGroupComponent.DLL file and highlight it. Click Open. The Choose a Condition Type dialog box should look similar to the one shown in Figure 5.12.
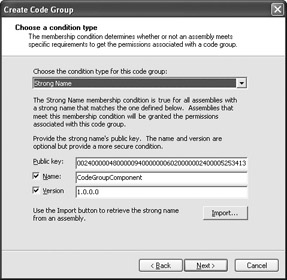
Figure 5.12: Use the strong name information from the component to create a strong name membership. -
Click Next. The .NET Framework Configuration Tool displays an Assign a Permission Set to the Code Group dialog box.
-
Select FullTrust from the permission set list, and then click Next.
-
Click Finish to complete the process.
The current setup lets anyone using the current machine also access the component. If the user isn’t part of the current machine or tries to access the machine from another location, then the call will fail. You could easily change this to a user specific check by moving the code group to the User list.
Writing the Code Group Access Code
The example component file actually contains two components. The first uses the attribute technique, while the second uses the membership technique. The code in Listing 5.4 shows how to test both components. Notice that this code isn’t anything special—it could easily represent nonsecure code. (You can find the full listing for this example in the \Chapter 05\C#\CodeGroup or \Chapter 05\VB\CodeGroup folder of the source code located on the Sybex Web site.)
Listing 5.4 Code Group Component Testing Example
private void btnTest_Click(object sender, System.EventArgs e) { SayHello MyHello; // The test component. try { // Create the component. MyHello = new SayHello(); // Test the component. MessageBox.Show(MyHello.DoSayHello()); } catch (PolicyException PE) { // Display an error message. MessageBox.Show(PE.Message); } } private void btnTest2_Click(object sender, System.EventArgs e) { SayHello2 MyHello; // The test component. try { // Create the component. MyHello = new SayHello2(); // Test the component. MessageBox.Show(MyHello.DoSayHello2()); } catch (SecurityException SE) { // Display an error message. MessageBox.Show(SE.Message); } } In both cases, the code creates the component and then calls on the one method it contains to display a string on screen. The only difference between this application and any application you might have created in the past is that this application requires a key—the same key you used for the component. Once you sign the test program, it becomes part of the Demonstration_Strong_Name code group created earlier. Run the CASPol -machine -resolvegroup CodeGroup.EXE command. You’ll see output similar to that shown in Figure 15.13. This output demonstrates that the application is part of the code group.
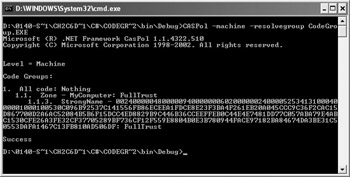
Figure 5.13: Signing the test program automatically adds it to the strongly named group.
Testing the Code Group
Both versions of the test program always run on the local machine as long as you sign the calling application and the component with the same key. Try compiling the test application without a key and you’ll notice that it fails. One interesting test is to compile both the test application and the component using MyKey2 supplied with the Signed Client example in Chapter 4. The more flexible membership testing technique shown in Listing 5.3 still works, but the simpler technique fails because the attribute hard codes the key.
The real test occurs when you place the test application on a network drive. Because of the way that we installed the Demonstration_Strong_Name code group, the test applications will fail. However, you can easily change that outcome. Right-click the Demonstration_Strong_Name code group entry in the .NET Framework Configuration Tool and choose Cut from the context menu. Right-click the LocalIntranet_Zone entry and choose Paste from the context menu. These two steps move the Demonstration_Strong_Name code group entry.
| Warning | Make sure you cut the entry and don’t copy it—if you copy the entry the test won’t work as anticipated. |
Try the test application again. Notice that the attribute method still fails because the attribute hard codes the zone error reaction. The membership testing technique displays an error message. When you click Yes, this application succeeds because the custom coding enables the user to decide the severity of the security risk. Of course, you can choose any of a number of mechanisms to make the decision. The important point is that you can make a decision.
Adding New Permissions
The permissions that Microsoft provides as part of the .NET Framework will address many (if not most) common situations. However, one consistent element of programming is that the unexpected is the normal condition that developers face. A company usually has some kind of special need for their data that Microsoft can’t consider as part of the common scenario. The need could be something as simple as ensuring that no one outside the selected group can use the program. You may need to limit the functionality of a program based on the needs of the requestor. Perhaps managers have access to features that other employees don’t need.
In the Win32 environment, handling special situations is difficult because security is a hard-wired element of the operating system. You can only go so far in protecting an operating system because the role of the user and the nature of the environment aren’t considered. In fact, you can’t even garner enough information to develop a kludge to handle this situation in many cases.
The .NET Framework makes it possible to create a new permission. This permission can describe any set of security requirements you can imagine. When you want to limit application access based on some criteria, you can build a permission to handle that requirement. The permission acts as input to a code group that defines access to the permission based on a membership criteria. Finally, your application can demand the requisite permission and perform analysis of which features the requestor can access. It’s an extremely flexible way to define security.
The following sections take you through the process of creating a new permission and testing it within an application. In short, when you finish this section, you should know the basic process for creating any security requirement needed to ensure the integrity of your data, the safety of your resources, and the use of resources.
Creating a Permission Assembly
In general, you must create a new permission to implement a new security requirement that’s part of a code group. You can take several routes to achieve this goal. For example, you can create a new permission out of the available named permissions. We discussed that possibility in the “Making Permission Modifications” section of the chapter. In that example, we created an XML file to hold the existing definitions in a new combination. You can assign that definition to a code group and use it as part of an application setup.
This section takes a different approach. It assumes that the existing permissions are inadequate for your particular needs. Listing 5.5 shows the code used to create a custom permission. Of course, this is just the permission assembly. You still have more work to do to implement the permission, but this is the starting point. (Note that this listing isn’t complete. You can find the full listing for this example in the \Chapter 05\C#\CustomPermission or \Chapter 05\VB\CustomPermission folder of the source code located on the Sybex Web site.)
Listing 5.5 A Typical Custom Permission Assembly
// This enumeration contains the acceptable permission values. public enum SpecialSet { All = 0, Some, None } [Serializable()] public class Special : CodeAccessPermission, IUnrestrictedPermission { // A required variable for unrestricted access. private Boolean _unrestricted; // A special variable for tracking access to this class. private SpecialSet _setValue; // At least one constructor should set the restricted state. public Special(PermissionState State) { if (State == PermissionState.Unrestricted) _unrestricted = true; else _unrestricted = false; // Make sure you also set any special property values. if (_unrestricted == true) _setValue = SpecialSet.All; else _setValue = SpecialSet.None; } // At least one constructor should set your special properties. public Special(SpecialSet SetValue) { // Set the property value. _setValue = SetValue; // You can assume an unrestricted state in some cases. if (SetValue == SpecialSet.All) _unrestricted = true; else _unrestricted = false; } // This implementation also requires a special property. public SpecialSet SetValue { get { return _setValue; } set { // Set the new value. _setValue = value; // Determine whether unrestricted has changed. if (_setValue == SpecialSet.All) _unrestricted = true; else _unrestricted = false; } } public override IPermission Copy() { // Create a new copy of the permission. Special Copy = new Special(PermissionState.None); // Define the properties. Copy._setValue = this.SetValue; // Set the restriction level. if (this.IsUnrestricted()) Copy._unrestricted = true; else Copy._unrestricted = false; // Return the copy. return Copy; } public override void FromXml(SecurityElement elem) { // Get the SetValue value. String Element; Element = elem.Attribute("SetValue"); // Set the property values according to the // SetValue entry. if(Element != null) { switch (Element) { case "All": this._setValue = SpecialSet.All; this._unrestricted = true; break; case "Some": this._setValue = SpecialSet.Some; this._unrestricted = false; break; case "None": this._setValue = SpecialSet.None; this._unrestricted = false; break; } // Don’t perform any more processing. return; } // The XML file didn’t contain a SetValue entry. Try // the Unrestricted entry. Element = elem.Attribute("Unrestricted"); if (Element != null) { // Process using the Unrestricted value. this._unrestricted = Convert.ToBoolean(Element); // Set the SetValue value. if (_unrestricted) this._setValue = SpecialSet.All; else this._setValue = SpecialSet.None; } else { // No one saved anything, so use defaults. this._setValue = SpecialSet.None; this._unrestricted = false; } } public override IPermission Intersect(IPermission target) { // Use a try...catch statement in case the caller sends // the wrong kind of permission. try { // If the permission is null, return null. if(target == null) { return null; } // Create a new copy of the permission. This is where the // code will fail if the supplied permission is the wrong // type. Special Perm = (Special)target; // Start checking permissions. Begin with the case where // the incoming permission allows everything. switch (Perm.SetValue) { case SpecialSet.All: return this.Copy(); case SpecialSet.Some: if (this.SetValue == SpecialSet.None) return this.Copy(); else return Perm; case SpecialSet.None: return Perm; } // If all else fails, return a copy of this object. return this.Copy(); } catch (InvalidCastException) { // Tell the caller there is an argument error. throw new ArgumentException("Wrong Argument Type ", this.GetType().FullName); } } public override bool IsSubsetOf(IPermission target) { // Use a try...catch statement in case the caller sends // the wrong kind of permission. try { // If the permission is null, return false. if(target == null) { return false; } // Create a new copy of the permission. This is where the // code will fail if the supplied permission is the wrong // type. Special Perm = (Special)target; // Start checking permissions. Begin with the case where // the incoming permission allows everything. switch (this.SetValue) { case SpecialSet.All: return true; case SpecialSet.Some: if (Perm.SetValue == SpecialSet.All) return false; else return true; case SpecialSet.None: if (Perm.SetValue == SpecialSet.None) return true; else return false; } // If all else fails, return false. return false; } catch (InvalidCastException) { // Tell the caller there is an argument error. throw new ArgumentException("Wrong Argument Type ", this.GetType().FullName); } } public override SecurityElement ToXml() { // Create a security XML encoding element. SecurityElement SE = new SecurityElement("IPermission"); // Determine the permission type. Type Inst = this.GetType(); // Determine the assembly name. StringBuilder AssemblyName; AssemblyName = new StringBuilder(Inst.Assembly.ToString()); // Replace double quotes with single quotes for the XML file. AssemblyName.Replace(‘\"’, ‘\’’); // Create the required attributes. SE.AddAttribute("class", Inst.FullName + ", " + AssemblyName); SE.AddAttribute("version", "1"); SE.AddAttribute("Unrestricted", _unrestricted.ToString()); SE.AddAttribute("SetValue", _setValue.ToString()); // Return the resulting security element. return SE; } public bool IsUnrestricted() { // Return the current restricted state. return _unrestricted; } } Notice that the Special class derives from the CodeAccessPermission class and implements the IUnrestrictedPermission interface. When you create a permission class, you must implement the IPermission interface in some way. Microsoft recommends that you use the CodeAccessPermission class to meet this requirement because otherwise you have to write code for all of the common IPermission interface members.
| Tip | It may be tempting to say that the CodeAccessPermission class is the only class you can use to derive a new permission class. This statement isn’t true. You can derive from any permission class and it may be better if you do derive from other classes in some situations. The CodeAccessPermission class is code access specific. When you need to create a new identity permission, you may want to derive your new permission from one of the identity permissions such as the ZoneIdentityPermission class. The point is that you don’t want to limit your choices based on the methods used in this section or online—choose the best class to meet your specific need and then modify that implementation as needed. |
The Special class also has the [Serializable()] attribute attached. You don’t have to include this attribute if you only intend to use imperative security with the new permission. However, it’s usually a good idea to include the [Serializable()] attribute in case you decide to implement declarative security later. Otherwise, you see a strange error message (it seems to vary by phase of the moon) that has nothing to do with the actual problem when you attempt to use the permission in declarative mode.
The code begins by creating two private variables. Part of the custom permission specification states that you must keep track of the unrestricted state. However, you’ll also want to track custom values.
The example provides two constructors. Look at most of the .NET Framework permission classes and you’ll notice that they also have a minimum of two constructors. The reason is that you must create one constructor that accepts a PermissionState enumeration value as input. This value sets the unrestricted value. Notice that the example code also sets the custom _setValue variable based on this input. Although this isn’t a requirement, you’ll find that your custom permission works better if you make some assumptions based on the unrestricted value when a caller uses the PermissionState enumeration as input. Likewise, the second constructor handles the unrestricted state based on the SetValue input.
It may not seem like a very important addition, but you should provide a property for every custom status value your permission supports. The example provides this feature to make it easier to implement declarative security. It’s also a good addition when the caller wants to learn the current permission state. A component may rely on specific caller states to grant or deny permissions.
Another rule for creating permissions based on the CodeAccessPermission class is that you must override the Copy(), Intersect(), IsSubsetOf(), ToXml(), and FromXml() methods. It’s also helpful to override the Union() method, but not absolutely required. The example code shows typical implementations that include functionality for a special security state property. Notice, for example, that the Copy() method sets the values of the new copy of the Special object before returning it.
The FromXml() and ToXml() methods are paired. Microsoft doesn’t place any restrictions on the format of the XML file except that the FromXml() must be able to read anything produced by the ToXml() method. The XML tags must also conform to the format produced by the SecurityElement object. This XML data isn’t strictly correct or even readable by a typical XML utility. Figure 5.14 shows typical SecurityElement object XML output. As you can see from the figure and the associated code, the general idea is to use an existing object to generate XML settings that the code can read in and use to create a replica object.
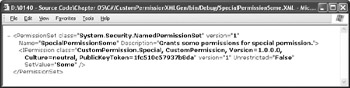
Figure 5.14: Create the specialized XML used for security needs in the FromXml() and ToXml() methods.
The Union(), Intersect(), and IsSubset() methods all perform manipulations of security settings based on the comparison of the existing permission with an input permission. The Union() method creates a result that’s the complete set of settings of the two permissions. The Intersect() method returns a result that’s the least of the two permissions. The IsSubset() method returns a Boolean value that states whether the input permission is a true subset (or an equal) of the existing permission. In all three cases, the code must check for a null input and act accordingly. After checking for a null input, the code coerces the input permission to an object of the same type as the current permission. If the coercion succeeds, the code performs the required comparison. As shown in the examples, you must provide handling for the InvalidCastException exception.
The IUnrestricted interface is relatively easy to implement. All you need to provide is an IsUnrestricted() method that returns the unrestricted value of your permission.
Listing 5.5 showed the imperative portion of the permission. However, you’ll likely want to implement declarative security too. Listing 5.6 shows a typical declarative security implementation. The attribute class appears as part of the Special class module, which makes it easy for the two to work together (and lessens the work you must perform to create the declarative version).
Listing 5.6 Declarative Security Addition
// Add an attribute class so the permission includes both imperative // and declarative security support. [AttributeUsageAttribute(AttributeTargets.All, AllowMultiple = true)] public class SpecialAttribute: CodeAccessSecurityAttribute { // A required variable for unrestricted access. private Boolean _unrestricted; // A special variable for tracking access to this class. private SpecialSet _setValue; // You must include a property for changing the unrestricted value. public new Boolean Unrestricted { get { return _unrestricted; } set { _unrestricted = value; } } // This implementation also requires a special property. public SpecialSet SetValue { get { return _setValue; } set { _setValue = value; } } // Create the constructor. public SpecialAttribute(SecurityAction Action) : base (Action) { } // Override this method so the attribute returns the correct // object type. public override IPermission CreatePermission() { // Handle the case where the SetValue argument is supplied. switch (SetValue) { case SpecialSet.All: return new Special(SpecialSet.All); case SpecialSet.Some: return new Special(SpecialSet.Some); case SpecialSet.None: return new Special(SpecialSet.None); } // Handle the case where the Unrestricted argument is supplied. if(Unrestricted) { return new Special(PermissionState.Unrestricted); } else { return new Special(PermissionState.None); } } } The SpecialAttribute class derives from CodeAccessSecurityAttribute. However, as with the imperative version of this example, you can implement a completely custom declarative version.
You must provide properties for every value that the user can change as part of the attribute. These properties contain the values when the system calls your code. For example, when the caller uses the
[SpecialAttribute(SecurityAction.Demand, SetValue=SpecialSet.All)]
Attribute, the SetValue property receives the SpecialSet.All value. If you don’t provide the requisite property, then your code won’t receive the value.
The only method you must implement is CreatePermission(). The example shows one method of handling the input. If the SetValue property isn’t set, the code looks at the Unrestricted property. You must handle the unrestricted setting at a minimum because many types of XML file handling rely on it. Note that in all cases, the SpecialAttribute class merely returns a new copy of the Special class.
Designing a Component to Use the Custom Permission
It’s time to use the new Special permission class to protect a component. Listing 5.7 shows typical component code. It depends on the imperative method, but you could easily use the declarative method as well. (You can find this example in the \Chapter 05\C#\ CustomPermissionComponent or \Chapter 05\VB\CustomPermissionComponent folder of the source code located on the Sybex Web site.)
Listing 5.7 A Custom Permission Test Component
public class TestClass { public TestClass() { // Demand the required permission. Special ClientCheck; ClientCheck = new Special(SpecialSet.All); ClientCheck.Demand(); } public String Random() { // Create a random number and place it in a string. Random MyRand; MyRand = new Random(DateTime.Now.Second); return "Next random number: " + MyRand.Next().ToString(); } } When a caller tries to instantiate a copy of the component, the code checks for the correct security level using the Demand() method. Incorrect credentials produce a SecurityException exception. The Random() method is only used to test component access—it generates a string that includes a random number.
Designing an Application to Test the Custom Permission
The test program checks grant and deny security conditions when using the Special permission. Listing 5.8 shows the code used to instantiate a copy of the test component and display a string using the Random() method. (You can find this example in the \Chapter 05\C#\ CustomPermissionTest or \Chapter 05\VB\CustomPermissionTest folder of the source code located on the Sybex Web site.)
Listing 5.8 Custom Permission Test Application
private void btnGrant_Click(object sender, System.EventArgs e) { // Create a new permission. Special Perm; Perm = new Special(SpecialSet.All); Perm.Demand(); // Try to create the custom component. try { TestClass TC; TC = new TestClass(); // Display a result. MessageBox.Show(TC.Random()); } catch (SecurityException SE) { // Display the error. MessageBox.Show(SE.Message); } } private void btnDeny_Click(object sender, System.EventArgs e) { // Create a new permission. Special Perm; Perm = new Special(SpecialSet.All); Perm.Deny(); // Try to create the custom component. try { TestClass TC; TC = new TestClass(); // Display a result. MessageBox.Show(TC.Random()); } catch (SecurityException SE) { // Display the error. MessageBox.Show(SE.Message); } } As you can see, both methods are essentially the same. The only difference is that one uses the Demand() method to gain access to the required permission and the other uses the Deny() method to refuse the permission. Clicking Deny produces a message box that contains a security error message. The message box correctly identifies the CustomPermission.Special class as the source of the error.
|
EAN: 2147483647
Pages: 168