Using Policy Objects
|
Creating a permission lets you create custom policy objects using the CASPol command line tool or the .NET Framework Configuration Tool. As your organization depends more on .NET to ensure the safety of your data, creating custom policies becomes more important.
| Tip | You may run into a situation where you want to return a system to the default security policy before you make any other changes. For example, this technique works well if you use a batch file for setup and want to ensure the system is in a baseline configuration before you begin the batch file. To return the system to a default security configuration, type CASPol –reset. |
This section of the chapter relies on the custom permission created in the “Adding New Permissions” section of the chapter. In this case, we’ll use the Special permission class as the basis for defining a new policy.
Installing a New Permission
When you create a code group, you begin by looking at the membership condition and the permission granted by fulfillment of that condition. However, before you can grant a permission, it must appear as part of the standard security policy used by the .NET Framework. You must make the system aware of the permission in order to use it as a basis for any policy. The first task is to add the permission class to the Policy Assemblies folder at one or more levels. Repeated attempts show that this part of the .NET Framework Configuration Tool doesn’t work as expected, so you must type CASPol -machine -addfulltrust CustomPermission.DLL and press Enter at the command prompt.
At this point, you need to create the permissions used with the code groups. Unfortunately, you can’t just use the existing CustomPermission.DLL file as you might for other purposes. Neither of the utilities discussed so far will accept anything other than an XML file as input, which means you need to build the requisite program. Listing 5.9 shows that this program isn’t difficult to write—just annoying. (This listing isn’t complete. However, you can find the complete listing for this example in the \Chapter 05\C#\CustomPermissionXMLGen or \Chapter 05\VB\CustomPermissionXMLGen folder of the source code located on the Sybex Web site.)
Listing 5.9 XML Generator for a Custom Permission
private void btnTest_Click(object sender, System.EventArgs e) { Special Perm; // Special permission object. NamedPermissionSet NPS; // Permission set container. StreamWriter Output; // Data storage to disk. // Create the All special permission. Perm = new Special(SpecialSet.All); // Define a named permission set. NPS = new NamedPermissionSet("SpecialPermissionAll", PermissionState.None); NPS.Description = "Grants all permissions for special permission."; NPS.AddPermission(Perm); // Generate the All permission output file. Output = new StreamWriter("SpecialPermissionAll.XML"); Output.Write(NPS.ToXml()); Output.Close(); ... Some and None Permission Generation ... // Operation complete. MessageBox.Show("Output Complete!"); } As you can see, the code begins by building a named permission set and a permission to place in it. It’s important to create one permission for each permission state that you want a code group to support. Because the code is relatively easy, the example creates permission files for all three of the example permission states. The program uses a StreamWriter to output the information to an XML file. The result of running this program is three XML files that you can use to create permissions. The following steps show how to perform this part of the process using the .NET Framework Configuration Tool.
-
Select the Runtime Security Policy/Machine/Permission Sets folder.
-
Click Create New Permission Set. You’ll see a Create Permission Set dialog box.
-
Select the Import a permission set from an XML file option.
-
Click Browse to locate the XML file or type the location of the file. Your dialog box should look similar to the one shown in Figure 5.15.
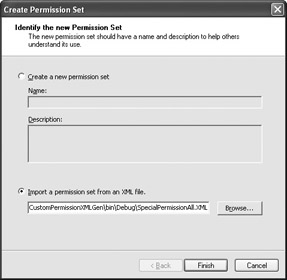
Figure 5.15: Define the location of the XML file containing the new permission you want to create. -
Click Finish. The .NET Framework Configuration Tool will add the new permission to the list.
-
Repeat Steps 2 through 5 for each of the permissions you want to add (three for this example).
Figure 5.16 shows the Permission Sets folder with all three permissions added.
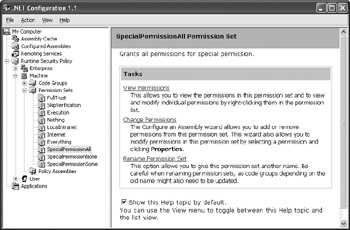
Figure 5.16: A view of the Permission Sets folder with custom permissions added.
Creating a Code Group Based on the Permission
Now that you have a new permission to use, you’ll likely want to create a code group to use it. Using a custom permission is like any other permission you might have used. The only difference is that you use a custom permission instead of one of the supplied permissions. The “Installing the CodeGroupComponent” section of the chapter provides an example of the techniques you use to create a new code group. Here are the quick steps for creating a code group for the custom permission.
-
Select the Runtime Security Policy/Machine/Code Groups/All_Code/My_Computer_Zone folder.
-
Click Add a Child Code Group. You’ll see a Create Code Group dialog box.
-
Type Special_Permission_Test in the Name field and Tests the CustomPermission .Special class permission. in the Description field, and then click Next.
-
Select All_Code as the membership condition and click Next.
-
Select SpecialPermissionAll as the permission and click Next.
-
Click Finish. The .NET Framework Configuration Tool creates the new code group.
Designing a Named Permission Test Program
It’s the decisive moment. The example in this section shows how to check for the existence of a named permission on your system. In this case, the program only provides output for the custom permissions you just installed. Listing 5.10 shows the code that you’ll need. (The listing in this chapter is incomplete. You can find the complete listing for this example in the \Chapter 05\C#\NamedPermission or \Chapter 05\VB\NamedPermission folder of the source code located on the Sybex Web site.)
Listing 5.10 Obtaining a Named Permission
private void btnTest_Click(object sender, System.EventArgs e) { IEnumerator Policies; // Security policies. PolicyLevel Policy; // A single policy. NamedPermissionSet NPS; // The special permission set. Special Perm; // The special permission. StringBuilder Output; // The output value. // Initialize the output. Output = new StringBuilder(); // Get the all of the policies. Policies = SecurityManager.PolicyHierarchy(); while (Policies.MoveNext()) { // Get the current policy. Policy = (PolicyLevel)Policies.Current; // Check for the SpecialPermissionAll named permission set. NPS = Policy.GetNamedPermissionSet("SpecialPermissionAll"); // Process the named permission set when available. if (NPS != null) { // Get the named permission and check its values. Perm = (Special)NPS.GetPermission(typeof(Special)); Output.Append("SpecialPermissionAll\r\nUnrestricted: "); Output.Append(Perm.IsUnrestricted().ToString()); Output.Append("\r\nSetValue: "); Output.Append(Perm.SetValue.ToString()); } ... Other Permission Checks ... } // Output the results. MessageBox.Show(Output.ToString(), "Named Permission Sets", MessageBoxButtons.OK, MessageBoxIcon.Information); } The code begins by accessing the SecurityManager and gaining access to the policy hierarchy. The code moves from one policy to the next in search of the named permission sets you created. You use the GetNamedPermissionSet() method to access a named permission set. If the permission set is missing, the return value is null.
Once the code locates the named permission set, it uses the GetPermission() method to obtain access to the actual permissions. The code coerces the IPermission output to the Special type. The permission has all the same features as the custom permission you created. Figure 5.17 shows the output from this example. Note that all of the values reflect the custom permission code.
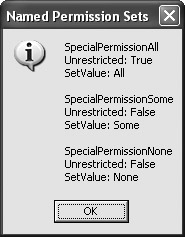
Figure 5.17: Viewing the output of the named permission program shows custom permissions really work.
| Tip | You’ll likely find that the GetPermission() method doesn’t work as advertised in Visual Basic .NET. The technique to get around this problem is to use an enumeration. While using this method isn’t as fast or memory efficient as the C# alternative, it is reliable. In addition, you’ll run into casting problems with Visual Basic when using the Special permission. The alternative in this case is to use an Object instead of the actual type. See the Visual Basic .NET version of this example for details. |
|
EAN: 2147483647
Pages: 168