Using the Code Access Security Policy Tool
|
The Code Access Security Policy (CASPol) tool is a command line utility you can use to add and remove policies from a system, as well as make other adjustments. Normally, you want to use the .NET Framework Configuration tool demonstrated in the “Using the .NET Framework Configuration Tool” section of Chapter 4 to make changes, but this tool can come in quite handy for a number of tasks. Generally, you won’t use it directly at the command prompt, but will call on the CASPol tool from a batch file or a program to perform specific types of tasks automatically.
CASPol provides an extensive number of command line switches. There are so many, in fact, that you’ll quickly find yourself getting lost in switches if you try to use them all in your first program. You can find a complete list of these switches at http://msdn.microsoft.com/library/en-us/cptools/html/cpgrfcodeaccesssecuritypolicyutilitycaspolexe.asp. This section demonstrates some of the more common switches. Here’s the command line syntax for CASPol:
CASPol [Option] [Arguments]
When you type CASPol by itself or with the ? switch, you receive a list of options. The list is relatively long, so knowing what you want to do is always best. An option tells CASPol what type of information you want to see or defines how you want CASPol to perform. For example, the –machine option tells CASPol to make all commands act at just the machine level, while the –addgroup adds a new group. Only use one of each option type in any command. Typing CASPol –machine –addgroup would add a group to the machine level. You use the arguments to provide additional information. In general, use only the arguments that you actually need to perform a task.
CASPol is a task-oriented tool. You use it in different ways depending on the task you need to perform. Microsoft provides an overview of a large number of CASPol tasks at http://msdn.microsoft.com/library/en-us/cpguide/html/cpconusingcodeaccesssecuritypolicytoolcaspolexe.asp. You can also find a list of CASPol command line options at http://msdn.microsoft.com/library/en-us/cptools/html/cpgrfcodeaccesssecuritypolicyutilitycaspolexe.asp. This chapter only reviews a limited number of common tasks, but covers those tasks in a relatively detailed manner. CASPol is a powerful tool that you can use to automate a variety of tasks.
Listing the Permissions and Code Groups
Even a default .NET Framework setup includes a number of policies and code groups, so listing them at the command prompt is often useful. For that reason, it’s usually better to list them to a file using the CASPol -list >>Filename command, where Filename is the name of the file you want to use. (You can find a sample listing in the \Chapter 05\FullListing.TXT file of the source code located on the Sybex Web site.) The default setup includes all policies and code groups for all levels. CASPol formats the file so that you can potentially parse it using an external program.
You can reduce the amount of information by specifying a particular level. For example, typing CASPol -user –list displays just the policies and code groups at the user level. Of course, now you can’t compare differences between levels, but you do gain access to all of the information at one level.
Another way to list policies and code groups is by type. For example, you can type CASPol –enterprise –listgroups to list just the enterprise groups. Typing CASPol –machine –listdescription displays a description of the various groups, as shown in Figure 5.1. You also have options for listing all of the permissions (the –listpset switch) and all of the assemblies that have full trust (the –listfulltrust switch). The combination of all these switches provides relatively full access to all of the security information for the .NET Framework. Unfortunately, you have to issue the commands one at a time—you can’t combine them to create custom listings in a single pass.
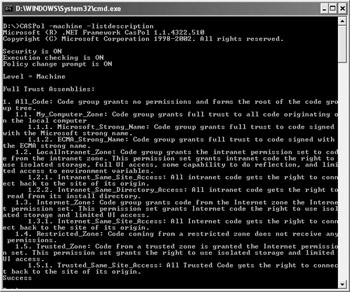
Figure 5.1: Employ various lists as needed to see a snapshot of the information on your system.
| Note | Many of these switches also come in a shortened version that you can use to reduce your typing. For example, you could type the command in this example as CASPol –m –ld. The chapter uses the longer form to make the meaning of the command line entries clearer. |
The CASPol -listgroups command is particularly handy when you want to see the hierarchical structure of the zones. Notice that there are actually subzones in some cases. For example, the My_Computer_Zone entry includes Microsoft_Strong_Name and ECMA_Strong_Name entries.
Of course, the question remains as to why you’d want to use this approach to list the various security elements when you can use the .NET Framework Configuration Tool. As you work with the various outputs, you’ll notice that they’re structured, which means you can process the output information in a variety of ways. The simple text makes it easy to manipulate the entries for storage in a permanent form in either a database or a written report.
Using this utility is also the only way to obtain information when you use a remote connection that doesn’t have the bandwidth required to use the .NET Framework Configuration Tool. A text interface is faster and uses fewer resources. These reasons keep many developers using text-based utilities, even when GUI alternatives exist.
Making Group Modifications
The .NET Framework security features work like a hierarchical database in some respects. Consequently, you can add and delete entries as needed to create new policies and setups. You can also modify existing policies. For example, you can add a new permission set to an existing group. This is one area where CASPol really shines. Imagine having to set up a new server using the .NET Framework Configuration Tool. Yes, you can eventually do it, but it’s going to take considerable time (assuming you can keep the network administrator awake). A simple batch file lets CASPol perform the required configuration for you using a single command.
The reason that I mentioned the hierarchical database approach is that you can visualize how a change will affect the system better when you use this perspective. Look again at the hierarchy in Figure 5.1. You can add a new code group at any point along that hierarchy. For example, if you wanted to add a super secret strong naming convention to the Microsoft_Strong_Name entry, you could type the following command: CASPol -addgroup 1.1.1. -zone MyComputer FullTrust -name MyStrongGroup -description “This is a special group.”, CASPol will display the security policy message shown in Figure 5.2. Type yes (lowercase and the full word) and CASPol will display the success message shown in Figure 5.2.
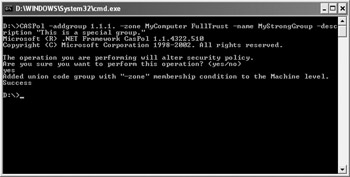
Figure 5.2: When adding a new group, CASPol asks whether you want to change the security policy.
| Tip | You can turn the policy change message shown in Figure 5.2 off using the CASPol –polchgprompt off command. This feature works well for batch processing because you don’t want the processing to stop to wait for input. However, it’s dangerous to turn policy change messages off when working at the command line because you won’t receive any warnings. It’s always better to receive the policy change message so that you can validate any changes before you make them. The best method is to turn the policy change messages off at the beginning of a batch file and turn them back on using the CASPol –polchgprompt on command at the end of the batch file. |
When you execute the –addgroup command, CASPol adds a new group to the Microsoft_Strong_Name entry, as shown in Figure 5.3. (Figure 5.3 uses the .NET Framework Configuration Tool to make the addition clear, but you could also use the listing commands in the “Listing the Permissions and Code Groups” section.) The -addgroup command has several components. First, notice that the –addgroup entry specifies the location in the hierarchy as 1.1.1. You could also use a group name. Second, this new entry belongs to the MyComputer zone and it has the FullTrust permission. Figure 5.3 shows both of these elements. Third, the new group has a name of MyStrongName and a description of “This is a special group”. The examples in the Microsoft help file make it look like you can create a name with spaces, but this feature doesn’t appear to work without error. However, you can create a description with spaces by enclosing the description in double quotes.
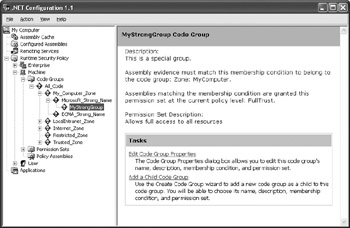
Figure 5.3: Defining a new group adds the entry to the specified location in the group hierarchy.
Removing a group is actually easier than adding one. All you need is either the hierarchical level or the code group name. Type CASPol -remgroup MyStrongGroup to remove the MyStrongGroup added earlier. CASPol will ask you whether you’re sure about making the change as it did before. After you type yes, CASPol will remove the group and display the success message shown in Figure 5.4.

Figure 5.4: Removing a group is relatively easy using CASPol, which makes the policy change notice more important.
| Warning | The –remgroup command is a one-way process. Removing a group is permanent and there’s no undo command. Make sure you actually want to remove a group before you execute this command. |
Making Permission Modifications
Working with permissions is similar to working with groups. To add a permission, you use the –addpset command. For example, you might want to add a new permission set to the machine level by typing: CASPol -machine -addpset MyPermission.XML. Figure 5.5 shows the results of this example command using the .NET Framework Configuration Tool.
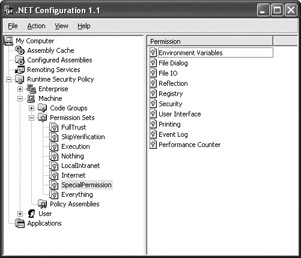
Figure 5.5: Adding a permission lets you create custom setups for a code group.
Notice that the -addpset command requires an XML file that includes the permission information. You can create a custom permission or you can use a combination of named permissions. The example uses a combination of named permissions, as shown in Listing 5.1. (This listing isn’t complete. You can find the complete XML file in the \Chapter 05\ MyPermission.XML file of the source code located on the Sybex Web site.)
Listing 5.1 Permission XML File Example
SpecialPermission (Allows access to some resources.) = <PermissionSet version="1" Name="SpecialPermission" Description="Allows access to some resources."> <IPermission version="1" Unrestricted="true"/> ... Other IPermission Entries ... <IPermission version="1" Unrestricted="true"/> </PermissionSet>
| Tip | When you want to work with named permissions, start with one of the existing permission sets such as Everything. Modify the permissions in the XML file to meet your specific needs. You can obtain a file with the existing named permissions using the CASPol –listpset >>Filename command, where Filename is the name of the file you want to use. |
Creating a permission set always entails the same features. You define the permission set itself using the <PermissionSet> tag, and then add any number of <IPermission> tags to define the permissions in the permission set.
The <PermissionSet> tag always includes a reference to the System.Security.NamedPermissionSet class as shown. The current version of the .NET Framework and all previous versions use a version number of 1 for this class, so you set the Version argument to 1. You must also provide a Name argument that includes the name of the permission set. The Description argument is optional, but you should consider including it.
| Tip | You can undo most current policy change by using the CASPol –recover command. Make sure you specify a level when you want to undo just the change at a specific level. Otherwise, CASPol will undo all of your changes and you’ll need to start again. Note that CASPol doesn’t have an undo cache, so you can only undo the last change that you made. |
Each of the <IPermission> tags includes the name of the class, the name of the file that contains the class, a version number, the culture, and the public token key for that permission class. All of these entries identify the class. You must also provide a version number for the <IPermission> tag and the level of access the permission provides. When you include Unrestricted=”true”, the permission grants all of the access the class provides. All of the permission classes provide at least one property that accepts access levels. Look at the SecurityPermission entry and you’ll notice that it uses the Flags property to control the number of permissions this entry provides. Figure 5.6 shows the effect of using these flag values. Likewise, the FileDialogPermission entry uses the Access property. In this case, the permissions are the same as providing unrestricted access, so CASPol actually sets this entry to Unrestricted=”true”.
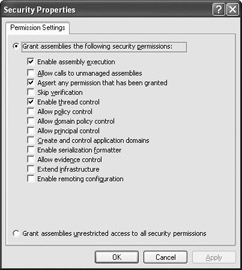
Figure 5.6: Setting access permissions using a property changes the way CASPol makes the policy change.
Defining the <IPermission> tags means creating pointers to code that contains the permission handling functionality. The Everything permission contains all of the permissions that the .NET Framework supports, so you can use it as a template for your own permission set. Giving access to everything is usually too much; however, some of the supplied permissions are too restrictive. The reason you want to create custom named permissions is to ensure that the code group has enough permission to perform a given task, but not so much permission that it becomes a security risk. For example, the code in Listing 5.1 lacks the IsolatedStorageFilePermission because there’s little reason for most code to access isolated file storage. The example also lacks the DirectoryServicesPermission and other permissions that you would want to grant only as needed.
Removing a permission set requires use of the –rempset command. For example, to remove the previous example, you’d type CASPol -rempset SpecialPermission. As with most policy changes you make, the system will ask if you really want to remove the permission.
Adding an Assembly
Adding an assembly to the security setup lets you use it for permissions, which in turn affects code groups. Microsoft assumes that you want to place this custom permission in a class. Consequently, you need to add the resulting assembly to the Global Assembly Cache (GAC), which means giving it a strong name.
Experimentation shows that you can place any assembly with a strong name in the policy assembly list even if it doesn’t appear in the GAC. This means you could create a very specific permission for an application that would reside in the application assembly. The security is self-contained within the application it supports.
As an experiment, you can use the application found in the Signed Client example for Chapter 4. (You can find the full listing for this example in the \Chapter 04\C#\SignedClient or \Chapter 04\VB\SignedClient folder of the source code located on the Sybex Web site.) Type CASPol –machine –addfulltrust SignedClient.EXE to add the assembly to the list. Figure 5.7 shows the results of this command.

Figure 5.7: Adding any assembly with a strong name to the Policy Assemblies list lets you reference that assembly.
Obviously, this assembly doesn’t really do anything to demonstrate permissions, but it does show how to use the command. The “Creating a Permission Assembly” section of the chapter shows how to create a permission class, design a permission around that class, and then use the custom permission as the basis for a code group. The resulting applications won’t work without the custom permission object in place on the machine, which means that the application is useless without the proper support.
Interestingly enough, the help file doesn’t say how to remove an assembly from the Policy Assemblies list. Type CASPol –machine –remfulltrust SignedClient.EXE to remove the assembly from the list. This command will fail if the assembly is currently in use, but will succeed otherwise. The command must be able to find the assembly for removal, just as it does when you add it.
Resolving Security Errors in Assemblies
You can use CASPol to locate security problems in an assembly. An assembly may not run if it lacks permissions to execute or to perform specific tasks. For example, let’s say you want to check the Declarative example in Chapter 4 for errors. (You can find the full listing for this example in the \Chapter 04\C#\Declarative or \Chapter 04\VB\Declarative folder of the source code located on the Sybex Web site.) Type CASPol -machine -resolvegroup Declarative.EXE to determine the groups that this assembly belongs to at the machine level. Figure 5.8 shows typical output.
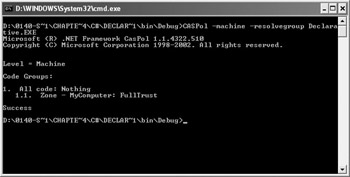
Figure 5.8: Check for security errors in an assembly by using one of the resolve commands.
The example belongs to the All_Code group, but that group doesn’t provide any access. However, the MyComputer zone that appears below the All_Code group does grant full access to system resources.
Working with permissions is similar to checking groups. For this example, you’d type CASPol -machine -resolveperm Declarative.EXE to determine the permissions of the Declarative example. In this case, the example has full access through the System.Security.PermissionSet class. The example also has permissions from both the System.Security.Permissions.UrlIdentityPermission and System.Security.Permissions.ZoneIdentityPermission classes.
Using the .NET Wizards
You have another choice in addition to using CASPol or the .NET Framework Configuration Tool for modifying security. Using the .NET Wizards is an alternative when the security changes you need to make are extremely simple and straightforward. Figure 5.9 shows these three tools.
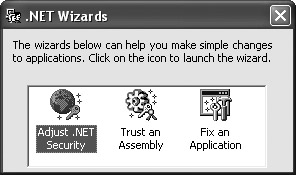
Figure 5.9: Depend on the .NET Wizards to help you make simple configuration changes.
As you can see, the three wizards help you perform simple security adjustments, trust an assembly, or fix an application setup. All you need to do to use these three wizards is double-click the appropriate icon and follow the prompts. It’s important to remember that these wizards can help in some situations, so you shouldn’t forget that they exist. However, most security needs are more complex than these wizards can handle.
| Warning | Unfortunately, it’s not a good idea to use the wizards as a starting point and then make modifications using some other tool. Using the same tool from start to finish for a given task is less error prone because you don’t have to remember where you stopped making security changes when switching from one tool to another. |
|
EAN: 2147483647
Pages: 168