Setting Up Remote Installation Services
RIS is a cool new feature of Windows 2000 Server that allows administrators to install Windows 2000 Professional on client computers without ever touching the computer. You can also use RIS with the IntelliMirror technologies (User Settings Management, User Data Management, and Software Installation and Maintenance) to install Windows 2000 Professional remotely and then automatically add a user's personalized work environment—complete with the user's computer settings, software applications, and data.
It's not hard to see the advantages RIS offers to an administrator who is short of both time and money. The sections that follow describe how RIS works, help you determine whether your network meets the requirements for RIS, and explain how to install, configure, and use RIS to set up client systems.
![]()
NOTE
If the system doesn't support Preboot Execution Environment (PXE) network booting, you may have to insert an RIS boot disk in the system, but otherwise you don't have to touch it unless you want to.
How RIS Works
RIS is a combination of technologies that provides the nifty ability to easily boot a system and install an operating system from a remote server—all without needing any data on the system beforehand.
The first technology that facilitates the ability to install an operating system remotely is the Preboot execution Environment (PXE). PXE allows a user of a computer with a PXE-compliant network interface card (NIC) to boot directly from the network by pressing F12 at bootup.
When the client boots to the network using a PXE-compliant NIC (or a network boot disk and a NIC that is supported by the disk), it requests an IP address from a Dynamic Host Configuration Protocol (DHCP) server, which also supplies the IP address of the nearest RIS server.
When a prestaged client contacts the RIS server, the RIS server queries the Active Directory for the unique GUID for the client and then transmits the name of any operating system images the client is permitted to install automatically. If the client isn't prestaged, it must log on to Active Directory and use the Client Installation Wizard to select an operating system image. (RIS uses Group Policy to determine which images the user has access to, and it displays only those images.)
RIS Requirements and System Recommendations
RIS servers need to meet the minimum system requirements for Windows 2000 Server and in addition must have a separate 2-GB hard disk or partition for the operating system images. (You can get by with less if you deploy only a couple of images.) As was mentioned in Chapter 5, however, you shouldn't be using a system that meets only the minimum system requirements, especially when it comes to RAM. Don't deploy a server with less than 128 MB of RAM, and if you're going to combine services such as Active Directory, DHCP, DNS, and RIS, get 256 MB of RAM or more; the extra cost is small and the performance gain is large. In addition, RIS must be installed on an NTFS 5 formatted partition that is separate from the system partition. RIS doesn't support Dfs links or Encrypting File System (EFS) files.

TIP
Operating system images stored on an RIS server can be synchronized with operating system images on other RIS servers via the use of Dfs. However, RIS cannot follow Dfs links, so all needed data and images must be stored locally.
RIS clients also need to meet or preferably exceed the minimum system requirements for Windows 2000 Professional, and in addition should have a 10 Mbps or preferably 100 Mbps NIC that supports PXE remote boot or is explicitly supported by the remote boot disk. (See the section "Creating a Remote Boot Disk" later in this chapter for more information.)
Installing RIS
Before you can use RIS on the network, you need to install it, of course. Once you've chosen the server you want to use as an RIS server, use the following procedure to install the service and run the initial setup wizard:
- Open Add/Remove Programs from Control Panel, and then click the Add/Remove Windows Components button in the left pane to launch the Windows Components Wizard.
- Select the Remote Installation Services check box, and then click Next to install it. If Windows prompts you to reboot, reboot the server.
- Launch Add/Remove Programs again from Control Panel, and click the Configure button next to Configure Remote Installation Services (Figure 24-15).
- Click Next in the first screen, enter the folder path you want to use as the root for the RIS operating systems, and click Next. Note that the path you enter cannot be on the system partition, and it must be an NTFS 5 formatted partition with enough free disk space for all of the installations. You cannot use a Dfs share either.
- Select the Respond To Client Computers Requesting Service check box if you want to turn on RIS immediately. Otherwise, select the Do Not Respond To Unknown Client Computers check box to prevent computers not already having a computer account in Active Directory from receiving an operating system installation. (This precaution avoids the potential security risk described in the Real World sidebar "Reasons for Ignoring Unknown Clients" in section "Enabling or Disabling RIS.") Click Next.
- In the next screen, enter the path to the Windows 2000 Professional installation files, and then click Next.
- Enter a name for the folder that will store this operating system image, and then click Next.
- Enter a user-friendly name for the operating system image in the Friendly Description box of the next screen (Figure 24-16). This is the description users will see listed as an operating system choice when they boot their system from the network.
- Enter a more detailed description of the operating system image in the Help Text box, and click Next. This will supplement the friendly description in helping a user decide which operating system image to install.
- Review the settings in the next screen, and then click Finish to set up the server. RIS configures a number of settings and copies the necessary files, and then the service starts, if you chose to enable it, allowing the server to begin serving client requests.
- If the RIS server isn't already an authorized DHCP server, open the DHCP snap-in.
- Right-click the DHCP root in the console tree, and choose Manage Authorized Servers from the shortcut menu.
- Click the Authorize button, enter the IP address for the RIS server in the dialog box, and then click OK.
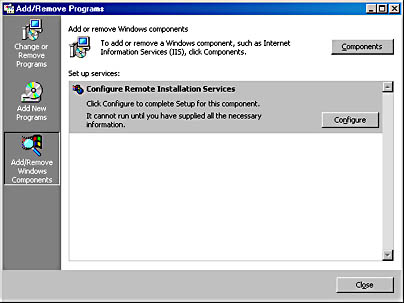
Figure 24-15. The Add/Remove Programs window.
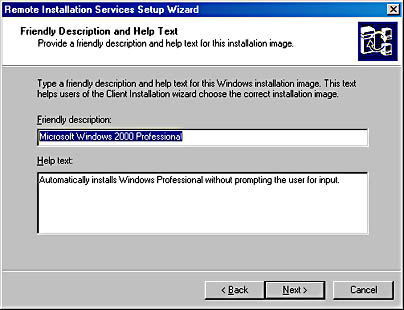
Figure 24-16. Specifying a friendly description and help text for an operating system image.
Configuring and Administering RIS
The Remote Installation Services Setup Wizard does an adequate job of setting up the server with all of the default settings, but sooner or later you're going to need to tweak these settings. The next several sections tell you how.
TIP
You can administer most functions of an RIS server from a Windows 2000 Professional system by installing the Windows 2000 Administration Tools (Adminpak.msi) from the i386 folder of the Windows 2000 Server CD-ROM. This tool also allows you to administer most other server services from a Windows 2000 Professional machine.
If all client computers that use RIS to install an operating system are to contain the same settings, all RIS servers need to be configured in exactly the same way. Windows 2000 doesn't support replication of operating system images or RIS configuration settings between RIS servers. You can, however, use the replication capabilities of SMS for image replication between RIS servers.
Enabling or Disabling RIS
To enable the RIS server to respond to client requests or to disable the RIS server from serving client requests, follow these steps:
- Open the Active Directory Users and Computers console.
- In the applicable domain and OU, right-click the server hosting RIS and choose Properties from the shortcut menu.
- Click the Remote Install tab (Figure 24-17).
- Select the Respond To Client Computers Requesting Service check box if you want to turn on RIS, or clear it if you want to disable RIS.
- Select the Do Not Respond To Unknown Client Computers check box if you want to prevent computers not already having a computer account in Active Directory from receiving an OS installation.
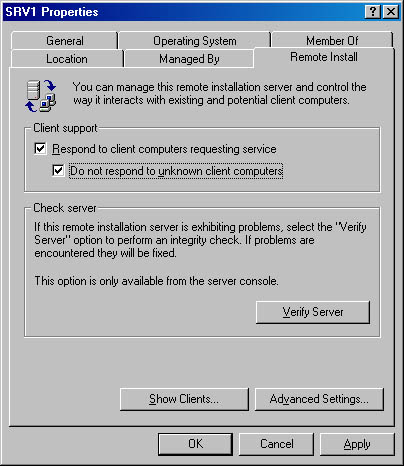
Figure 24-17. The Remote Install tab of an RIS server's Properties window.
![]()
REAL WORLD Reasons for Ignoring Unknown Clients
Selecting the Do Not Respond To Unknown Client Computers check box adds one extra step (creating a computer account for a client) to the process of deploying Windows 2000 Professional, but it does so for a couple of good reasons. The first reason for the added step is security. If this check box isn't selected, anyone who can reach the server can receive an operating system installation, provided that the user has adequate permissions.The second reason is compatibility with existing remote-boot applications. If you don't select this check box and you are using another company's remote boot/installation program on the network, clients may not be able to reach the other program. When you clear this check box, you ensure that only prestaged clients with registered computer accounts will use RIS. See the section "Prestaging a Client" later in this chapter for more details.
Verifying Server Functionality
The most reliable way to determine whether an RIS server is working is to attempt an operating system installation from it. However, this is predictably inconvenient, and it's often handy to be able to check on basic functionality directly from whatever computer you're using to manage the server. Microsoft has provided the Check Server Wizard for just this purpose. To use it, follow these steps:
- Open the Active Directory Users and Computers console.
- In the applicable domain and OU, right-click the server hosting RIS and choose Properties from the shortcut menu.
- Click the Remote Install tab.
- Click the Verify Server button to start the Check Server Wizard.
- Click Next in the first window, and the wizard checks the server. Read the summary of the test results and click Finish.
![]()
NOTE
The Check Server Wizard checks only that the RIS server is properly set up. It doesn't check the integrity of any operating system images on the server or the ability of clients to properly reach the server across the network. If you experience any problems, check the server's event log and check the functionality of the DHCP, DNS, and Active Directory services.
Viewing Clients
You may want to view a list of clients that have used the server to install Windows 2000 Professional or that are prestaged to install Windows 2000 from the server. To do so, follow these steps:
- Open the Active Directory Users and Computers console.
- In the applicable domain and OU, right-click the server hosting RIS and choose Properties from the shortcut menu.
- Click the Remote Install tab.
- Click the Show Clients button to see a list of clients that have been serviced or that are ready to be serviced by the server.
Changing How Clients Are Configured
You might want to change how RIS configures clients, especially if your company has its own computer naming convention. By default, the computer name is created by appending a number to the user name used to log on to Active Directory during the client installation. This can be changed to another scheme if desired.
The Active Directory location in which the new client computer account is created can also be changed. The default location is in the Computers container in the same domain as the RIS server, but you can change this to the same container as the user's user account (probably the Users container) or to any other location in Active Directory. Note that if an end user will be setting up the computer, the user's account needs to have sufficient permissions to create a new computer account in the specified location, unless the system is prestaged, as described in the section "Prestaging a Client" later in this chapter. To change the way in which RIS configures new clients, use the following procedure:
- Open the Active Directory Users and Computers console.
- In the applicable domain and OU, right-click the server hosting RIS and choose Properties from the shortcut menu.
- Click the Remote Install tab.
- Click the Advanced Settings button.
- Select the field you want to use to generate client computer names from the list box, as shown in Figure 24-18, or click the Customize button to create your own computer name format, as shown in Figure 24-19.
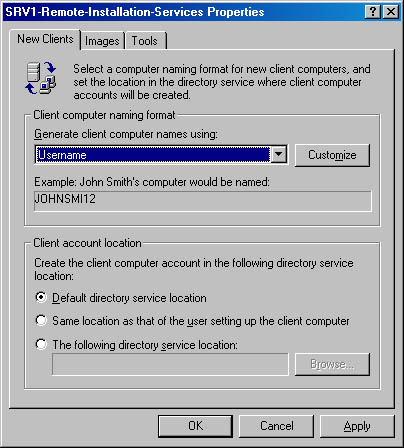
Figure 24-18. Selecting a predefined computer naming format.
TIP
You can combine several fields when defining a computer naming format. For example, the string %1First%10Last%# would yield computer names using the first letter of a user's first name and then 10 characters from the user's last name, followed by a number, such as JGEREND11.
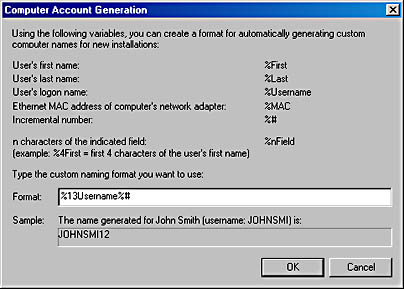
Figure 24-19. Defining a customized computer naming format.
- To create the clients' computer accounts in the default location in Active Directory (the Computers container in the RIS server's domain), select the Default Directory Service Location option on the New Clients tab.
To create the computer accounts in the same place in Active Directory as the user's user account (probably the Users container), select the Same Location As That Of The User Setting Up The Client Computer option.
To manually specify a location in Active Directory for the computer accounts, select The Following Directory Service Location, and then click Browse and locate the appropriate container (possibly an RIS Clients container). Click OK when you're done.
Managing Operating System Images
Despite the fact that RIS is able to deploy only Windows 2000 Professional (support for Windows 2000 Server may be added at some point), it is often useful to maintain several different images on the RIS server. You may want to add a completely new image derived from an existing system—applications and all—or you may want to apply an answer file to an existing image to modify how the operating system is set up. (See the section "Using Remote Installation Preparation" later in this chapter for information about creating images of computers, complete with installed applications and other settings.) To manage the images, use the following procedure:
- Open the Active Directory Users and Computers console.
- In the applicable domain and OU, right-click the server hosting RIS, choose Properties from the shortcut menu, and then click the Remote Install tab.
- Click the Advanced Settings button, and then click the Images tab (Figure 24-20).
- To view or change the friendly description and help text associated with an image, select the image and click Properties. You can also see whether the image is CD-based (flat) or RIPrep-based here.
- To remove an unattended answer file associated with an operating system image, select the image you want to remove and click Remove.
- To add an image, click Add. The Add Wizard starts. Note that the Add button doesn't work for RIPrep images and answer files.
- In the first screen of the wizard, you can specify a new answer file for an existing image by selecting Associate A New Answer File To An Existing Image. This saves the time and space required to make and store a new image. Click Next.
- To create a new image from the Windows 2000 Professional CD, select the Add A New Installation Image option, and then click Next. Use the Add Installation Image Wizard to create the image and associated answer file, and click Finish when you're done to complete the process.
- Choose whether you want to use a sample answer file provided by Windows, an answer file from another RIS server, or an answer file you created already in another location. Click Next.
- If you chose to use an answer file from another server or location, specify the server or location, and then click Next.
- Select the operating system image to which you want to apply the answer file (Figure 24-21), and then click Next.
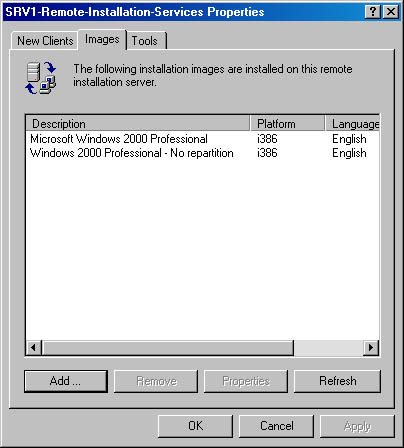
Figure 24-20. The Images tab of the RIS Properties window.
![]()
NOTE
Back up the answer files before removing them from RIS. To remove an image, not just the associated answer file, open Microsoft Windows Explorer and actually delete the physical folder containing the image.
- If you chose to use a sample answer file, select the answer file you want to use, and then click Next.
- Enter a filename for the answer file and then click Next.
- Enter a user-friendly name for the operating system image in the Friendly Description box of the next screen. This is what users will see as an operating system choice when they boot their system from the network.
- Enter a more detailed description of the operating system image in the Help Text box. Click Next, review the settings you chose, and click Finish.
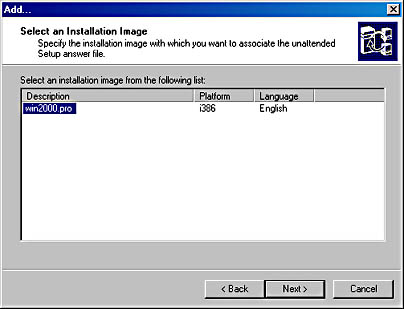
Figure 24-21. The Select An Installation Image screen of the Add Wizard.
![]()
NOTE
RIS doesn't support unattended installs on computers containing ISA or non-Plug and Play devices.
Adding RIS Tools
RIS allows independent software vendors (ISVs) and original equipment manufacturers (OEMs) to add tools that are available to users and administrators for use prior to the installation of the operating system. Since client systems may have blank hard disks before Windows 2000 is installed via RIS, the maintenance and troubleshooting tools provided by some ISVs and OEMs can be extremely useful. These tools can also provide administrators with a handy way to update such things as the client's system BIOS.
RIS doesn't ship with any tools installed, and there is no built-in mechanism for adding tools; instead, you must use the external setup program supplied with the tools to install them. You can then use the Tools tab of the Remote Installation Services dialog box (the previous section described how to display this dialog box) to view the properties for the tools or remove the tools' associated template files (files with the extension .SIF), making the tools unavailable to clients.
Using Remote Installation Preparation
The other way to create an operating system image for deployment with RIS is to use the Remote Installation Preparation (RIPrep) Wizard. RIPrep allows you to create a Windows 2000 Professional installation (complete with applications and settings), image it, and then deploy it using RIS.
Although this technique is very similar to using the System Preparation (SysPrep) tool included with the Windows 2000 Resource Kit in combination with a third-party disk-imaging program, using RIPrep has a couple of advantages. First, the hardware on the client systems can be completely different from that on the reference system, since RIS uses Windows 2000's Plug and Play functionality to perform a complete device scan. SysPrep performs only a partial device scan and still requires systems to have identical mass storage controllers. (See Chapter 5 for more information.)
Second, there is no need to copy the system image to the client's hard disk, since all information is pulled from the RIS server after performing a network boot. In addition, the installation process can be automated to such a degree as to obviate the need for trained supervision of the installation—even most untrained users will have no trouble starting a RIS installation.

CAUTION
The operating system and all applications and files must be installed in a single boot partition on the C: drive of the reference computer in order for RIPrep to function properly.
To create an operating system image using RIPrep, follow these steps:
- Install Windows 2000 Professional via RIS on the reference system, using the standard Windows 2000 Professional image.
- Install any applications that don't use Windows Installer. (Windows Installer applications are better deployed using the Software Installation and Maintenance feature of IntelliMirror.)
- Configure the system the way you want to deploy it—for example, by changing the color scheme or uninstalling games.
- Close all applications and stop all services running on the system.
- Run Riprep.exe from the RIS server's RemoteInstall\Admin\i386 folder. Click Next in the first screen of the Remote Installation Preparation Wizard.
- Enter the name of the RIS server on which you want to store the image, and then click Next.
- Enter a name for the folder that will store this operating system image, and then click Next.
- Enter a user-friendly name for the operating system image in the Friendly Description box of the next screen (Figure 24-22). This is the name users will see listed as an operating system choice when they boot their system from the network.
- Enter a more detailed description of the operating system image in the Help Text box. This will provide information to help users decide which operating system image to install. Click Next.
- In the last screen, review the settings you chose and then click Next.
- Review the information presented after the image is created, and click Next to copy the image to the RIS server. When this process is complete, the system will shut down. Upon reboot, a mini-setup program will run, preparing the system to create another RIPrep image, if desired.
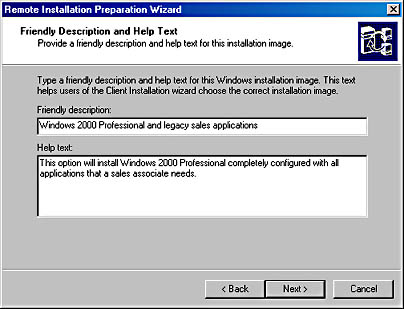
Figure 24-22. Specifying a friendly description and help text for an installation image.
![]()
REAL WORLD Remote Installation Cautions
Make sure that the BIOS on both the reference system and the RIS clients has up-to-date Advanced Configuration Power Interface (ACPI) support with a date of January 1, 1999, or later. RIPrep doesn't support mixing ACPI and non-ACPI systems, and we don't recommend it. Certain desktop shortcuts may not work properly on RIS clients made from RIPrep images. For example, Microsoft Outlook 2000's desktop shortcut will not work after a RIPrep RIS installation. To fix this, disable 8.3 name creation on the reference computer before running RIPrep. For information on how to do this, consult the Microsoft Knowledge Base. You cannot include encrypted files in a RIPrep image.
EAN: 2147483647
Pages: 366