Repackaging Applications
If you want to deploy an application that doesn't have a native Windows Installer package, you'll probably want to either repackage the application or create your own installation program. Several third-party tools exist that permit you to author your own setup program. This section describes how to repackage applications using Seagate Software's WinInstall LE software package, which is included with Windows 2000 Server. Repackaging applications provides the benefits of the Windows Installer, discussed in the section "Choosing an Installation Package Format" earlier in this chapter.
![]()
REAL WORLD Best Practices for Installation
You can take a number of precautions to minimize problems with the installation package you are creating. If you follow these recommendations, the applications should deploy properly on a wide range of hardware:
- Always create installation packages on a clean computer—that is, on a computer with no software on it except the operating system and operating system service packs. (The computer on which you create an installation package is known as the reference computer.)
- Don't install the Seagate Software Console on the reference computer. By definition, this makes the system "unclean."
- Don't map any drives on the reference computer.
- Roll the computer back to a clean state after every installation by uninstalling the program and using a program such as Reg.exe to restore a clean registry.
- Consider setting up multiple reference computers so that you can be creating an installation package on one while rolling the other back. These computers don't need to be fast or have much hard disk space, so just about any system can be pressed into service for this role.
- If you have to use an unclean computer as a reference computer, make sure that none of the files installed by the programs you're repackaging are already present on the computer—especially .DLL files.
- Close any antivirus programs, uninstall programs such as CleanSweep, or any other programs that may write data during the repackaging.
- Close all e-mail, word processing, and other programs, and disable any screen saver or other memory-resident programs.
- Don't delete files or drag files to the Recycle Bin during the repackaging process.
Creating the "Before" Snapshot and Installing the Application
The first step in repackaging an application is to take a snapshot of the system state before you install the program. To do this, follow these steps:
- On the clean reference computer, connect to the server hosting WinInstall LE and launch the Discover (Discoz.exe) program in the \Seagate Software\Wininstall folder, which is placed by default in the %SystemRoot%\Program Files folder.
- Click Next in the first screen of the WinInstall Discover Wizard.
- In the first box of the next screen, enter a useful, descriptive name for the application you are installing, as shown in Figure 24-12. Note that this is the name that will be published in Active Directory for users to see.
- In the second box, enter the path and filename where you want to store the package.
- Click the button next to the third box if you want to change the language that Windows Installer uses for messages to the user, and then click Next.
- In the next screen, select the drive you want WinInstall to use for temporary files, and then click Next. Note that this drive should have at least 250 MB of free space available and should be a local drive for optimal Discover process speed.
- For each drive that you expect the program to make changes on, select the drive and click the Add button to add it to the list of drives that Discover will monitor for changes. Click Next when you're done. Since it takes added time to scan each drive, don't add drives that you know will not be modified.
- In the next window, shown in Figure 24-13, specify any folders that you want to exclude from scanning by selecting them and clicking Add. To exclude specific files or a range of files from the scanning process, click the Files & Wildcard Entries button.
- Select the Enhanced Registry Scan check box to be sure that the scanning process picks up all changed registry keys.
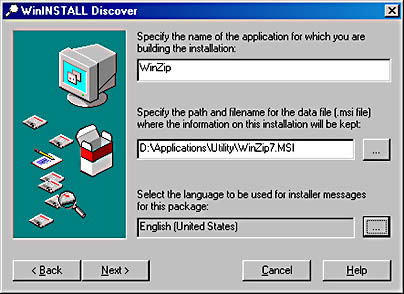
Figure 24-12. Specifying the application name and path.
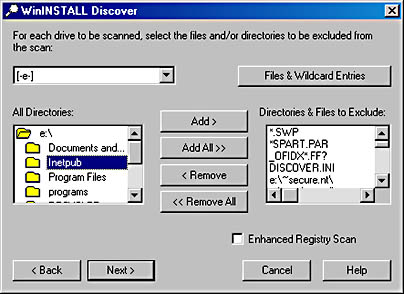
Figure 24-13. Specifying folders and files to exclude from the scan.
![]()
NOTE
For the most reliable packaging results, we recommend not altering the exclusions much or at all. Additionally, we recommend that you always select the Enhanced Registry Scan check box.
- Click Next when you're finished to start the actual Discover process. WinInstall scans the system in preparation for the program installation.
- When the Discover process is finished, you see a dialog box asking if you want to run the setup program now. Click OK, locate the setup program, and click Open.
- Install the program exactly as you want your users to install it. When you're finished, restart the computer.
- Make any modifications you want to the program, and then continue with the next section to finish repackaging the application.
Creating the "After" Snapshot
After you've created the initial system snapshot and installed the program, you're ready to create the "after" snapshot, which will complete the repackaging process. To do so, follow these steps:
- Connect to the server hosting WinInstall LE, and launch the Discover (Discoz.exe) program again. You see the screen shown in Figure 24-14.
- To create the "after" snapshot, select the Perform The 'After' Snapshot Now option and click Next. Discover then compares the system to the "before" snapshot and creates the Windows Installer package.
- In the dialog box that shows the results of the repackaging process, click OK, and then click OK in the next dialog box to finish repackaging the application.
To abort the repackaging process, select the Abandon the 'Before' Snapshot And Start Over option. This step will allow you to start over and create a new "before" snapshot.
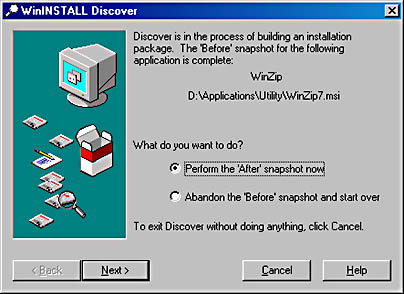
Figure 24-14. Creating the "after" snapshot.
EAN: 2147483647
Pages: 366