Formatting the Calendar View
| < Day Day Up > |
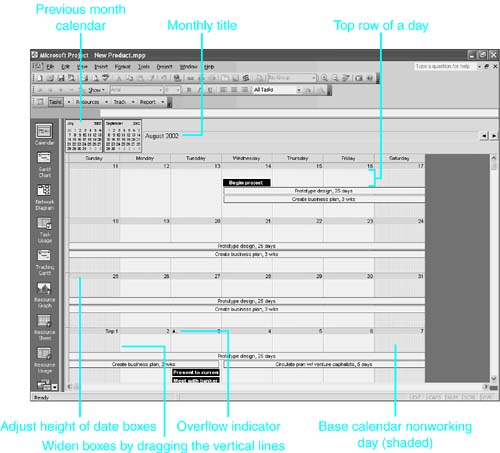
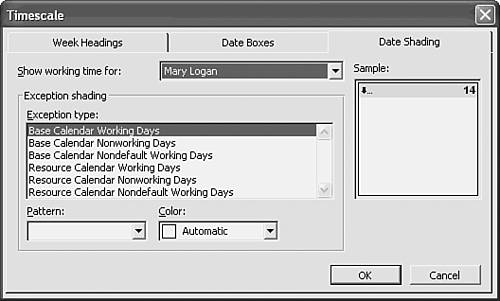
You can change the height and width of the squares where the dates are displayed in a number of ways by using your mouse. If you use your mouse to point to any vertical line in the calendar, the mouse pointer changes to a double-headed arrow. Drag left or right to narrow or widen the column. Likewise, if you point to a horizontal line, the mouse pointer again changes to a double-headed arrow, indicating that you can drag up or down to make the date box taller or shorter (see Figure 20.18). This is particularly useful when you have more tasks on a given day than can be displayed at once. Figure 20.18. Date boxes on the Calendar view can be expanded to show more tasks per day. The options that are available on the Format menu for the Calendar view include Timescale, Gridlines, Text Styles, Bar Styles, Layout, and Layout Now. The Text Styles and Gridlines options are the same as those discussed in previous sections of this chapter. The options Timescale, Bar Styles, and Layout are unique to the Calendar view and are discussed in detail in the following sections. Formatting the Timescale for the CalendarYou can display the Timescale dialog box by choosing Format, Timescale, or you can use the shortcut menu by right-clicking any spot other than a specific bar in the calendar portion of the view (not the headings). The Timescale dialog box, shown in Figure 20.19, has three tabs that offer choices for headings and titles, for additional data elements that can appear in the date boxes, and for applying shading on certain days. Figure 20.19. Options in the Timescale dialog box for the Calendar view are very different from those for the Gantt Chart views. The Week Headings tab provides choices of labels for the month, for the days of the week, and for each week. In addition, you can choose to display a five- or seven-day week, and you can include small calendars for the previous and next months. The Date Boxes tab enables you to place additional data elements in the top or bottom row of each individual date box. You can also apply patterns and colors for emphasis. The default setting omits a display for the bottom row and includes in the top row an overflow indicator and the date. The overflow indicator appears when all tasks that are scheduled to occur on a given day can't be displayed within the date box. When you print the calendar, overflow tasks appear on a separate page. On the Date Shading tab (refer to Figure 20.19) you can shade a variety of categories of working or nonworking dates. In the Show Working Time For drop-down list, you can select a base or resource calendar as the starting point. Then choose an exception type, such as nonworking days or a resource's calendar, and apply a pattern and a color to make a visual distinction. A sample is displayed on the right as you make your choices. To create Figure 20.20, the resource calendar for Mary Logan is used as the starting point. Mary's nonworking days have been formatted in horizontal stripes by defining the resource calendar nonworking time. The Using Resource filter has been applied so that only Mary's tasks are displayed. Figure 20.20. You can indicate working and nonworking days on the Calendar view with options in the Date Shading tab of the Timescale dialog box. Selecting Calendar Bar Styles OptionsAs with the Gantt Chart view, with the Calendar view you have control over how the bars in the calendar appear, including text that can be displayed as part of the bars. You can access the Bar Styles dialog box by choosing Format, Bar Styles, or you can use the shortcut menu by right-clicking any spot other than a specific bar in the calendar portion of the view (not the headings). Then select the Bar Styles option. The Bar Styles dialog box appears (see Figure 20.21). Figure 20.21. The Bar Styles dialog box offers choices for changing the display of taskbars in the Calendar view. First, select the type of bar you want to modify in the Task Type list box. Then use the drop-down lists in the Bar Shape area to modify the bar type, pattern, color, and split pattern for the bar. You can choose a bar or a simple line to represent a task's duration. If you choose a bar for the bar type, you can also apply a shadow for emphasis. You have a variety of choices for pattern and color. There are also choices of different displays for tasks that have been split. The Bar Rounding check box deals with tasks whose durations are not a whole day (for example, durations of a half day or a day and a half). If the check box is left selected, the bar on the calendar is rounded to a full day. In the Text area, you can choose the fields to be displayed in the bar either by typing in their names (separated by commas) or by choosing them from the Field(s) drop-down list. If you want to have more than one field listed on the bar and you are choosing from the drop-down list, make sure to deselect the field name and type a comma before selecting another field from the list. Otherwise, if you choose another field while the first field is still selected, the first field is replaced rather than added to. Field values can be centered, left-aligned, or right-aligned in the bars. When the text in a bar is long, it might be useful to check the Wrap Text in Bars check box. For all categories of tasks except All, a sample is displayed at the bottom of the dialog box, to show the effect of your choices. CAUTION Depending on your choices in the Bar Styles dialog box, you might see a warning message from Project's Planning Wizard, indicating that some of the calendar bars have different heights. The messages include instructions for how to reposition those bars. Setting the Layout Options for the Calendar ViewThe display order of tasks in date boxes is determined by settings in the Layout dialog box (see Figure 20.22). You can access the Layout dialog box either by choosing Format, Layout or by using the calendar shortcut menu. The default is Use Current Sort Order. The alternative to this is Attempt to Fit as Many Tasks as Possible (that is, without regard for sorting). The check box Show Bar Splits determines whether a task that has been split displays any differently than a regular task. By default, a split task shows a dotted outline during the portion of the task when work is not underway. The check box Automatic Layout specifies that the settings in the Layout dialog box are initiated automatically as tasks are edited, added, or deleted. When Automatic Layout is not selected, you must choose Layout Now from either the Format menu or from the calendar shortcut menu to apply the changes. Figure 20.22. The Layout dialog box enables you to determine how and when tasks are sorted within each date box. |


| < Day Day Up > |
EAN: 2147483647
Pages: 283