Creating Custom Forms
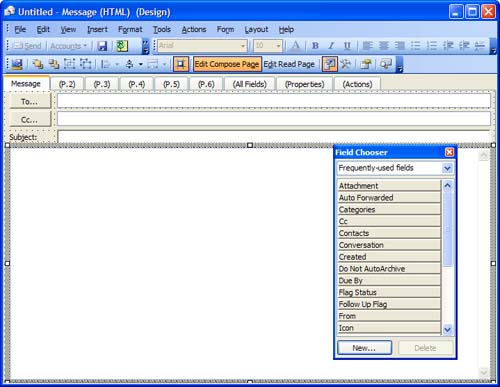
| Although the standard Outlook forms are often good enough, there are times when you'll wish the form had different fields. You might want to remove some of the default fields, add some of your own, or just rearrange what's there. You might want to create a boilerplate message to use in response to inquiries, or pre-address a message form to a group of people with whom you often correspond . You can do all of this and more using custom forms. You can create templates and forms containing boilerplate text by editing the fields in the form. But when you want to add or remove fields or use scripting with the form, you need to use Design mode to open Outlook forms so that they can be edited. You don't need a special program to use Design mode; it's part of every form included with Outlook and is enabled when you tell Outlook you want to design a form. You can open a form in Design mode two ways: by using T ools, F orms, D e sign a Form and selecting a form from the dialog; or when a form is already open, by using its T ools, F orms, Design this Form menu option. In any case, when it's a message form, it will look similar to Figure 20.1. Figure 20.1. A message form in Design mode. Hidden pages have parentheses around their names . Drag fields from the Field Chooser to add them to a form or create your own fields.
When forms are in Design mode, the Form Design toolbar is visible (see Figure 20.2). This toolbar has many of the design tools you'll use the most. The Fo r m and L ayout menus also contain design tools. Figure 20.2. The Forms toolbar has many of the commands you'll need when you customize your forms.
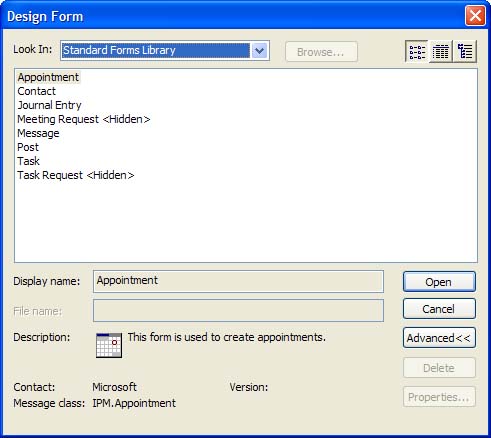
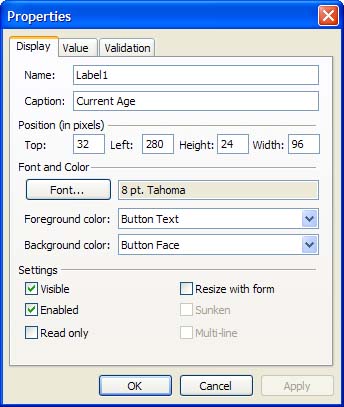
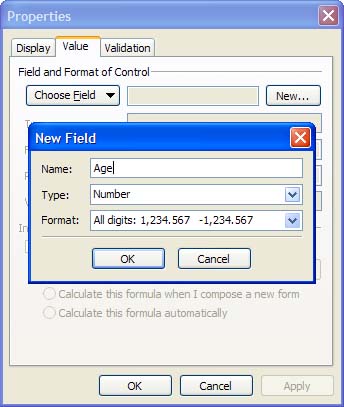
Along with the Form Design toolbar, you'll also use the Field Chooser and Control Toolbox to create your custom forms. Right-click on any control to access the Properties and Advanced Properties dialogs. The Properties dialog contains display, value, and validation information for the control, whereas Advanced Properties has more advanced display properties. To design forms, drag controls from the Control Toolbox or fields from the Field Chooser and configure the properties. Select the control and drag it to the form, dropping the control when the mouse cursor is over the area where you want the control placed. When you drag fields to the form, the fields are automatically arranged on the left edge of the form. A feature many people request is to list a person's age on the contact form, so I'll show you how to create a custom form with the contact's age on it. Task: Design a FormDesigning a custom form is actually pretty easy, at least for simple forms. You can customize any Outlook form, except for message forms, when you use Word as the editor.
Now it's time to test your form. Choose Form, Run This Form to open a new form using your new form. Enter 1 test in the File As Field, select the Details tab, and type your birth date in the Birthday field. Save the form using File, Save (Ctrl+S) and check the Age field.
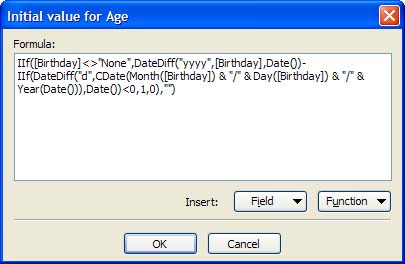
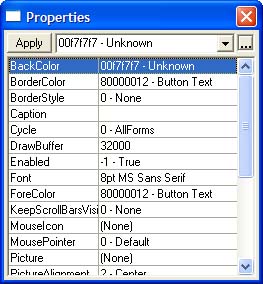
Does it show your age as of your last birthday? If the age is correct, congratulations: You created your first custom form. If the age is not correct, check the formula for typographical errors. If you want to copy the formula and paste it into the field, the formula and sample forms are at http://www.outlook-tips.net/samples.htm. Before publishing or saving the form, you'll want to change the tab name from P.2 to something more informative. Choose Fo r m, R ename Page and enter a new name for your page. The new page uses an ugly gray color . You can change this by right-clicking on the Current Age label and choosing Advanced Properties. Select the BackColor field, type 00f7f7f7 in the text box at the top of the form, and then click Apply, as shown in Figure 20.6. This changes the label field to the silver color used on the other pages. You can double-click on the BackColor property to open the color picker, if you want to use a different color. Click again anywhere on the page to switch to the Properties dialog for the page (see Figure 20.8). Change the BackColor property to 00f7f7f7, apply it, and close the Properties dialog. Figure 20.8. Use the Advanced Properties dialog to change the display properties for the control. The final step before saving the form is entering a version number. This helps to prevent corruption in the forms cache when you increment the version number after editing the form and republishing it using the same name.
Select the (Properties) tab and enter a number in the Version field. In most cases, you'll use 1, but any number will do. Enter a number in the Form Number field. Although it's not necessary, you can also select custom icons to use for the large and small icons. Choose a 32x32 icon for each size, with the large icon filling the 32x32 square and the small icon using a 16x16 image in the upper-left corner.
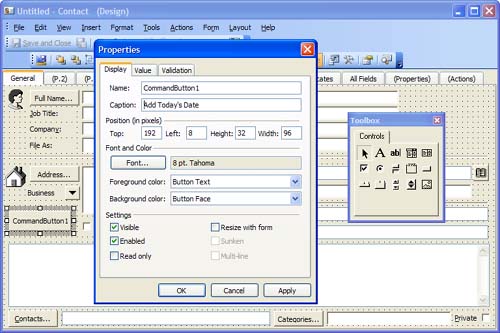
The other options you can configure on the dialog include password protecting the form so that others can't customize it and sending the form definition with the item. Check Send Form Definition when you are creating a form you're going to share with other people, or when you use Exchange Server and didn't publish the form to the Organizational Forms library. When it's enabled, the complete form is sent, resulting in a larger item but enabling the recipient to see and use your customizations. If you don't send the form definition, Outlook uses the default form to display the item. Although you can create many nice custom forms using only controls and fields, at some point you might need code to do what you want the form to do. You'll need to know how to write VBScript, or at least know where to find code samples on the Internet. Task: Add a VB Script to a FormI'm going to customize another contact form, this time with a command button that enables you to add the time and date to the Notes field.
Because the form contains code, it must be published. Outlook's security prevents the code from running. |


EAN: 2147483647
Pages: 228