Flylib.com

Books Software


Publishing Custom Forms


Publishing Custom Forms

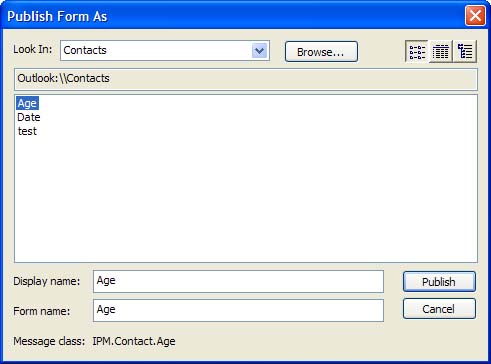
After the form is completed, you obviously need to save it somewhere. In most cases, the preferred method is publishing it to an Outlook folder or library. It's also good practice to save the form as a template to your file system so that you have a backup copy. Use F ile, Save A s, and select Outlook Template (*.oft) as the file type.

Use the T ools, F orms, Publish F orm menu selection to bring up the Publish Form As dialog (see Figure 20.10). Select the folder the form will be published in from the Look In list. Use the Browse button to select folders that aren't listed.

Figure 20.10. Use the Publish Form dialog to publish forms to your Outlook folders. Type a display name and Outlook enters it into the Form Name field for you.

graphics/20fig10.jpg

graphics/lightbulb_icon.gif

Publish forms to the folder you're planning to use them in, such as the Age form to the Contacts folder, and you can select the form from the bottom of the Actions menu after opening the folder.


When you're using Exchange Server, you can publish to the Organizational Forms library if your administrator allows it. When forms are in the Organizational Forms library, anyone in the organization can use them. Do this when you want to share the form with your co-workers .


Using Templates

A template is a custom form you save in your Windows file system, instead of publishing it to an Outlook folder. A template can be used for everything that a form is used for. Create a custom form, and then choose File, Save As, Outlook Template instead of publishing it to a folder.

You can also create a template without entering Design mode by choosing F ile, Save A s, Outlook Template (*.oft) from any form. Use this method when you're creating a template with fields filled in or a message that contains boilerplate text.

graphics/lightbulb_icon.gif

A good use of a custom template is explained at http://www.slipstick.com/dev/olforms/skedrpt.htm. Follow the instructions to send a message to the same group of people on a schedule.


Many users find templates easier to work with than forms for several reasons. You can copy templates to a folder in Outlook and double-click to use them. When you no longer need a template, it's easy to delete it. You can create toolbar buttons hyperlinked to templates or add templates to the Navigation bar's Shortcut bar.

When you use scripting in your form, you'll have to publish the form to avoid Outlook's security features or use ClickYes (http://www.express-soft.com/mailmate/clickyes.html) to avoid the security prompts.

graphics/bookpencil_icon.gif

You must use Outlook as your email editor to design email forms or templates.


Managing Published Forms

After you've published a form, you might want to always use it when you create an item in your folders, convert all existing items to use the new form, or delete old forms that you no longer use.

As I mentioned previously, when the form is published to a folder, it's listed in the Actions folder when you open the folder. This works well for a form that you don't want to use for every item, but it won't work when you automatically create items without opening the folder, such as dropping messages in a folder to create contact, task, or calendar entries.

When you want the new form set as your default, select a folder, right-click on it, and choose Properties (see Figure 20.11). Select the new form from the When P osting to This Folder, Use drop-down list. To test it, drag a message to the folder. It should use your new form.

Figure 20.11. Use the Properties dialog to manage your custom forms. Set the default form for the folder from the General tab and manage your forms from the Forms tab.

graphics/20fig11.jpg

If your form wasn't published in this folder, you'll have to copy it to the folder.

  1. Switch to the Forms tab and select M anage (see Figure 20.12).

    Figure 20.12. Use the Forms Manager to copy forms between folders and delete forms you no longer want.

    graphics/20fig12.jpg

  2. Choose S e t and browse to the folder you need to copy a form to or from.

  3. Select the form you want to copy and choose C opy.

  4. Delete forms you no longer use by selecting the form and choosing De l ete.

Use the P roperties button to look at and edit the properties of the selected form. If you didn't enter categories, contact, or description information before you published the form, you can add the information using the Form Manager. The description displays on the Forms Manager dialog and in the description field on the Forms tab. Choose Clear C a che to delete the forms cache file and create a fresh one.

Changing existing items to use the new form requires VBA code or a utility to change the old MessageClass to the new MessageClass. I use Change Forms, a utility included in the Office 2000 Resource Kit. It was written for Outlook 2000 and works well with Outlook 2003, although you'll have to unzip ChangeForms.exe and run Changeforms.msi to install it.

After installed, select an item you want to change to use the new MessageClass, and run Change Forms from the Tools, Forms, Change Forms menu. Type the name of the new MessageClass in the field and run the utility. Only the items using the old MessageClass are changed to the new MessageClass.

Another utility is Omsgclas, which is available from Microsoft's Knowledge Base Article 201089. It changes all items in the folder to the new message class. As a result, when you run Omsgclas on a Contacts folder, it destroys all distribution lists in the folder. You can use Omsgclas to identify the different message classes you have in a folder, and then use Change Forms to change specific message classes.

graphics/lightbulb_icon.gif

For more information and utilities you can use to change the MessageClass, see http://www.slipstick.com/dev/newdefaultform.htm.