Working with Folders
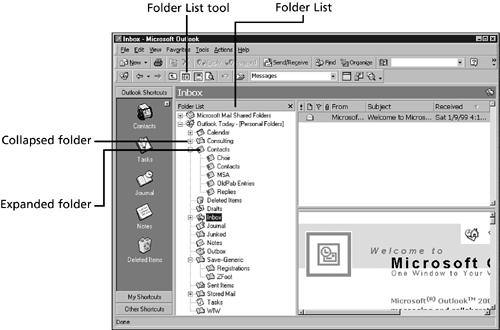
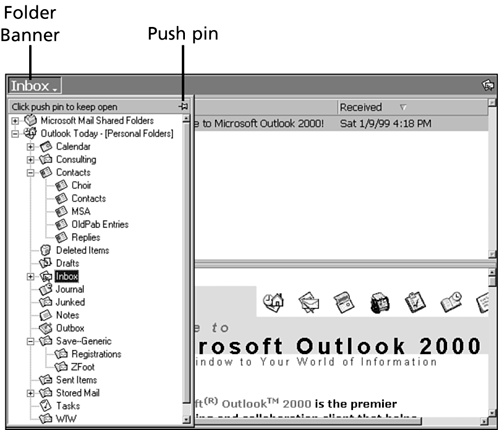
| As you use Outlook to create more and more tasks , notes, appointments, email messages, and other items, and as mail starts to arrive from others, you might find it useful to create other folders to better organize your information. For example, you might want to organize data by project or by the type of contact. Sent Items is a useful concept. However, mail you sent to Aunt Jane probably doesn't belong in the same folder as mail you sent to the IRS. You can create folders, change their names , arrange them in a different order on the Outlook Bar, copy them, and even delete them. By learning to manipulate the Outlook folders on your hard drive, you will find it easier to organize your information. Figure 15.1 shows a sample view of a folder structure. Figure 15.1. The Folder List view is displayed. There are several ways to display the folder structure:
In Figure 15.1, there are several folders within the main folder. These are called subfolders . The term subfolder is relational. When looking upward in the folder hierarchy, you might think of the Contacts folder, for example, as a subfolder. When looking downward, however, if Contacts is subdivided into other folders, you tend to think of Contacts as a folder.
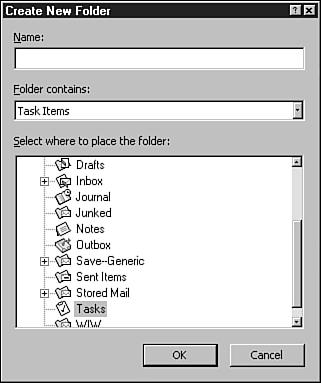
A profile is a group of settings that defines a specific combination of Outlook services (email, fax, address books, personal folder files, and so on). Typically, you need only one profile. However, workgroups, families, and individuals often can use profiles to help further organize their use of Outlook. Profiles are available only in Corporate or Workgroup mode and are created by using the Mail icon in the Windows Control Panel. Folder List SymbolsWhen the Folder List is displayed, as in Figure 15.1, notice that some of the folders have minus signs, some have plus signs, and others have no symbol at all. The presence of a plus or minus sign indicates that the folder contains subfolders. If the plus sign is displayed, the subfolders are collapsed (not displayed). If the minus sign is displayed, the subfolders are expanded (displayed). If there is no symbol next to the folder name, the folder contains no subfolders. If you've used Windows Explorer, you're already familiar with the hierarchical use of and + to indicate expanded and collapsed . You can use the /+ icons to control the level of folders displayed at any time. Clicking a minus icon collapses the folder; that causes all subfolders to be hidden. The symbol changes to a plus to indicate there are subfolders that are not displayed. Clicking a plus icon expands the folder, displaying the next level of subfolders under that folder. Creating a SubfolderThe purpose of the Folder List is to allow you to organize how your information is stored so that you can access it quickly and efficiently . You can direct Outlook to store various types of information in specific folders. There are several ways to create a subfolder. Choose a method that fits the way you work, at the time you need it. If the Folder List is displayed, select the folder (for example, Inbox) in which you want to create a subfolder:
In the next few steps, you'll get a chance to practice changing the view, expanding and collapsing folders, and creating a subfolder to store additional information. The skills you learn in the next few minutes will be ones that you will continue to use as your Outlook skills increase.
Copying or Moving a FolderWhen you copy a folder from one place in the main folder to another, any items in the folder are also copied . When you move a folder, the items are also moved to the new position. When you copy a folder, you end up with two folders (which take up twice as much space as one). Moving a folder from one place to another means that the folder is no longer in the original location. To move a folder, simply drag it from its current position into the new folder. For example, if you want it to be a subfolder of the Inbox folder, drag it onto the Inbox icon. To copy a folder from one position to another, press Ctrl and drag the folder to the new position. Alternatively, drag using the right mouse button and you'll be prompted to Move, Copy, or Cancel. You can also copy or move a folder by highlighting it and choosing Edit, Move to Folder (Ctrl+Shift+V) or Edit, Copy to Folder. If you use the Edit, Move to Folder or Edit, Copy to Folder method (from Outlook's main menu), the Move (or Copy) Folder dialog box is displayed. Click the destination folder. The Move Folder dialog box is then displayed. If you want to create an additional folder as the destination folder, click the New button. Renaming a FolderThe simplest way to rename an existing folder is to select the folder icon (the name appears blue) in the Folder List and press the F2 key. The folder name text box is highlighted (selected). While the folder name is highlighted, any text you type replaces the existing name. Or, you can press the left or right arrow key to clear the selection, and then use normal editing keys to modify the existing name.
Adding a Folder to the Outlook BarIn some cases, you might want to add a shortcut to the Outlook Bar. The easiest way to do that is to drag the folder icon onto the Outlook Bar. You can then drag it up or down to position it between existing icons or move it to the top or bottom of the Outlook Bar. Adding File System ShortcutsThe Outlook Bar can also be a container for shortcuts to file system items such as files, folders, and URLs. Follow these steps to see how to add an item to the Outlook Bar:
Deleting a FolderTo delete a folder from the Folder List, select the folder icon and press the Delete key, click the Delete button on the toolbar, or right-click and choose Delete "File Name". Outlook prompts for you to confirm the deletion and, in the process, reminds you that deleting sends the folder to the Deleted Items folder. Remember, if the folder icon isn't selected, you won't be able to delete the folder (or do anything else with it). |
EAN: 2147483647
Pages: 474


