Merging Versions and Handling Reviewers Changes
Microsoft Office Specialist After you send a presentation for review, reviewers make changes and add comments, and then send the presentation back to you. You can then merge their versions of the presentation into the original so that you can see all the changes in one place.
When you merge presentations, PowerPoint shows the differences between the original and the reviewed versions with change markers . When more than one person has reviewed the same presentation, PowerPoint uses a different color marker for each reviewer so that you can quickly identify who made what change. These markers show the details of the changes without obscuring the presentation or affecting its layout. You can accept or reject one marker at a time, all markers on a slide, or all markers in a presentation. When you accept a change, PowerPoint incorporates it into the appropriate slide. When you reject a change, PowerPoint restores the original slide.
When you open a presentation that contains comments or changes, PowerPoint displays the Reviewing toolbar so that you can easily work with the markers. The following table lists the Reviewing toolbar buttons and a brief description of each one.
| Button name | Icon | Description |
|---|---|---|
| Markup | bip137 | Turns the tracking of changes on and off. |
| Reviewers | bip138 | Displays changes made by specific reviewers or by all reviewers. |
| Previous Item | bip139 | Moves to the previous comment or tracked change. |
| Next Item | bip140 | Moves to the next comment or tracked change. |
| Apply | bip141 | Accepts a single change, all changes to a slide, or all changes to the presentation. |
| Unapply | bip142 | Rejects a single change in a presentation, all changes to a slide, or all changes to the presentation. |
| Insert Comment | bip143 | Inserts a comment on the displayed slide. |
| Edit Comment | bip144 | Edits the selected comment. |
| Delete Comment/Marker | bip145 | Deletes a single comment or change, or all comments or changes in the presentation. (The name is either Delete Comment or Delete Marker depending on what type of revision is selected.) |
| Revisions Pane | bip146 | Shows or hides the Revisions task pane. |
You can also use the Revisions task pane to see the details of the changes. On the list tab, you can see a list of the changes made to the current slide by all reviewers or by a selected reviewer, or on the Gallery tab, you can see a graphical representation of the changes.
In this exercise, you will open one presentation and merge two other versions of the presentation into it. You will then review comments and changes, accept and reject changes, and save the revised presentation.
USE the CompareMerge , CompareMerge_KA , and CompareMerge_KB presentations in the practice file folder for this topic. These practice files are located in the My Documents\Microsoft Press\PowerPoint 2003 SBS \ReviewingShare\MergingVersion folder and can also be accessed by clicking Start/All Programs/Microsoft Press/PowerPoint 2003 Step by Step .
OPEN the CompareMerge presentation.
-
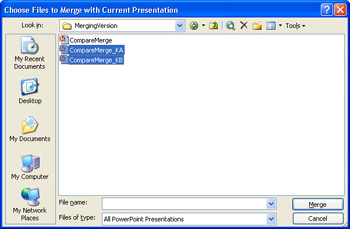
On the Tools menu, click Compare and Merge Presentations .
The Choose Files to Merge with Current Presentation dialog box appears.
-
Navigate to the My Documents\Microsoft Press\PowerPoint 2003 SBS\ReviewingShare \MergingVersion folder, click the CompareMerge_KA file, hold down the [SHIFT] key, and click the CompareMerge_KB file.
-
Click Merge .
A message warns that the presentations you have selected were not sent to reviewers via the Send To command on the File menu and that changes you have made to the presentation might consequently show up as reviewer changes.
Troubleshooting This message appears only because you are working with the practice files provided for this exercise. When working with real files that you sent to and received from reviewers, you will not see this message.
-
Click Continue .
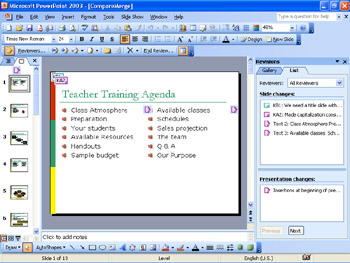
The Revisions task pane opens, showing the comments and changes made to the first slide in the presentation. The comments and changes from each reviewer appear in a different color with their initials .
-
On the Reviewing toolbar, click the Reviewers button, clear the Kim Akers check box in the drop-down list, and then click anywhere on the screen.
The comments and revisions made by Kim Akers are hidden, leaving only those made by Karen Berg, the owner of The Garden Company.
-
On the Reviewing toolbar, click the Reviewers button, select the All Reviewers check box, and then click anywhere on the screen.
Troubleshooting If clicking the All Reviewers check box clears it, click it again to make sure it is selected.
The comments and revisions made by both reviewers are now shown.
-
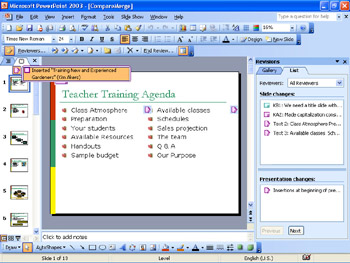
Click the change marker at the top of the Slides tab in the Outline/Slides pane.
The ScreenTip indicates that Kim Akers has added a slide titled Training New and Experienced Gardeners to the beginning of the presentation.
-
On the Reviewing toolbar, click the Apply button.
The title slide inserted by Kim in her version of the presentation appears as Slide 1 of the presentation.
-
Click the comment icon on the title slide, read it, and then on the Reviewing toolbar, click the down arrow to the right of the Delete Comment button, and click Delete All Markup on the Current Slide .
-
Move to Slide 2, and in the Slide changes area on the List tab of the Revisions task pane, click the KB1 comment.
Karen Berg s first comment, We need a title slide with our logo , is displayed.
Tip When you display a comment or change, the name that appears in the ScreenTip is that of the user identified on the General tab of the Options dialog box in the reviewer s installation of PowerPoint. If no user information is entered, end user appears in the ScreenTip.
-
In turn , click the KA2 comment and the two change markers.
You agree with Kim s changes and want to accept them.
-
On the Reviewing toolbar, click the down arrow to the right of the Apply button, and click Apply All Changes to the Current Slide .
-
On the Reviewing toolbar, click the down arrow to the right of the Delete Comment button, and click Delete All Markup on the Current Slide .
Tip To delete a single comment or change marker, you can right-click it, and then click Delete Comment or Delete Marker on the shortcut menu.
The Revisions task pane indicates that the next change is on Slide 3.
-
At the bottom of the Revisions task pane, click Next .
-
Review the comment and the changes, accept them, and delete the markers.
-
On the Reviewing toolbar, click the Next Item button.
PowerPoint displays Slide 4.
-
Apply all the changes to the slide. Then on the Reviewing toolbar, click the down arrow to the right of the Unapply button, and click Unapply All Changes to the Current Slide . Then apply the changes again.
Tip After accepting a change, you can also use the Undo and Redo buttons on the Standard toolbar to flip back and forth to see which version of a slide you prefer.
-
Delete all the markers from Slide 4.
-
In the Revisions task pane, click the down arrow to the right of the Reviewers box, clear the Kim Akers check box, and click away from the drop-down list to close it.
The message in the Slide changes area tells you that Karen Berg s next change is on Slide 11.
-
At the bottom of the Revisions task pane, click Next to move to Slide 11.
-
Read Karen s comment, and then on the Edit menu, click Delete Slide to comply with her request.
-
In the Revisions task pane, click Next , apply the changes, and delete the markers.
The message in the Slide changes area indicates that Karen has made no more comments or changes, and the setting in the Reviewers box changes to All Reviewers.
-
Press [Ctrl]+[Home] to move to Slide 1, and then on the Reviewing toolbar, click the Next Item button.
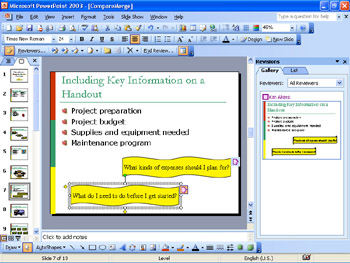
You move to Slide 7, the next slide to which Kim Akers has made changes.
-
In the Revisions task pane, click the Gallery tab.
This tab shows you what Slide 7 will look like if you accept Kim s changes.
-
Review all the remaining changes to the presentation, and then on the Reviewing toolbar, click the down arrow to the right of the Apply button, and click Apply All Changes to the Presentation .
-
On the Reviewing toolbar, click the down arrow to the right of the Delete Comment button, and then click Delete All Markup in this Presentation .
-
In the message box that appears, click Yes to confirm that you want to delete all comments and markers.
-
On the Standard toolbar, click the Save button to save the presentation.
CLOSE the CompareMerge presentation, and if you are not continuing on to the next chapter, quit PowerPoint.
EAN: N/A
Pages: 145