Frames
By using frames, you can break up the Web page into distinct regions and show a different HTML file in each. With this arrangement, one region can switch to another page while other regions remain the same. For instance, a page containing an advertising banner or a navigational menu (similar to a book's table of contents) can remain visible in one part of the browser window while the user jumps between pages in the site in another part of the window. Frames can be a tremendously valuable layout tool, but they can also present a variety of problems.
Frame Basics
You create frames by using a frameset document, a standard HTML file that simply contains information about how the page should be split and which files should be displayed in each region. Code Listing 3-8 is the HTML code for a basic frameset document; Figure 3-8 shows the document displayed by Internet Explorer.
NOTE
Notice that the document created in Code Listing 3-8 does not include a body region. To avoid potential problems, HTML standards dictate that an HTML file can have either a frameset or a body but not both. Older versions of Internet Explorer supported a body in the same document as a frameset, but Microsoft removed this functionality in Internet Explorer versions 4 and 5 to adhere more closely to the W3C standards.
Code Listing 3-8.
<HTML> <HEAD> <TITLE>Listing 3-8</TITLE> </HEAD> <FRAMESET COLS="50%,70,*"> <FRAME SRC="1.htm"> <FRAME SRC="2.htm"> <FRAME SRC="3.htm"> </FRAMESET> </HTML> |
The frameset in Code Listing 3-8 points to three documents that exist on the companion CD named 1.htm, 2.htm, and 3.htm. Inside the <FRAMESET> tag, we included the COLS attribute, which indicates that the page will be divided into columns. The attribute's three settings specify three columns: the first one will be 50 percent of the width of the browser window, the second will be 70 pixels wide, and the third will be allocated whatever space is left over (denoted by the asterisk symbol *). If you set the size of frames using percentages, they will scale accordingly as the browser window is resized. In Figure 3-8, notice the bars that separate the columns; a user can drag these bars to resize the columns. Back in Code Listing 3-8, notice that within the frameset lie the <FRAME> tags. These tags specify which HTML files the browser should display in each column of the frameset.
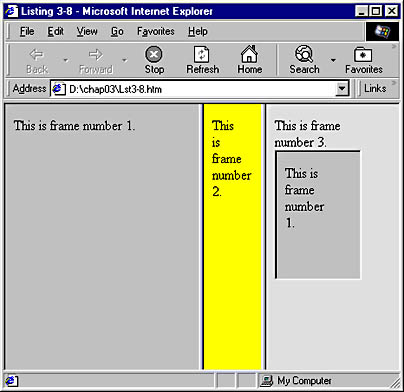
Figure 3-8. A basic frameset document.
In accordance with the W3C's specifications, Internet Explorer supports a special type of frame called an in-line frame, or IFRAME. Unlike standard frames, which must be created using a frameset document, an IFRAME can be embedded in any standard Web page, just as an IMG or a TABLE can be. Frame number 3 contains an IFRAME that displays the file 1.htm. You can see the IFRAME line in the code for the file 3.htm, shown below.
<HTML> <BODY BGCOLOR="blue"> This is frame number 3. <BR> <IFRAME SRC="1.htm" WIDTH="100"> </BODY> </HTML> |
To learn more about IFRAMEs, consult the SBN Workshop Web site and the CD that accompanies this book. On the CD go to Workshop (References); DHTML, HTML & CSS; HTML References; and then Elements. To get to the online version, visit the MSDN Online Resource page at http://msdn.microsoft.com/resources/schurmandhtml.htm , or open the file named MSDN_OL.htm on the companion CD, and choose HTML Tags and Attributes. No current versions of Netscape Navigator support the IFRAME tag. They will simply ignore it.
Like tables, framesets support embedding, or nesting, where one frame can be contained, or embedded, within another. With this feature, you can create a multitude of layouts. Code Listing 3-9 creates a more complicated frameset document by using nesting as well as a variety of attributes supported by framesets. You can see the results in Figure 3-9.
Code Listing 3-9.
<HTML> <HEAD> <TITLE>Listing 3-9</TITLE> </HEAD> <FRAMESET ROWS="50,*" FRAMEBORDER="0" FRAMESPACING="0"> <FRAME SRC="1.htm" NAME="frame1" SCROLLING="no"> <FRAMESET COLS="20%,80%" FRAMEBORDER="1" FRAMESPACING="1"> <FRAME SRC="2.htm" NAME="frame2" SCROLLING="yes"> <FRAME SRC="3.htm" NAME="frame3" SCROLLING="auto"> </FRAMESET> </FRAMESET> </HTML> |
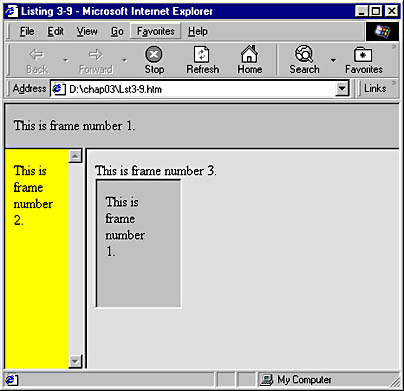
Figure 3-9. A more advanced frameset.
NOTE
Another way of creating nested framesets is to point the SRC attribute of a <FRAME> tag to another frameset document. We could have accomplished the same results as we did in Code Listing 3-9 by replacing its inner <FRAMESET> tag with a <FRAME> tag that pointed to an HTML file containing the frameset it replaced. Though each resulting file is simpler than Code Listing 3-9, this approach can be less flexible since changes to the layout of the frameset require edits to multiple files.
Code Listing 3-9 creates a frameset that contains two rows. The first row is 50 pixels tall, and the second takes up the remainder of the screen. The first row consists of a frame that points to 1.htm. The second row contains a separate frameset, which in turn contains two columns of its own.
The FRAMEBORDER and FRAMESPACING attributes control the area between frames. If you want to prevent users from resizing frames, you can set both these attributes to 0, as we did for the outer frameset in Code Listing 3-9. This setting eliminates the space between our top and lower frames—thereby also removing the borders, or bars, between columns. With no bar to drag, users are unable to resize the frames. This can be a handy technique when you want a particular region, such as an advertising banner, to remain a fixed size. Notice in Figure 3-9 that the inner frameset retains its borders and is sizeable because its FRAMEBORDER and FRAMESPACING attributes are not set to 0. Current versions of Netscape Navigator do not provide the level of support for these attributes found in Internet Explorer.
The SCROLLING attribute determines whether and when scroll bars appear in a frame. A no setting prevents scroll bars from ever appearing. You should avoid using this setting unless you are sure that scroll bars will not be needed under any circumstances—for example, your frame will contain no text and only images of known dimensions. Setting SCROLLING to yes means that scroll bars will always be present. An auto setting means that scroll bars will appear only when necessary. The auto setting is especially useful because traditional HTML offers no other way to hide scroll bars until they are needed.
NOTE
Even if you set SCROLLING to auto, browsers set aside space for a scroll bar on the right-hand side of the screen. Without this reserved space, the appearance of the scroll bar would force items on the page to suddenly shift away from the right-hand side of the screen, which might cause an undesirable change in the look of the page.
The NAME attribute, which we used in Code Listing 3-9, allows us to name the frames. Assigning names provides a way for the contents of one frame to address another frame, as the following section explains.
Addressing Across Frames
The ability to address the contents of a frame from any other frame opens up a range of possibilities. Suppose you want to create a navigational toolbar. To make such a feature work, an anchor tag in the navigational frame must be able to address other frames in that frameset. Code Listing 3-10 creates a frameset with a simple navigation bar; Internet Explorer displays the frameset and the bar in Figure 3-10.
Code Listing 3-10.
<HTML> <HEAD> <TITLE>Listing 3-10</TITLE> </HEAD> <FRAMESET COLS="25%,75%" FRAMEBORDER="1" FRAMESPACING="1"> <FRAME SRC="nav.htm" NAME="NavFrame" SCROLLING="yes"> <FRAME SRC="1.htm" NAME="ContentFrame" SCROLLING="auto"> </FRAMESET> </HTML> |
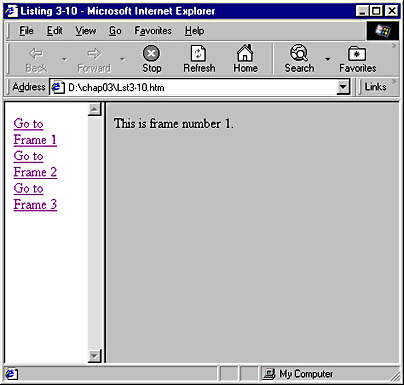
Figure 3-10. A frameset with a navigation bar.
The frameset in Code Listing 3-10 introduces a new HTML file named nav.htm, which contains this series of links:
<HTML> <BODY> <A HREF="1.htm" TARGET="ContentFrame">Go to Frame 1</A><BR> <A HREF="2.htm" TARGET="ContentFrame">Go to Frame 2</A><BR> <A HREF="3.htm" TARGET="ContentFrame">Go to Frame 3</A><BR> </BODY> </HTML> |
Notice that each anchor tag contains a TARGET attribute. This attribute's setting tells the anchor which frame in the frameset should change when the anchor is clicked. In this case, when a user clicks one of the links, the contents of the frame named ContentFrame will change to 1.htm, 2.htm, or 3.htm.
You can set the TARGET attribute to a variety of special values (sometimes known as magic values), shown in the following list. (You must include the underscore before each value, and the text must be lowercase.)
| _blank | The named document is loaded in a blank, new window. |
| _self | The named document is loaded into the window that contains the link. |
| _parent | The named document is loaded into the parent of the window that contains the link. The parent of a frame is the document containing the frameset that called the frame. |
| _top | Any current frameset is discarded, and the named document is loaded into the full Internet Explorer frame. |
For instance, if you want to use a link to exit your current frameset, you can use the setting _top, as shown in the following line of code:
<A HREF="1.htm" TARGET="_top">Exit Frameset</A><BR> |
The file 1.htm would then fill the Internet Explorer window, replacing your frameset.
If you set the value of the TARGET to a name that does not exist in the current frameset (such as someotherframe, in our example), the browser will launch a new window that will have that name. All future links with that TARGET will change the contents of this new window.
NOTE
For those who are familiar with scripting, several techniques are available for addressing frames other than the frame that contains a script. The top frame in a frameset is addressed with top, while the parent of the current frame uses parent. The top and parent keywords can be used in conjunction with the name of a frame to gain access to its contents. For example, a script in NavFrame could address an object named myObject in ContentFrame with the code top.ContentFrame.myObject. (If you are not familiar with scripting, don't worry; Part 2 covers this topic in depth.)
Special Considerations
When you are designing Web pages with frames, you might want to keep a few special considerations in mind:
- For each new frame in a document, Internet Explorer must download a new HTML file. This typically means a new connection with the server, which will slow down the load time of the overall page.
- Most browsers do not allow you to add a particular frame in a frameset to your Bookmarks or Favorites list but can reference only the frameset as a whole. Users who have added to their Favorites list a location in a frames-based site might be frustrated to discover that this Favorites item returns them to the first page in the frameset.
- Because many older browsers do not support frames (though they are supported in versions 3 and later of both Internet Explorer and Netscape Navigator), you might want to consider using a <NOFRAMES> tag in your Web pages. Browsers that do not support frames will simply display any text you place between a <NOFRAMES> and </NOFRAMES> tag pair. This text can include anything from a pointer to a nonframes version of your site to a gentle suggestion that the user upgrade to a more recent browser.
- All links leading to locations outside your site should have a TARGET attribute set to _top. Otherwise, users can find themselves trapped inside your frameset.
Working with frames can be a challenge. When used with care, however, frames can dramatically improve the navigability and style of your Web site.
In the next chapter, we will take a look at forms, through which a user can communicate information to the server; character entities, which allow for the display of characters that are not on the keyboard; and a variety of other useful HTML elements.