Installing PCAP
|
libpcap is a packet capture library for Linux systems. What is unique about this library is that it can capture packets destined for the local hosts, and can also pick up packets destined for other hosts on the network. This, in essence, means that you can place a machine in a strategic location on your network and have it analyze the packets that travel through (for a quick example, see Figures 30.1 and 30.2). Snort requires this library to function, and it is best to download the newest version of it every time you install or upgrade Snort. The benefits of getting the newest release are twofold: You will realize increased stability and speed running the program. Even if your system already has a version of PCAP (such as Red Hat Linux) you should follow this advice. The current version of libpcap can be found at www.tcpdump.org.
| Note | Some operating systems (such as Red Hat) include a modified PCAP library. It is usually worth the effort to install the latest version of libpcap every time you install a new version of Snort. Installing the latest version of libpcap provides two major benefits: Increased stability and speed. |
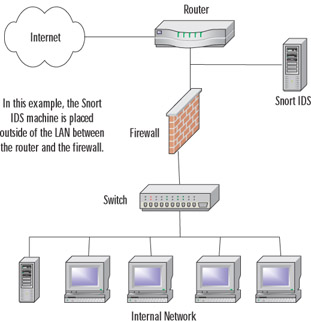
Figure 30.1: Snort IDS Monitoring Internal Traffic
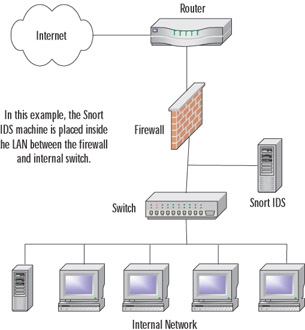
Figure 30.2: Snort IDS Monitoring External Traffic
Installing libpcap from Source
Installing libpcap from the source tarball is relatively simple, especially for those familiar with compiling source code. The only thing you really need to make sure of is that you have chosen to install development tools into your original OS install. These tools should include the following, and probably more depending on your distribution of choice. As noted previously, we are going to be using Red Hat Linux 8.0 for the purpose of demonstration.
-
gcc The GNU cc and gcc C compilers. This is the core of your development tools; nothing else functions without it.
-
automake The GNU utility for creating makefiles on-the-fly.
-
autoconf The GNU utility for configuring source code on-the-fly.
-
binutils GNU binary utilities.
-
make The GNU tool for making life easier for the individual compiling the code. It automates much of the process by using the makefile.
In Red Hat Linux 9.0, you can add these tools by performing the following:
-
As root, open the Panel menu and select System Settings | Packages (Figure 30.3).
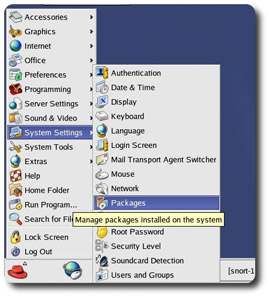
Figure 30.3: Selecting the Packages Utility from the Panel Menu -
The Package Management dialog will open.
-
Scroll down to the Development section and select the check box next to Development Tools (Figure 30.4).
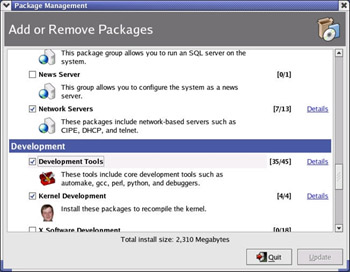
Figure 30.4: The Package Management System -
Click Update in the bottom-right corner of the window.
-
The OS will calculate the required packages and dependencies.
-
When it is complete, it will present you with a dialog confirming your package selection choices (Figure 30.5). You can always double-check your selections by clicking Show Details in this dialog.
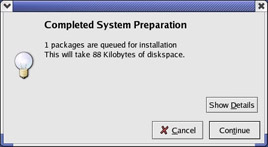
Figure 30.5: Completing the Package Install -
Simply click Continue and the system will proceed with the installation. This is the last dialog you will see, unless you are prompted for CD-ROM media, or if there are errors during the install. On a successful operation, there are no further visual or audible prompts.
Now that your system is complete with all of the tools necessary for package compilation, we will continue with the configuration and build stages. Again, if you have any experience compiling software on Linux, you will be able to get through this section fairly quickly. We will be following the common configure | make | make install format for building the package into the system. For those of you who are new at this, don't be afraid; this is pretty simple as long as your system has the tools described in the last section.
For those of you who are not familiar with the source code compilation/installation of packages from tarballs (a tarball is a compressed set of files similar to a zip file created in Windows using WinZip or PKZip), we have given you a little history on the subject in the subsequent section.
Configure, Make, Make Install Defined
Most of you might already be familiar with this time-tested method of software installation on Linux, but we think it might be a good idea for those new to the scene to cover the definition. At first glance, Linux can be an intimidating beast, but first impressions are not always accurate. Although this might seem like a long process just to install a piece of software, it really is worth the effort. Unlike shrink-wrapped software, compiling from source code is almost always better because it is being made specifically for your system. Prepackaged software is always built for the lowest common denominator, so if the programmer's target lowest machine is a 100MHz Pentium, that is what you get … software built to run on a 100MHz Pentium. If you have a 2GHz processor, you will not be taking advantage of all of the optimizations for your processor. When you compile software on Linux, it is being made by you, and for you. Each machine you compile it on will have its own unique setup. We are not saying that all prepackaged software is bad, because it's not. We have run a ton of it, but we just wanted to point out the benefits of doing it the Linux way.
Most software developed for Linux is distributed in what is known as a tarball. A tarball is nothing more than a compressed file containing other files and/or directory structures. We like to equate it to a zip file created with WinZip (for those of us familiar with the Windows OS). Tarballs can come in several formats, the most popular end with the extensions tgz, tar.gz, or tar.bz2. Each extension signifies a specific compression algorithm that was used to create the file. Depending on the source, the extensions might differ, but they are all capable of being extracted by modern versions of the tar program. Tar is a console program designed to create and extract compressed archives. You can read more about tar and its features at www.gnu.org/software/tar/. It comes as a standard package with almost every Linux distro, but you can get the latest version at that address as well.
When you receive a tarball, the first step is to extract it into a temporary directory where you can work with it; /tmp is usually a good place to accomplish this task. Once the tarball is extracted, verify that the archive created a new directory (they usually do) with its contents. In some cases, it might extract into your current working directory. In any case, locate a file named configure. The configure file is always located in the "root" (this directory is usually named after the package name) directory of the files you just extracted. This is the main directory you will be working from to install your software package. You will almost always use these three commands successively:
-
./configure The configure file is a script that contains code designed to essentially "figure out" the machine on which it is running. It looks at environment variables, dependencies, and verifies what software, if any, is missing. If you watch the screen when it is running, you will see a lot of questions and answers flying by. This is exactly what is going on. It is checking to make sure that everything is where it is supposed to be. The configure script is responsible for generating the makefile, which will become important in the next step. If you see any errors here, you will need to tend to them before continuing. Most issues will be cleared up by installing whatever dependency the configure script was missing. When all dependencies are fulfilled, you can run configure again.
-
make The make command is a part of almost every UNIX/Linux installations in existence today. It is not a script like configure is, but an actual utility. make will use the makefile created by the configure script in the last step. The primary function of make is to compile the code to be used during the final install. It accomplishes this by reading and executing the code in the makefile in a specific order determined by the configure script. The makefile is similar in layout to an initialization file in that it has "headings" or categories for each step of the make process. One of these headings is install, which is used in the next step by make install. Again, it is important to note any errors during the compilation process to make sure you take care of them before continuing.
-
make install This is the final step of the installation process. What make install does is fairly simple: it reads the information from the install section of the makefile and distributes the executables and other files created by make to the proper locations in the machine's directory structure. Once this step is complete (without error), the software is installed and ready to use.
Now when you are ready to tackle your next big software installation, you will be armed with the knowledge of what all of the syntax and commands actually mean. This has always been helpful to us … to be able to understand the meaning behind what we're doing, and not just going through the motions presented to us via documentation.
Installing libpcap from RPM
You can also install libpcap from an RPM package if your distribution supports it. At the time of writing, www.rpmfind.net returned 57 results (spanning 11 Linux distributions) when presented with a query for libpcap. Frankly, we believe that this is the best place to find custom-compiled RPMs for your distribution of choice.
-
Mandrake Version 9.0 (RPM), version 9.1 (RPM and SRPM)
-
Red Hat (7.2, 7.3, 8.0, 8.1) Version 6.2 (RPM only)
-
SuSE Linux Version 7.1 (RPM only)
The procedures involved in installation via RPM are, more often than not, much easier than an installation that uses source code—if there are no dependency problems. The RPM system, while an excellent package management tool, is fraught with problems regarding dependencies. It understands and reports what the specific package requires to install, but is not yet capable of acquiring and installing the packages necessary to fulfill its requirements.
If you are not familiar with the term, dependencies are packages and/or libraries required by other packages. The Linux operating system is built on dependencies, which you can visualize as an upside-down tree structure. At the top of the tree are your basic user-installed programs, such as Snort. Snort depends on libpcap to operate, and libpcap requires other libraries to function.
|
EAN: 2147483647
Pages: 240