Implementing the Shading and the Lighting
| [ LiB ] |
Implementing the Shading and the Lighting
The scene is always rendered after all light has been propagated and is being reflected onto each surface. Shading is the most important element to a rendering algorithm such as ray tracing. Shading refers to the concept of light being reflected off an arbitrary surface at some particular time. In other words, shading can be called the reflected radiance (the energy leaving a surface). Recall from Chapter 2 that when light is incident on a material, some of the energy is absorbed into the material and some is transmitted through the object to another object or reflected off the surface to another object. If a material absorbs all colors and reflects green, the material appears green. Because you're using backward ray tracing, which is the incorrect way of simulating light, the algorithm records the path light takes from the eye outward.
In the real world, photons originate from light sources and scatter from object to object until they reach our eyes. This is what forward ray tracing does.
Backward ray tracing utilizes a mathematical model that approximates how much light travels from one place to another. The nature of the simulated reflection is dependent on the type of material that the ray interacts with. Rough surfaces normally produce a diffuse reflection, whereas smooth surfaces have a specular reflection. For example, smoother surfaces like a mirror or glass normally reflect light back towards the eye. All physical attributes of the material must be taken into account when rendering. The different coefficients for absorbing and transmitting/reflecting light must be simulated. The overall appearance of the scene is determined by the color of each object, the diffuse shading, or diffuse interaction across each surface in the scene.
NOTE
TIP
The diffuse shading method is very efficient when used with ray tracing.
Adding Diffuse Shading
Recall from Chapter 6 that the dot product calculates the angle between two vectors in space. This is perfect for what you need here in order to shade each point of intersection for diffuse interaction. You must find the relative angle between the point normal and the light source. See Figure 9.2.
Figure 9.2. The tangent plane of the point is relative to the primitive.If the primitive is a sphere, the tangent plane is along its curve.If the primitive is a trian- gle,the tangent plane is the same as the surface normal.
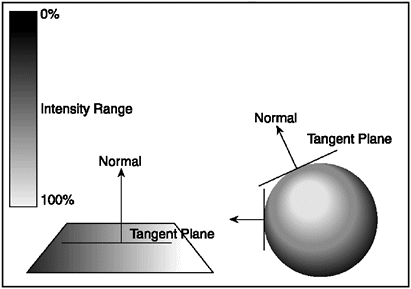
The point normal is the surface normal if the surface is flat. This value can be easily computed because the dot product is a unit length vector method. The range of the dot product method is given as 1 to 1. If the angle is 0 between the light source and the point normal, the returned value is 1.0. If the angle between the light source and the point normal is 90 degrees (or perpendicular ), the returned value is 0.The intensity is full if the light source and the surface directly face each other. The intensity weakens as the surface tilts away from the light source. This concept is known as cosine shading . The cosine shading method is the dot product (or cosine) between two vectors in 3D space. See Figure 9.3.
Figure 9.3. The angle between the point normal and the light source determines the intensity value of illumination .
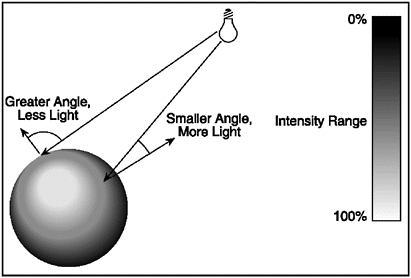
The values that are below 0 to 1 indicate that the surface is facing away from the light source, which means that the surface isn't receiving any energy from the light source. The values that are above 0, yet less than 1, indicate that the surface is facing the light source and should receive some of the light source's power. If the dot product value is 1.0 between these two vectors, this means the point on the surface should be at 100% full brightness; if the value is at 0, that's 0% brightness.
This is perfect for what you need because 0 to 1 or simplified 0 to 100% can represent an illumination range of brightness. By adding the object color into the equation you can shade the desired point of intersection on the object according to the intensity factor. The object color and cosine shade are not the only two coefficients needed to do diffuse shading. Materials have an internal diffuse factor of how much light it reflects across the surface. This is mostly the color of the object. You must add this coefficient too into the solution when using the cosine shading method.
Because ray tracing has indirect illumination problems (as seen in calculating the penumbra in shadows) it would be wise to add another coefficient to the application. In the real world, light is everywhere and even the darkest areas are lit to some small degree. A shadow you cast on a wall isn't pitch black because some of the light waves travel sideways and intersect with the object from different directions. This causes the shadow to appear brighter, based on the light source power. Because nothing is pitch black in the real world, you need an ambient factor that illuminates perfectly black shadows to some small degree of brightness. Remember sometimes the color black RGB(0,0,0) in the computer is returned if the ray is cast as a shadow. In essence, each object in the scene will receive a minimum amount of light. This means that if this ambient coefficient is set to 0.5 or 5%, all illumination in the scene is set to this base value by default. The remaining 95% must be evaluated by the cosine shading method.
NOTE
NOTE
The ambient factor isn't used in photon mapping because photon mapping is great at simulating shad- ows.The penumbras in shadows are easily handled with photon mapping. Simply put,photon mapping is good at indirect illumination.
Let's take a look at the steps required to shade an arbitrary point in 3D space. You first find the angle between the point-normal relative to the light source. This is done using the dot product method. If the angle of the cosine shading method is less than zero, no light is incident on the point of intersection and the point should be shaded as black (no lighting). But if the angle is above zero, you should begin shading the point using the different coefficients of the material as well as the ambient factor. After you've incorporated these different elements into one solution for the specific point of interest, you find the final solution.
Here is the process for shading a point for diffuse shading:
Shade = Find the Angle Between (Light Vector, Point Normal) If (Shade < 0 ) 1. Shade = 0 Diffuse = Surface.Color Diffuse = Diffuse x Surface.AmbientFactor Diffuse = Diffuse x Surface.DiffuseFactor Diffuse = Diffuse x Shade
As you can see, it's pretty simple. The object's color,the surface ambient factor, the diffuse factor,and the shadeare all incorporated into the final solution.
Implementing Specular Highlights
Objects such as apples, pool balls, bowling balls, and so on are smooth, thus causing a specular reflection. Unlike diffuse reflections that scatter light in many random directions, specular reflection transmits light in only one direction. When light is incident on a smooth surface some of the light is reflected back towards the eye. Because the object is smooth, the light rays don't scatter in a random fashion as with rough surfaces; the full intensity of the light source is reflected from the surface.
A mirror is a perfect specular reflection and will reflect whatever it's facing because it has few imperfections. But most smooth objects have a higher degree of imperfections. This causes the reflected light to be bounced in a somewhat imperfect fashion. If the eye is in front of the light source, the light that's reflected back into the eye directly off the smooth surface generates a bright shiny spot on the surface. This bright shiny spot on the surface is called the specular highlight and the imperfection the surface has is a coefficient called Shininess . See Figure 9.4.
Figure 9.4. The specular highlight is the bright shiny spot reflecting the full intensity of the light source on the surface.
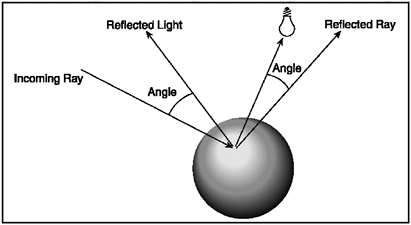
The location of the highlight is relative to the observer. This viewing vector was originally read in as the Viewing Direction in the cScene class. The viewing direction vector is used to simulate the brightness of the light focused on the surface. The shininess of the highlight is an exponent. A large exponent will create a small sharply focused highlight and a small exponent will generate a larger highlight. This value is calculated as the angle between the reflection of the light relative to the ray and to the light source direction. The specular highlight coefficient indicates how shiny the object is; you must add this to simulate specular highlights.
Simulating specular highlights is rather simple as compared to diffuse interaction. You need only to find the angle between the reflected ray direction and the ray to light direction. If the angle between these two vectors is above zero, the specular highlight is applied to the pixel. The highlight is the Shininess of the object times the Shade to the power of the Specular Exponent . Here is the process for shading a point for specular highlights:
Shade = Find the Angle Between (Reflected Ray Direction, Ray to Light Direction) If (Shade > 0 ) Specular = pow (Shade, Surface.Shininess)* Surface.fSpecularExponent Else Specular = 0
The next step after finding the diffuse shading and specular highlights contribution to the point of intersection is to combine the two into one final solution. This allows other elements to be incorporated into the solution such as the light source's wattage and color.
Implementing Diffuse Interaction with Specular Highlights
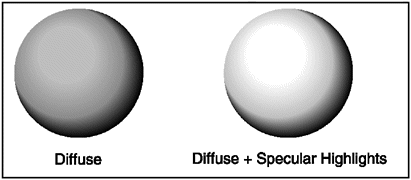
You must now apply the specular and diffuse factors to the final pixel intensity. Finding the final pixel shade of a point on a surface for the view plane is the primary goal. Figure 9.5 shows the two shadings . The important elements to note here are the light source wattage, light source color, the color of the object, the ambient factor, the diffuse shading, and the specular highlights contribution.
Figure 9.5. A side- by-side comparison of diffuse reflection and diffuse reflection with specular high lights.
NOTE
TIP
Diffuse interaction and specular highlights are collectively referred to as local illumination lighting effects .
The process of putting it all together for the different factors is broken into the following steps:
-
The final color is set to black (no lighting).
-
The light source's color is summed into the final color.
-
The light source's wattage is summed into the final color.
-
The combination of the specular and diffuse shading is summed into the final color.
-
The final color is set to the pixel on the image plane.
To find the final pixel intensity, use this formula:
Returned Color = Lightsource.Color * Lightsource.Wattage * (Specular + Diffuse)
You can now upgrade the cScene class to accommodate the new changes required for ray tracing.
| [ LiB ] |
EAN: 2147483647
Pages: 128