Using Backward Ray Tracing
| [ LiB ] |
Using Backward Ray Tracing
You are going to implement backward ray tracing in this book. Backward ray tracing is the best choice in this case because forward and bi-directional ray tracing both take forever to return reasonable results and are a bit more complicated to set up. Almost all images today are rendered from rays being shot from the view plane. Keep this idea in mind because you're going to use this same concept to render the final image for photon mapping by tracing rays into the scene from the view plane. This method guarantees results without wasting processing cycles. But it has all the problems that backward ray tracing poses, which include multiple specular reflections and indirect illumination .
The Basic Logic Behind Backward Ray Tracing
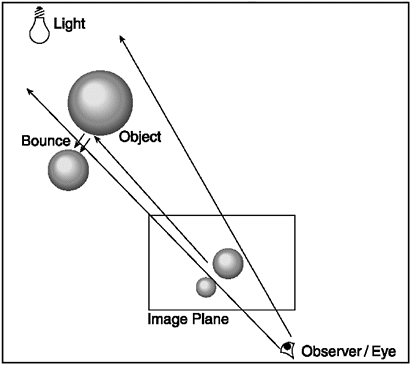
By now you should have a good idea how ray tracing works. Backward ray tracing works by tracing individual rays from the view plane into the scene. The view plane is set up by the camera position and the field of view of the camera. As each ray is launched through the image plane, it travels through the scene by bouncing from object to object. The job of the application is to determine the color of each ray as it intersects each point on a surface. Finding the color is its primary goal. Because rays travel from object to object the same way that light does, the ray-tracing application has to use a recursive algorithm. The ray can bounce from object to object indefinitely unless you limit it. This limit is typically set at a value of eight or ten times. See Figure 9.1.
Figure 9.1. The ray-tracing algorithm calculates the light- ing for a point in 3D space by sampling rays from the eye to determine the color ing of each object projected on the image plane.

The following list outlines the basic logic involved in implementing ray tracing in a practical application. Ray tracing can be broken into three basic components :
-
Begin tracing: This part of the application sets up a ray relative to the camera and guides it through each pixel on the image plane. Here, you need to begin tracing rays from the image plane into the scene. This is done by picking a ray and shooting through one pixel of the image plane into the scene.
-
Trace ray: This component traces the ray into the scene and finds a point of intersection. It calls the shade point method, which shades each point of intersection for illumination. It also traces other rays for the different types of reflections and refractions (more on this later).
-
Shade point: This method shades the point of intersection to the different natural lighting factors. It then saves the shaded color of the point on the pixel that the ray originally left from the image plane.
Here is the algorithm, explained in a bit more detail.
-
Begin tracing.
-
For each pixel on the image plane, pick a ray from the eye through this pixel
-
Pixel color = Trace Ray In Scene (ray)
-
-
Trace the ray in the scene.
-
Find closest intersection with scene
-
Compute intersection point and normal on surface
-
Color = Shade Point( point, normal )
-
Return Color
-
-
Shade the point.
-
Color = black
-
For each light source
-
Color = Color + direct illumination
-
Return Color
-
As you can see, the algorithm is pretty simple and shouldn't be a problem to implement. The three basic sections of the algorithm are going to be turned into computer functions and incorporated into the cScene class. You can begin developing the necessary methods to implement the algorithm.
| [ LiB ] |
EAN: 2147483647
Pages: 128