Lesson 5: Using Security Templates
Windows 2000 provides a centralized method of defining security using security templates. This lesson explains how to use security templates.
After this lesson, you will be able to
- Explain the purpose of security templates
- Explain the purpose of the predefined security templates
- Manage security templates
Estimated lesson time: 25 minutes
Security Templates Overview
A security template is a physical representation of a security configuration, a single file where a group of security settings is stored. Locating all security settings in one place streamlines security administration. Each template is saved as a text-based .inf file. This allows you to copy, paste, import, or export some or all of the template attributes. With the exceptions of IP Security and Public-Key policies, all security attributes can be contained in a security template.
Security Template Uses
You can import (apply) a security template file to a local or nonlocal GPO. Any computer or user accounts in the site, domain, or OU to which the GPO is applied receive the security template settings. Importing a security template to a GPO eases domain administration by configuring security for multiple computers at once.
The security settings in the local GPO are the initial settings applied to a computer. You can export the local security settings to a security template file to preserve initial system security settings. This enables the restoration of the initial security settings at any later point.
Predefined Security Templates
Windows 2000 includes a set of predefined security templates, each based on the role of a computer and common security scenarios: from security settings for low-security domain clients to highly secure domain controllers. These templates can be used as provided, they can be modified, or they can serve as a basis for creating custom security templates. Do not apply predefined security templates to production systems without testing to ensure that the right level of application functionality is maintained for your network and system architecture.
The following are the predefined security templates:
- Default domain controller security settings (BASICDC.INF)
- Default server security settings (BASICSV.INF)
- Default workstation security settings (BASICWK.INF)
- Compatible workstation or server security settings (COMPATWS.INF)
- Default security settings updated for domain controllers (DC SECURITY.INF)
- Highly secure domain controller security settings (HISECDC.INF)
- Highly secure workstation or server security settings (HISECWS.INF)
- Removes the Terminal Server User security identifier (SID) from Windows 2000 server (NOTSSID.INF)
- Optional Component File Security for server (OCFILESS.INF)
- Optional Component File Security for workstation (OCFILESW.INF)
- Secure domain controller security settings (SECUREDC.INF)
- Secure workstation or server security settings (SECUREWS.INF)
- Out of the box default security settings (SETUP SECURITY.INF)
By default, these templates are stored in the systemroot\Security\Templates folder.
Security Levels
The predefined security templates are designed to cover the following common requirements for security:
- Basic (BASIC*.INF). The basic configuration templates are provided as a means to reverse the application of a different security configuration. The basic configurations apply the Windows 2000 default security settings to all security areas except those pertaining to user rights. These are not modified in the basic templates because application setup programs commonly modify user rights to enable successful use of the application. It is not the intent of the basic configuration files to undo such modifications.
- Compatible (COMPAT*.INF). By default, Windows 2000 security is configured such that members of the local users group have ideal security settings and members of the local Power Users group have security settings that are compatible with Windows NT 4.0 users. This default configuration enables development of applications to a standard definition of a secure Windows environment, while still allowing existing applications to run successfully under the less secure Power User configuration. By default, all users that are authenticated by Windows 2000 are members of the Power Users group. This may be too unsecured for some environments, where it would be preferable to have users, by default, only be members of the Users group, and decrease the security on the Users group to the level where the applications run successfully. The compatible templates are designed for such environments. By lowering the security levels on specific files, folders, and registry keys that are commonly accessed by applications, the compatible templates allow most applications to run successfully. In addition, as it is assumed that the administrator applying the compatible template does not want users to be Power Users, all members of the Power Users group are removed.
- Secure (SECURE*.INF). The secure templates implement recommended security settings for all security areas except files, folders, and registry keys. These are not modified because file system and registry permissions are configured securely by default.
- Highly Secure (HISEC*.INF). The highly secure templates define security settings for Windows 2000 network communications. The security areas are set to require maximum protection for network traffic and protocols used between computers running Windows 2000. As a result, such computers configured with a highly secure template can only communicate with other Windows 2000 computers. They will not be able to communicate with computers running Windows 95, Windows 98, or Windows NT.
Managing Security Templates
The following is the sequence of tasks required for managing security templates:
- Accessing the Security Templates console
- Customizing a predefined security template
- Defining a new security template
- Importing a security template to a local and nonlocal GPO
- Exporting security settings to a security template
Accessing the Security Templates Console
The Security Templates console is the main tool for managing security templates.
Follow these steps to access the Security Templates console:
- Decide whether to add the Security Templates console to an existing console or create a new console.
- To create a new console, click Start, click Run, type mmc and then click OK.
- To add the Security Templates console to an existing console, open the console, and proceed to Step 2.
- On the Console menu, click Add/Remove Snap-In, and then click Add.
- In the Add Standalone Snap-In dialog box, select Security Templates, click Add, click Close, and then click OK.
- On the Console menu, click Save.
- Enter the name to assign to this console and click Save.
The console appears on the Administrative Tools menu.
Customizing a Predefined Security Template
Customizing a predefined security template allows you to save the predefined template as a new template (to preserve the original predefined template) and then make edits to security settings to create a new template.
Follow these steps to customize a predefined security template:
- In the Security Templates console (see Figure 21.13), double-click Security Templates.
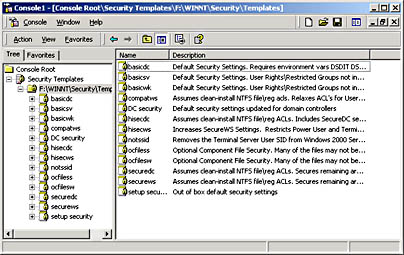
Figure 21.13 The Security Templates console
- Double-click the default path folder (systemroot\Security\Templates), right-click the predefined template you want to modify, and then click Save As.
- In the Save As dialog box, in the File Name box, specify a filename for the new security template, and then click Save.
- In the console tree, right-click the new security template, and then select Set Description.
- In the Security Template Description dialog box, type a description for the new security template, and then click OK.
- In the console tree, double-click the new security template to display the security policies, and double-click the security policy (such as Account Policies) you want to modify.
- Click the security policy you want to customize (such as Password Policy), and then double-click the security setting to modify (such as Minimum Password Length).
- On the Template Security Policy Setting dialog box, click the Define This Policy Setting In The Template check box to allow configuration, and then configure the security setting.
- Click OK.
- Configure other security settings as needed.
- Close the Security Templates console.
- In the Save Security Templates dialog box, click Yes to save the new security template file.
Defining a New Security Template
You can define a new security template and then modify the default settings to meet your requirements.
Follow these steps to define a new security template:
- In the Security Templates console, double-click Security Templates.
- Right-click the template path folder where you want to store the new template and click New Template.
- In the dialog box for the templates folder, type the name and description for your new security template, and then click OK.
- In the console tree, right-click the new security template, and then select Set Description.
- In the Security Template Description dialog box, type a description for the new security template, and then click OK.
- In the console tree, double-click the new security template to display the security policies, and double-click the security policy (such as Account Policies) you want to define.
- Click the security policy you want to define (such as Password Policy), and then double-click the security setting to define (such as Minimum Password Length).
- In the Template Security Policy Setting dialog box, click the Define This Policy Setting In The Template check box to allow configuration, and then configure the security setting.
- Click OK.
- Configure other security settings as needed.
- Close the Security Templates console.
- In the Save Security Templates dialog box, click Yes to save the new security template file.
Importing a Security Template to a GPO
You can import a security template to local or nonlocal GPOs. Importing security templates make administration easier because security is configured in one step for multiple objects.
Follow these steps to import a security template to a local and nonlocal GPO:
- In a console from which you manage local or nonlocal group policy settings, click the GPO to which you want to import the security template.
- In the console tree, right-click Security Settings, and then click Import Policy.
- In the Import Policy From dialog box (see Figure 21.14), click the security template you want to import, and then click Open.
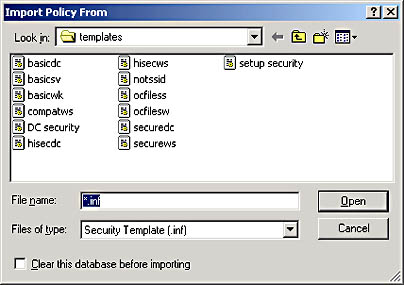
Figure 21.14 The Import Policy From dialog box
- Because the security settings are applied when the group policy is propagated (applied) to your computer, do one of the following to initiate policy propagation:
- Type secedit /refreshpolicy machine_policy at the command prompt, and then press Enter.
- Restart your computer.
- Wait for automatic policy propagation, which occurs at regular, con-figurable intervals. By default, policy propagation occurs every 8 hours.
Exporting Security Settings to a Security Template
You can export both local and effective security settings to a security template. By exporting the local settings to a security template, you can preserve initial system settings. Because the local GPO is overridden by domain-based GPOs, the local security settings are available for restoration later, if necessary. By exporting the effective security settings to a security template, you can then import the settings into a security database (discussed in the next lesson), overlay new templates, and analyze potential conflicts.
Follow these steps to export security settings to a security template:
- Click Start, point to Programs, point to Administrative Tools, and then click Local Security Policy.
- In the console tree, right-click Security Settings, click Export Policy, and select Local Policy or Effective Policy.
- In the Export Policy To dialog box (see Figure 21.15), type the name of the security template to which you want to export security settings, and then click Save.

Figure 21.15 The Export Policy To dialog box

Practice: Managing Security Templates
In this practice you access the Security Templates console and customize a predefined security template.
Exercise 1: Accessing the Security Templates Console
In this exercise you access the Security Templates console, the main tool for managing security templates.
To access the Security Templates console
- Click Start, click Run, type mmc and then click OK.
- On the Console menu, click Add/Remove Snap-In, and then click Add.
- In the Add Standalone Snap-In dialog box, select Security Templates, click Add, click Close, and then click OK.
- On the Console menu, click Save.
- In the File Name list, type Security Templates to name this console, and then click Save. The console appears on the Administrative Tools menu.
Exercise 2: Customizing a Predefined Security Template
In this exercise you customize a predefined security template by saving the predefined template as a new template (to preserve the original predefined template) and then making edits to security settings to create a new template.
To customize a predefined security template
- In the Security Templates console, double-click Security Templates.
- Double-click the default path folder (systemroot\Security\Templates), right-click the basicdc template, and then click Save As.
- In the Save As dialog box, in the File Name box, type new template and then click Save.
- In the console tree, right-click New Template, and then select Set Description.
- In the Security Template Description dialog box, type the description New domain controller template and then click OK.
- In the console tree, double-click the new security template to display the security policies.
- Double-click Account Policies, click Password Policy, and then double-click Minimum Password Length.
- In the Template Security Policy Setting dialog box, click the Define This Policy Setting In The Template check box to allow configuration, and then set the password to be at least 10 characters.
- Click OK.
- Close the Security Templates console and save the console settings.
- In the Save Security Templates dialog box, click Yes to save the NEW TEMPLATE.INF security template file.
Lesson Summary
In this lesson you learned that a security template is a physical representation of a security configuration, a single file where a group of security settings is stored. Locating all security settings in one place streamlines security administration.
You learned that the tasks for managing security templates are accessing the Security Templates console, customizing a predefined security template, defining a new security template, importing a security template to a local and nonlocal GPO, and exporting security settings to a security template.
In the practice portion of this lesson, you accessed the Security Templates console, which is the main tool used to manage security templates, and customized a predefined security template.
EAN: N/A
Pages: 244